

こんにちは、やまぐちです。
概要
今回は、Amazon Q Business の匿名アクセスで Web サイトに組み込み(embedded)を実施します。
ユーザ認証不要で、不特定多数のユーザに Web experience (Amazon Q Business のチャット) を利用してもらう場合に匿名アクセスの採用が考えられます。
しかしながら、ユーザ認証の場合と比べて匿名アクセスを利用する際には考慮点があります。
今回のブログでは、その考慮点を冒頭にお伝えした上で実装例の流れをご紹介いたします。
匿名アクセスの Web experience URL について
前提として、Amazon Q Business の匿名アクセスを採用すると Web experience の URL は固定ではなく使い切りとなるなど注意点があります。
- Web experience は作成する必要がある
- 作成された URL は 5分以内に利用する必要がある
- 作成された URL の利用は 1度しか利用できない
- 一度アクセスすると、セッションは設定された期間アクティブなままになる
- 以下のいずれか早い方に CreateAnonymousWebExperienceUrl を呼び出して新しい URL を作成する必要がある
- 新しいアプリケーションセッションが必要になったとき
- 1時間経過したとき
以下ブログでも言及しておりますので、ご参考いただけると幸いです。 blog.serverworks.co.jp
つまり、ユーザ認証の場合は Web experience URL が固定となるのでコードに埋め込めばすぐに実装できますが、匿名アクセスの場合はそうはいかないというわけです。
ユーザ認証での組み込み方法は、以下ブログをご参照ください。
blog.serverworks.co.jp
実装例について
では、どのように実装するのか?ですが、サイトに組み込んで利用する場合ですとユーザが Web experience を利用する際に URL を発行して Web サイトに組み込むという形になります。
Web experience の URL はCreateAnonymousWebExperienceUrlを使用することで発行できます。
docs.aws.amazon.com
今回の構成
今回は、サイト内に「New Chat」というボタンを用意します。
このボタンを押したらバックエンドでCreateAnonymousWebExperienceUrlを実行してレスポンスで返ってきた URL を利用して Web experience を利用できるようにします。

Amplify で実装しますので、以下の構成でこれを実現します。

やってみる
前提
- 開発環境:EC2 (Amazon Linux 2023)
- 開発フォルダ:クローンした自身の GitHub リポジトリ
- 事前導入済みツール:
- git
- node.js 20.19.4
- Amazon Q Business の匿名アクセス Application は作成済み
※ブログ内で紹介するコードは AI に助けてもらいながら作成したものとなるので、冗長な書き方になっているものなどもあるかもしれませんがご了承ください。
Vue アプリケーションの作成
Vue アプリケーションを作成します。
$ npm create vue@latest .

Scaffolding project in /home/ec2-user/q-business-test...
│
└  Done. Now run:

   npm install
   npm run dev
以下のような階層構造でアプリケーションが作成されます。
$ tree
.
├── README.md
├── index.html
├── jsconfig.json
├── package.json
├── public
│   └── favicon.ico
├── src
│   ├── App.vue
│   ├── assets
│   │   ├── base.css
│   │   ├── logo.svg
│   │   └── main.css
│   ├── components
│   │   ├── HelloWorld.vue
│   │   ├── TheWelcome.vue
│   │   ├── WelcomeItem.vue
│   │   └── icons
│   │       ├── IconCommunity.vue
│   │       ├── IconDocumentation.vue
│   │       ├── IconEcosystem.vue
│   │       ├── IconSupport.vue
│   │       └── IconTooling.vue
│   └── main.js
└── vite.config.js
必要なパッケージをインストールして、動作確認します。
$ npm install
$ npm run dev
ブラウザ上でhttp://localhost:5173を入力して確認すると、サイトが開きました!

Amplify の利用
今回はテンプレートを利用せずに1から開始したいと思います。 以下のコマンドを実行します。
$ npm create amplify@latest
以下のような階層構造でファイルが作成されます。
$ tree amplify/
amplify/
├── auth
│   └── resource.ts
├── backend.ts
├── data
│   └── resource.ts
├── package.json
└── tsconfig.json
今回は、認証設定は実装しないのでamplify/auth/を削除しておきます。
$ rm amplify/auth/
TypeScript 型定義をインストールします。
$ npm install --save-dev @types/node
Amazon Q Business 用の SDK クライアントをインストールします。
$ npm install @aws-sdk/client-qbusiness
Amplify 側のコード作成・修正(バックエンド)
環境は整ったので、バックエンドのソースコードを作成・修正していきます。
Lambda
まずは、Lambda のコードを作成します。
amplify/にfunctions/getQBusinessAnonymousUrlというフォルダを作成して、2種類のファイルを作成します。
$ mkdir amplify/functions/getQBusinessAnonymousUrl/ && mkdir amplify/functions/getQBusinessAnonymousUrl

# ファイルの作成
$ touch amplify/functions/getQBusinessAnonymousUrl/handler.ts amplify/functions/getQBusinessAnonymousUrl/resource.ts
amplify/functions/getQBusinessAnonymousUrl/handler.tsとamplify/functions/getQBusinessAnonymousUrl/resource.tsには以下のコードを記載します。
amplify/functions/getQBusinessAnonymousUrl/handler.ts
import { QBusinessClient, CreateAnonymousWebExperienceUrlCommand } from '@aws-sdk/client-qbusiness';
import type { Schema } from '../../data/resource';

export const handler: Schema["getQBusinessAnonymousUrl"]["functionHandler"] = async (event) => {
  console.log('🚀 Lambda function started');
  console.log('📥 Event:', JSON.stringify(event, null, 2));

  try {
    const qBusinessClient = new QBusinessClient({
      region: process.env.AWS_REGION || 'us-east-1'
    });

    const command = new CreateAnonymousWebExperienceUrlCommand({
      // ここはご自身のQ Businessの設定に合わせてください
      applicationId: "xxxxxxxxx",
      webExperienceId: 'xxxxxxxx',
    });

    const response = await qBusinessClient.send(command);

    console.log('📥 Q Business API Response:');
    console.log('   - Full response:', JSON.stringify(response, null, 2));
    console.log('   - anonymousUrl:', response.anonymousUrl);
    console.log('   - Response metadata:', response.$metadata);

    return response.anonymousUrl || '';
  } catch (error) {
    console.error('Error creating Q Business anonymous URL:', error);
    throw new Error('Failed to create anonymous web experience URL');
  }
};
applicationIdとwebExperienceIdは利用する Amazon Q Business Application の値で設定します。
amplify/functions/getQBusinessAnonymousUrl/resource.ts
import { defineFunction } from '@aws-amplify/backend';

export const getQBusinessAnonymousUrl = defineFunction({
  name: 'getQBusinessAnonymousUrl',
  entry: './handler.ts',
  timeoutSeconds: 60,
});
AppSync
AppSync のコードを記載します。
amplify/data/resource.tsを以下コードに修正します。
amplify/data/resource.ts
import { type ClientSchema, a, defineData } from '@aws-amplify/backend';
import { getQBusinessAnonymousUrl } from '../functions/getQBusinessAnonymousUrl/resource';

const schema = a.schema({
  Todo: a
    .model({
      content: a.string(),
    })
    .authorization((allow) => [allow.publicApiKey()]),

  // Amazon Q Business Anonymous Web Experience URL を取得する関数
  getQBusinessAnonymousUrl: a
    .query()
    .returns(a.string())
    .authorization((allow) => [allow.publicApiKey()])
    .handler(a.handler.function(getQBusinessAnonymousUrl))
});

export type Schema = ClientSchema<typeof schema>;

export const data = defineData({
  schema,
  authorizationModes: {
    defaultAuthorizationMode: 'apiKey',
    apiKeyAuthorizationMode: {
      expiresInDays: 30,
    },
  },
});
backend.ts
amplify/backend.tsは以下コードを記載します。
16行目で Lambda 関数が CreateAnonymousWebExperienceUrl を呼び出せる権限を付与しています。
amplify/backend.ts
import { defineBackend } from '@aws-amplify/backend';
import { data } from './data/resource';
import * as iam from "aws-cdk-lib/aws-iam"
import { getQBusinessAnonymousUrl } from './functions/getQBusinessAnonymousUrl/resource';

export const backend = defineBackend({
  data,
  getQBusinessAnonymousUrl,
});

// Lambda関数にQ Business APIへのアクセス権限を付与

const statement = new iam.PolicyStatement({
  sid: "Allow",
  actions: ["qbusiness:CreateAnonymousWebExperienceUrl"],
  effect: iam.Effect.ALLOW,
  resources: ["*"],
})

backend.getQBusinessAnonymousUrl.resources.lambda.addToRolePolicy(
  statement
);
Vue 側のコード作成・修正(フロントエンド)
フロントエンド側もコードを修正します。
まずは、不要ファイルの削除とsrc/components/QBusinessChat.vueを作成します。
$ rm src/components/HelloWorld.vue src/components/TheWelcome.vue src/components/WelcomeItem.vue
$ touch src/components/QBusinessChat.vue
src/components/QBusinessChat.vueには以下コードを記載します。
94行目で、バックエンドから受け取った Web experience URL を埋め込んでいるのがミソです。
src/components/QBusinessChat.vue
<!-- filepath: src/components/QBusinessChat.vue -->
<template>
  <div class="qbusiness-wrapper">
    <!-- ヘッダー部分 -->
    <div class="qbusiness-header">
      <div class="header-content">
        <div class="header-left">
          <div class="logo-container">
            <div class="logo-icon">🤖</div>
            <div class="logo-text">
              <h2>Amazon Q Business</h2>
              <p>AI-powered business assistant</p>
            </div>
          </div>
        </div>
        <div class="header-right">
          <button
            @click="refreshUrl"
            :disabled="loading"
            class="action-btn"
          >
            <span class="btn-icon">{{ loading ? '⏳' : '🔄' }}</span>
            {{ loading ? 'Creating...' : 'New Chat' }}
          </button>

          <!-- 表示モード切替ボタン -->
          <button
            v-if="webExperienceUrl"
            @click="toggleViewMode"
            class="view-mode-btn"
          >
            <span>{{ showIframe ? '📋' : '🖥️' }}</span>
            {{ showIframe ? 'Show URL' : 'Open Chat' }}
          </button>
        </div>
      </div>
    </div>

    <!-- メインコンテンツ -->
    <div class="qbusiness-content">
      <!-- ローディング状態 -->
      <div v-if="loading && !webExperienceUrl" class="status-container loading-state">
        <div class="status-icon">
          <div class="loading-spinner"></div>
        </div>
        <div class="status-content">
          <h3>Starting your Q Business session</h3>
          <p>Setting up your AI-powered business assistant...</p>
          <div class="loading-dots">
            <span></span>
            <span></span>
            <span></span>
          </div>
        </div>
      </div>

      <!-- エラー状態 -->
      <div v-else-if="error" class="status-container error-state">
        <div class="status-icon">
          <div class="error-icon">❌</div>
        </div>
        <div class="status-content">
          <h3>Connection Error</h3>
          <p>{{ error }}</p>
          <button @click="refreshUrl" class="retry-btn">
            <span>🔄</span>
            Try Again
          </button>
        </div>
      </div>

      <!-- 成功状態 - iframeビュー -->
      <div v-else-if="webExperienceUrl && showIframe" class="iframe-container">
        <div class="iframe-header">
          <div class="iframe-info">
            <span class="status-dot"></span>
            <span>Q Business Chat Active</span>
          </div>
          <div class="iframe-controls">
            <button @click="refreshIframe" class="control-btn" title="Refresh">
              <span>🔄</span>
            </button>
            <button @click="openInNewTab" class="control-btn" title="Open in New Tab">
              <span>🚀</span>
            </button>
            <button @click="copyToClipboard" class="control-btn" title="Copy URL">
              <span>{{ copied ? '✅' : '📋' }}</span>
            </button>
          </div>
        </div>

        <div class="iframe-wrapper">
          <iframe
            :src="webExperienceUrl"
            :key="iframeKey"
            class="qbusiness-iframe"
            frameborder="0"
            allowfullscreen
            sandbox="allow-same-origin allow-scripts allow-forms allow-popups allow-top-navigation-by-user-activation"
            @load="onIframeLoad"
            @error="onIframeError"
          ></iframe>

          <!-- iframe ローディングオーバーレイ -->
          <div v-if="iframeLoading" class="iframe-loading">
            <div class="loading-spinner"></div>
            <p>Loading Q Business Chat...</p>
          </div>

          <!-- iframe エラーオーバーレイ -->
          <div v-if="iframeError" class="iframe-error">
            <div class="error-icon">⚠️</div>
            <p>Failed to load Q Business Chat</p>
            <button @click="refreshIframe" class="retry-btn">Try Again</button>
          </div>
        </div>
      </div>

      <!-- 成功状態 - URL表示ビュー -->
      <div v-else-if="webExperienceUrl && !showIframe" class="status-container success-state">
        <div class="status-icon">
          <div class="success-icon">✅</div>
        </div>
        <div class="status-content">
          <h3>Q Business Session Created</h3>
          <p>Your AI assistant is ready to help with business queries</p>

          <div class="url-display">
            <div class="url-label">Generated Session URL:</div>
            <div class="url-value">{{ webExperienceUrl }}</div>
            <div class="url-actions">
              <button @click="copyToClipboard" class="copy-btn">
                <span>📋</span>
                {{ copied ? 'Copied!' : 'Copy URL' }}
              </button>
              <button @click="openInNewTab" class="open-btn">
                <span>🚀</span>
                Open in New Tab
              </button>
            </div>
          </div>

          <div class="next-steps">
            <h4>What's Next:</h4>
            <ul>
              <li>✅ Q Business session created successfully</li>
              <li>🔗 Anonymous URL generated for secure access</li>
              <li>🖥️ Click "Open Chat" to view Q Business in this page</li>
              <li>🚀 Or open in a new tab for full-screen experience</li>
            </ul>
          </div>
        </div>
      </div>

      <!-- 初期状態 -->
      <div v-else class="status-container initial-state">
        <div class="status-icon">
          <div class="initial-icon">💼</div>
        </div>
        <div class="status-content">
          <h3>Welcome to Q Business</h3>
          <p>Click "New Chat" to create a secure session with Amazon Q Business</p>
        </div>
      </div>
    </div>
  </div>
</template>

<script setup>
import { ref } from 'vue';
import { generateClient } from 'aws-amplify/data';

const client = generateClient();

const webExperienceUrl = ref('');
const loading = ref(false);
const error = ref('');
const copied = ref(false);
const showIframe = ref(false);
const iframeLoading = ref(false);
const iframeError = ref(false);
const iframeKey = ref(0);

const fetchQBusinessAnonymousUrl = async () => {
  try {
    loading.value = true;
    error.value = '';

    console.log('Calling Q Business Lambda function...');

    const response = await client.queries.getQBusinessAnonymousUrl();

    console.log('Lambda response:', response);

    if (response.data) {
      webExperienceUrl.value = response.data;
      console.log('Q Business URL generated:', response.data);
      // 自動的にiframeビューに切り替え
      showIframe.value = true;
      iframeLoading.value = true;
    } else if (response.errors && response.errors.length > 0) {
      console.error('GraphQL errors:', response.errors);
      const errorMessages = response.errors.map(e => e.message || 'Unknown error').join(', ');
      error.value = `Failed to create Q Business session: ${errorMessages}`;
    } else {
      error.value = 'No response from Q Business service';
    }
  } catch (err) {
    console.error('Error calling Q Business function:', err);
    error.value = `Connection failed: ${err.message || 'Please try again later'}`;
  } finally {
    loading.value = false;
  }
};

const refreshUrl = () => {
  webExperienceUrl.value = '';
  copied.value = false;
  showIframe.value = false;
  iframeLoading.value = false;
  iframeError.value = false;
  fetchQBusinessAnonymousUrl();
};

const toggleViewMode = () => {
  showIframe.value = !showIframe.value;
  if (showIframe.value) {
    iframeLoading.value = true;
    iframeError.value = false;
  }
};

const refreshIframe = () => {
  iframeLoading.value = true;
  iframeError.value = false;
  iframeKey.value += 1; // iframeを強制再読み込み
};

const onIframeLoad = () => {
  console.log('Q Business iframe loaded successfully');
  iframeLoading.value = false;
  iframeError.value = false;
};

const onIframeError = () => {
  console.error('Q Business iframe failed to load');
  iframeLoading.value = false;
  iframeError.value = true;
};

const copyToClipboard = async () => {
  try {
    await navigator.clipboard.writeText(webExperienceUrl.value);
    copied.value = true;
    setTimeout(() => {
      copied.value = false;
    }, 2000);
  } catch (err) {
    console.error('Failed to copy:', err);
  }
};

const openInNewTab = () => {
  window.open(webExperienceUrl.value, '_blank');
};
</script>

<style scoped>
.qbusiness-wrapper {
  max-width: 1200px;
  margin: 0 auto;
  background: white;
  border-radius: 16px;
  box-shadow: 0 4px 20px rgba(0, 0, 0, 0.08);
  overflow: hidden;
  min-height: 600px;
}

/* ヘッダー */
.qbusiness-header {
  background: linear-gradient(135deg, #1e3a8a 0%, #3730a3 50%, #581c87 100%);
  color: white;
  padding: 2rem;
}

.header-content {
  display: flex;
  justify-content: space-between;
  align-items: center;
  gap: 2rem;
}

.header-left {
  flex: 1;
}

.header-right {
  display: flex;
  gap: 1rem;
}

.logo-container {
  display: flex;
  align-items: center;
  gap: 1rem;
}

.logo-icon {
  font-size: 3rem;
  background: rgba(255, 255, 255, 0.1);
  padding: 1rem;
  border-radius: 12px;
  backdrop-filter: blur(10px);
}

.logo-text h2 {
  margin: 0;
  font-size: 1.8rem;
  font-weight: 700;
}

.logo-text p {
  margin: 0.25rem 0 0;
  opacity: 0.9;
  font-size: 1rem;
}

/* ボタン共通スタイル */
.action-btn, .view-mode-btn {
  display: flex;
  align-items: center;
  gap: 0.5rem;
  padding: 1rem 2rem;
  background: rgba(255, 255, 255, 0.15);
  border: 2px solid rgba(255, 255, 255, 0.3);
  color: white;
  border-radius: 12px;
  font-size: 1rem;
  font-weight: 600;
  cursor: pointer;
  transition: all 0.3s ease;
  backdrop-filter: blur(10px);
}

.action-btn:hover:not(:disabled), .view-mode-btn:hover {
  background: rgba(255, 255, 255, 0.25);
  transform: translateY(-2px);
  box-shadow: 0 8px 25px rgba(0, 0, 0, 0.2);
}

.action-btn:disabled {
  opacity: 0.6;
  cursor: not-allowed;
  transform: none;
}

.view-mode-btn {
  background: rgba(34, 197, 94, 0.2);
  border-color: rgba(34, 197, 94, 0.4);
}

.btn-icon {
  font-size: 1.2rem;
}

/* iframe コンテナ */
.iframe-container {
  height: calc(100vh - 200px);
  min-height: 600px;
  display: flex;
  flex-direction: column;
  padding: 0;
}

.iframe-header {
  display: flex;
  justify-content: space-between;
  align-items: center;
  padding: 1rem 2rem;
  background: #f8fafc;
  border-bottom: 1px solid #e2e8f0;
}

.iframe-info {
  display: flex;
  align-items: center;
  gap: 0.5rem;
  font-weight: 600;
  color: #374151;
}

.status-dot {
  width: 8px;
  height: 8px;
  background: #10b981;
  border-radius: 50%;
  animation: pulse 2s infinite;
}

@keyframes pulse {
  0%, 100% { opacity: 1; }
  50% { opacity: 0.5; }
}

.iframe-controls {
  display: flex;
  gap: 0.5rem;
}

.control-btn {
  display: flex;
  align-items: center;
  justify-content: center;
  width: 36px;
  height: 36px;
  background: white;
  border: 1px solid #d1d5db;
  border-radius: 6px;
  cursor: pointer;
  transition: all 0.2s ease;
}

.control-btn:hover {
  background: #f3f4f6;
  border-color: #9ca3af;
}

/* iframe wrapper */
.iframe-wrapper {
  position: relative;
  flex: 1;
  background: #f9fafb;
}

.qbusiness-iframe {
  width: 100%;
  height: 100%;
  border: none;
  background: white;
}

/* iframe オーバーレイ */
.iframe-loading, .iframe-error {
  position: absolute;
  top: 0;
  left: 0;
  right: 0;
  bottom: 0;
  background: rgba(255, 255, 255, 0.95);
  display: flex;
  flex-direction: column;
  align-items: center;
  justify-content: center;
  z-index: 10;
}

.iframe-loading {
  color: #3730a3;
}

.iframe-error {
  color: #dc2626;
}

.iframe-loading .loading-spinner {
  width: 40px;
  height: 40px;
  border: 4px solid #e5e7eb;
  border-left: 4px solid #3730a3;
  border-radius: 50%;
  animation: spin 1s linear infinite;
  margin-bottom: 1rem;
}

.iframe-error .error-icon {
  font-size: 3rem;
  margin-bottom: 1rem;
}

/* メインコンテンツ(従来のスタイル) */
.qbusiness-content {
  padding: 3rem;
  min-height: 400px;
}

.iframe-container .qbusiness-content {
  padding: 0;
  min-height: auto;
}

.status-container {
  display: flex;
  flex-direction: column;
  align-items: center;
  text-align: center;
  max-width: 600px;
  margin: 0 auto;
}

.status-icon {
  margin-bottom: 2rem;
}

.status-content h3 {
  font-size: 1.5rem;
  margin: 0 0 1rem;
  color: #1f2937;
}

.status-content p {
  font-size: 1.1rem;
  color: #6b7280;
  margin: 0 0 2rem;
  line-height: 1.6;
}

/* ローディング状態 */
.loading-state {
  color: #3730a3;
}

.loading-spinner {
  width: 60px;
  height: 60px;
  border: 4px solid #e5e7eb;
  border-left: 4px solid #3730a3;
  border-radius: 50%;
  animation: spin 1s linear infinite;
}

.loading-dots {
  display: flex;
  gap: 0.5rem;
  justify-content: center;
  margin-top: 1rem;
}

.loading-dots span {
  width: 8px;
  height: 8px;
  background: #3730a3;
  border-radius: 50%;
  animation: bounce 1.4s infinite ease-in-out;
}

.loading-dots span:nth-child(1) { animation-delay: -0.32s; }
.loading-dots span:nth-child(2) { animation-delay: -0.16s; }

@keyframes spin {
  0% { transform: rotate(0deg); }
  100% { transform: rotate(360deg); }
}

@keyframes bounce {
  0%, 80%, 100% { transform: scale(0); }
  40% { transform: scale(1); }
}

/* エラー状態 */
.error-state {
  color: #dc2626;
}

.error-icon {
  font-size: 4rem;
}

.retry-btn {
  display: flex;
  align-items: center;
  gap: 0.5rem;
  padding: 1rem 2rem;
  background: #dc2626;
  color: white;
  border: none;
  border-radius: 8px;
  font-size: 1rem;
  font-weight: 600;
  cursor: pointer;
  transition: all 0.2s ease;
}

.retry-btn:hover {
  background: #b91c1c;
  transform: translateY(-2px);
}

/* 成功状態 */
.success-state {
  color: #059669;
}

.success-icon {
  font-size: 4rem;
}

.url-display {
  background: #f3f4f6;
  border-radius: 12px;
  padding: 1.5rem;
  margin: 1.5rem 0;
  text-align: left;
  width: 100%;
}

.url-label {
  font-weight: 600;
  color: #374151;
  margin-bottom: 0.5rem;
}

.url-value {
  background: white;
  border: 1px solid #d1d5db;
  border-radius: 6px;
  padding: 1rem;
  font-family: 'Courier New', monospace;
  font-size: 0.9rem;
  word-break: break-all;
  margin-bottom: 1rem;
  color: #1f2937;
}

.url-actions {
  display: flex;
  gap: 1rem;
  flex-wrap: wrap;
}

.copy-btn, .open-btn {
  display: flex;
  align-items: center;
  gap: 0.5rem;
  padding: 0.75rem 1.5rem;
  border: none;
  border-radius: 6px;
  font-size: 0.9rem;
  font-weight: 600;
  cursor: pointer;
  transition: all 0.2s ease;
}

.copy-btn {
  background: #059669;
  color: white;
}

.copy-btn:hover {
  background: #047857;
}

.open-btn {
  background: #3730a3;
  color: white;
}

.open-btn:hover {
  background: #1e40af;
}

.next-steps {
  text-align: left;
  margin-top: 2rem;
}

.next-steps h4 {
  color: #374151;
  margin: 0 0 1rem;
}

.next-steps ul {
  color: #6b7280;
  line-height: 1.6;
}

.next-steps li {
  margin-bottom: 0.5rem;
}

/* 初期状態 */
.initial-state {
  color: #6b7280;
}

.initial-icon {
  font-size: 4rem;
}

/* レスポンシブ */
@media (max-width: 768px) {
  .qbusiness-wrapper {
    max-width: 100%;
    margin: 0;
    border-radius: 0;
  }

  .qbusiness-header {
    padding: 1.5rem;
  }

  .header-content {
    flex-direction: column;
    gap: 1rem;
  }

  .header-right {
    flex-direction: column;
    width: 100%;
  }

  .logo-container {
    flex-direction: column;
    text-align: center;
  }

  .logo-text h2 {
    font-size: 1.5rem;
  }

  .qbusiness-content {
    padding: 2rem 1rem;
  }

  .action-btn, .view-mode-btn {
    padding: 0.75rem 1.5rem;
    font-size: 0.9rem;
    justify-content: center;
  }

  .iframe-container {
    height: calc(100vh - 150px);
    min-height: 500px;
  }

  .iframe-header {
    padding: 1rem;
  }

  .url-actions {
    flex-direction: column;
  }
}
</style>
次に、
src/App.vueを以下コードに修正します。
src/App.vue
<!-- filepath: src/App.vue -->
<script setup>
import QBusinessChat from './components/QBusinessChat.vue'
</script>

<template>
  <div class="app-container">
    <QBusinessChat />
  </div>
</template>

<style scoped>
.app-container {
  min-height: 100vh;
  background: linear-gradient(135deg, #f5f7fa 0%, #c3cfe2 100%);
  padding: 1rem;
  display: flex;
  align-items: center;
  justify-content: center;
}

@media (max-width: 768px) {
  .app-container {
    padding: 0;
    align-items: stretch;
  }
}
</style>
サンドボックス環境で動作確認
それでは動作確認をしていきます。
バックエンドの動作確認は、Amplify にデプロイしないといけないのでは?と思われるかもしれません。
実は、Amplify Gen2 にはサンドボックス機能があり Amplify へデプロイせずにバックエンドの動作確認ができます。
以下コマンドを実行することで、CloudFormation が動いてサンドボックス環境を構築してくれます。
--debugをつけるとデバッグを表示してくれるので、個人的にはつけて実行した方が望ましいと考えています。
$ npx ampx sandbox --debug
CloudFormation を確認するとスタックが作成されているのがわかります。
※キャプチャは、ステータスがUPDATE_COMPLETEとなってますが初回実行時はCREATE_COMPLETEとなります。

フロントエンドも動かして動作確認してみます。
$ npm run dev
ブラウザ上でhttp://localhost:5173を入力して確認すると、サイトが開きました!
New Chatボタンを押しても、Web experience は開きませんが Amazon Q Business の Application 側で許可設定をしていないためです。

これはサンドボックス環境では実施できないため、Amplify にデプロイしてから確認します。
他にエラーが出ていなければ、動作確認は完了です!
最後に、リポジトリに push しておきます。
$ git add .
$ git commit -m "First Commit"
$ git push
Amplify へデプロイ
動作確認が完了しましたので、Amplify へデプロイします。
マネジメントコンソールから Amplify に移動して、「アプリケーションをデプロイ」を選択します。

初期設定が完了していない場合は、完了させます。


今回は GitHub と連携するので GitHub を選択して、対象のリポジトリと連携します。


連携できたら、対象リポジトリを選択して次へ進めます。

Node.js のバージョンを 20 で指定して次へ進めます。

内容を確認して、「保存してデプロイ」を押下します。
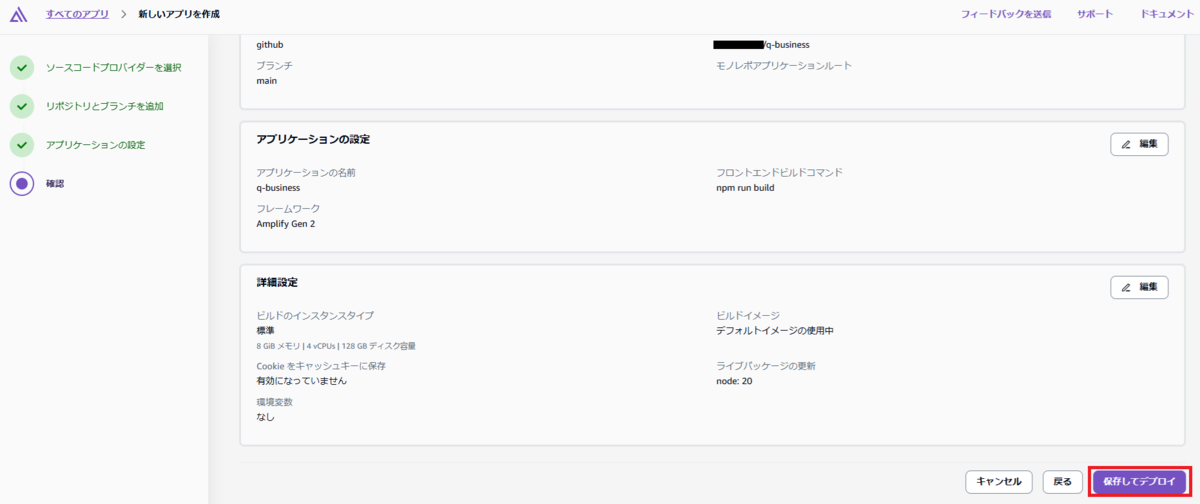
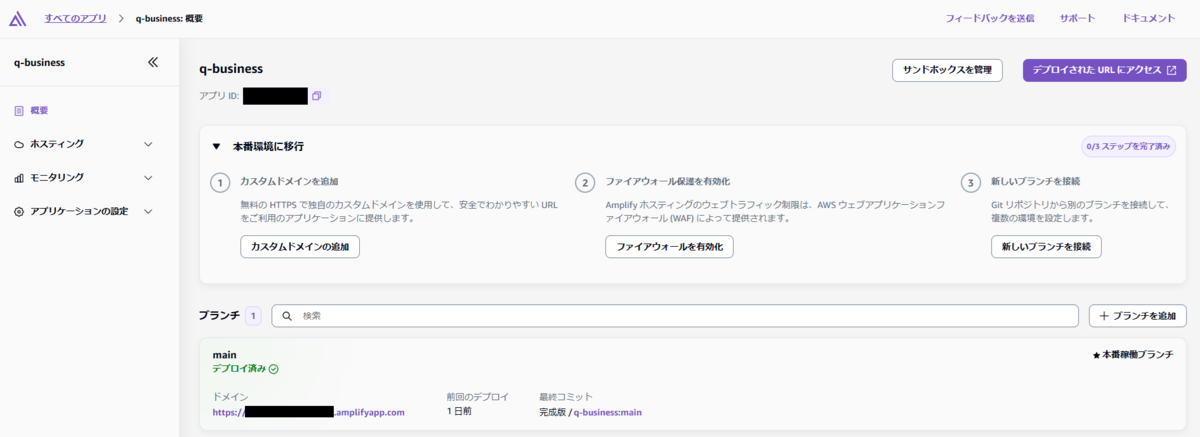
しばらくすると、ビルドとデプロイが完了します。
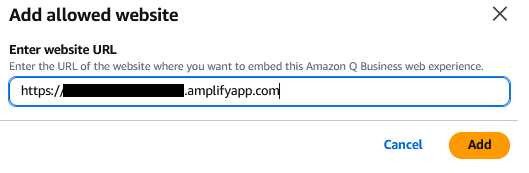
Amazon Q Business Application から embedded を設定
Amazon Q Business に移動し、Application 内の「Amazon Q embedded」を選択します。

「Add Allowed websites」を選択して、Amplify の URL を入力します。
動作確認
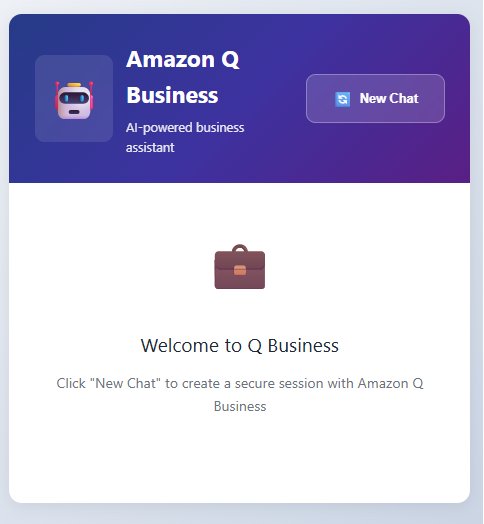
URL にアクセスすると画面が表示されました!
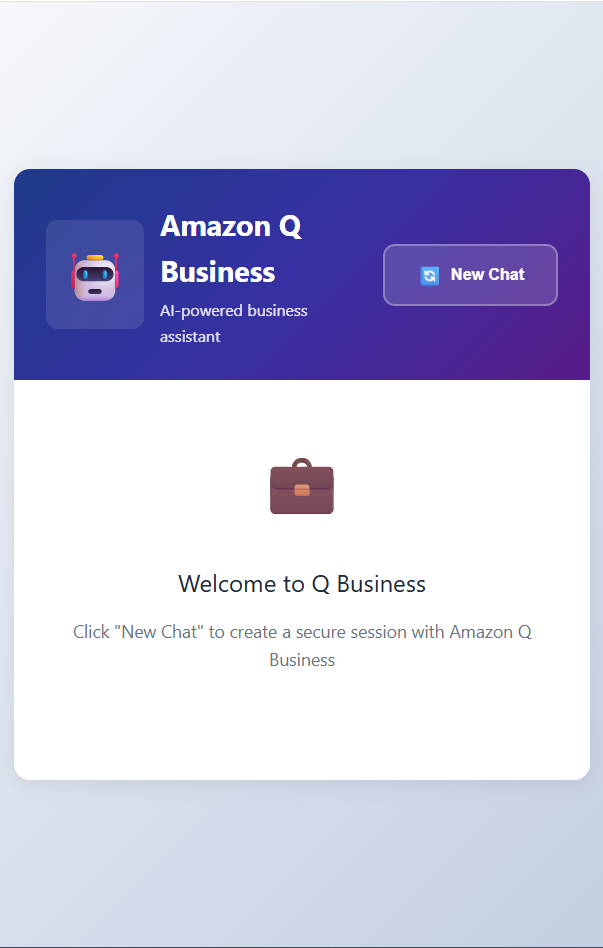
「New Chat」をポチっとすると、Web experience が登場しました~

まとめ
今回は、Amazon Q Business の匿名アクセスで Web サイトに組み込む方法をご紹介しました。
ユーザ認証の場合と比較するとバックエンドの開発など考慮が必要な部分があり、手軽に実装は難しい印象を受けました。
また、今回は実装しませんでしたがセッションについても注意点があるのでそこを考慮した実装も必要になりそうです。
さらに、匿名アクセスはユーザ認証の場合と比較して利用できる機能に制限があったりもするので採用前に検討は必要だと考えています。
それでは、またどこかで