

はじめに
こんにちは。アプリケーションサービス部の河野です。
今まで、RESTAPI を構築する場合は、FastAPI × Serverless Framework で作ることが多かったのですが、 Amplify Console が非常に便利なので、バックエンドも Amplify に寄せたいなと思い試してみました。
FastAPIとは?
Pythonの標準である型ヒントに基づいてPython 3.6 以降でAPI を構築するための、モダンで、高速(高パフォーマンス)な、Web フレームワークです。
公式ドキュメントが非常にわかりやすく、チュートリアルも豊富なため、初めての方は是非読んでみてください。
構成図
今回作成する構成図です。
画面から API を呼び出すところまでを作ります。

環境
- macOS Catalina 10.15.7
- vue/cli 4.5.3
- amplify cli 4.45.0
- python 3.8.2
- pipenv, version 2021.5.29
プロジェクト初期設定
以下コマンドを実行し、Vue プロジェクトの作成及び、Amplify の初期化を行います。
- Vue プロジェクト作成
$ vue create my-app
$ ? Please pick a preset: Default ([Vue 2] babel, eslint)

...

🎉  Successfully created project my-app.
- Amplify 初期化
$ cd my-app
$ amplify init
オプションは、全てデフォルトで進めます。
? Enter a name for the project myapp
? Enter a name for the environment dev
? Choose your default editor: Visual Studio Code
? Choose the type of app that youre building javascript
Please tell us about your project
? What javascript framework are you using vue
? Source Directory Path:  src
? Distribution Directory Path: dist
? Build Command:  npm run-script build
? Start Command: npm run-script serve
Using default provider  awscloudformation
? Select the authentication method you want to use: AWS profile

For more information on AWS Profiles, see:
https://docs.aws.amazon.com/cli/latest/userguide/cli-configure-profiles.html

? Please choose the profile you want to use default

...

Initialized your environment successfully.
データベース作成
下記コマンドを実行して DynamoDB を作成します。
今回は、Todo アプリを想定として、以下スキーマの DynamoDB テーブルを作成します。
| 属性名 | データ型 | パーティションキー | ソートキー |
|---|---|---|---|
| id | String | ○ | - |
| name | String | - | - |
| description | String | - | - |
オプションが多いので、途中で間違えた場合は、Ctrl + C で中断し、再度 amplify add storage を実行してください。
$ amplify add storage
? Please select from one of the below mentioned services: NoSQL Database

Welcome to the NoSQL DynamoDB database wizard
This wizard asks you a series of questions to help determine how to set up your NoSQL database table.

? Please provide a friendly name for your resource that will be used to label this category in the project: TodoDB
? Please provide table name: TodoTable

You can now add columns to the table.

? What would you like to name this column: id
? Please choose the data type: string
? Would you like to add another column? Yes
? What would you like to name this column: name
? Please choose the data type: string
? Would you like to add another column? Yes
? What would you like to name this column: description
? Please choose the data type: string
? Would you like to add another column? No

Before you create the database, you must specify how items in your table are uniquely organized. You do this by specifying a primary key. The primary key uniquely identifies each item in the table so that no two items can have the same key. This can be an individual column, or a combination that includes a primary key and a sort key.

To learn more about primary keys, see:
https://docs.aws.amazon.com/amazondynamodb/latest/developerguide/HowItWorks.CoreComponents.html#HowItWorks.CoreComponents.PrimaryKey

? Please choose partition key for the table: id
? Do you want to add a sort key to your table? No

You can optionally add global secondary indexes for this table. These are useful when you run queries defined in a different column than the primary key.
To learn more about indexes, see:
https://docs.aws.amazon.com/amazondynamodb/latest/developerguide/HowItWorks.CoreComponents.html#HowItWorks.CoreComponents.SecondaryIndexes

? Do you want to add global secondary indexes to your table? No
? Do you want to add a Lambda Trigger for your Table? No
Successfully added resource TodoDB locally
以下コマンドを実行し、AWS にデプロイします。
amplify push -y
API を作成する
以下コマンドを実行して、 RESTAPI を追加します。
$ amplify add api
? Please select from one of the below mentioned services: REST
? Provide a friendly name for your resource to be used as a label for this category in the project: TodoApi
? Provide a path (e.g., /book/{isbn}): / # FastAPI アプリケーション側でルーティングするため、"/" をベースパスとしています。
? Choose a Lambda source Create a new Lambda function
? Provide an AWS Lambda function name: TodoApiFunction
? Choose the runtime that you want to use: Python
Only one template found - using Hello World by default.

Available advanced settings:
- Resource access permissions
- Scheduled recurring invocation
- Lambda layers configuration

? Do you want to configure advanced settings? Yes
? Do you want to access other resources in this project from your Lambda function? Yes
? Select the categories you want this function to have access to. storage
? Select the operations you want to permit on TodoDB create, read, update, delete # 先ほど作成した DB のアクセス権限を付与します

You can access the following resource attributes as environment variables from your Lambda function
        ENV
        REGION
        STORAGE_TODODB_ARN
        STORAGE_TODODB_NAME
? Do you want to invoke this function on a recurring schedule? No
? Do you want to configure Lambda layers for this function? No
? Do you want to edit the local lambda function now? No
Successfully added resource TodoApiFunction locally.

Next steps:
Check out sample function code generated in <project-dir>/amplify/backend/function/TodoApiFunction/src
"amplify function build" builds all of your functions currently in the project
"amplify mock function <functionName>" runs your function locally
"amplify push" builds all of your local backend resources and provisions them in the cloud
"amplify publish" builds all of your local backend and front-end resources (if you added hosting category) and provisions them in the cloud
Succesfully added the Lambda function locally
? Restrict API access No
? Do you want to add another path? No
Successfully added resource TodoApi locally
以下コマンドを実行し、AWS にデプロイします。
amplify push -y
FastAPI 導入
FastAPI は、APIで追加時に作成した、function 内に実装します。 以下コマンドを実行して、FastAPI を導入します。
$ cd amplify/backend/function/TodoApiFunction
$ pipenv install fastapi mangum boto3 aws-lambda-powertools
$ pipenv install --dev uvicorn flake8
FastAPI 導入にあたってのライブラリは以下の通りです
| 名前 | 説明 |
|---|---|
| fastapi | API 構築の Web フレームワーク |
| mangum | ASGIアプリケーションをAWS Lambda & API Gatewayで使用するためのアダプター |
| uvicorn | fastAPI ローカルサーバ起動用(開発時のローカル実行で使用) |
.env ファイルを作成します。
$ pwd
~/my-app/amplify/backend/function/TodoApiFunction

$ vi .env
# 以下内容を追記し、保存
ENV=""
STORAGE_TODODB_NAME="TodoTable-dev"
RESTAPI 実装
ここからは、amplify/backend/function/TodoApiFunction/src 配下で FastAPI を使用して RESTAPI を実装する形になります。
今回は、サンプルコードとして、index.py にCRUD処理を実装します。
ディレクトリ構成などは、src 配下であれば自由に構成して問題ありません。
今回は、手間削減のため、index.py に全て実装しています。
以下をindex.pyにコピーします
ローカル実行で挙動を確認
以下コマンドを実行して、ローカルで FastAPI を起動させます。
$ pwd
~/my-app/amplify/backend/function/TodoApiFunction/src

$ pipenv run uvicorn --reload index:app
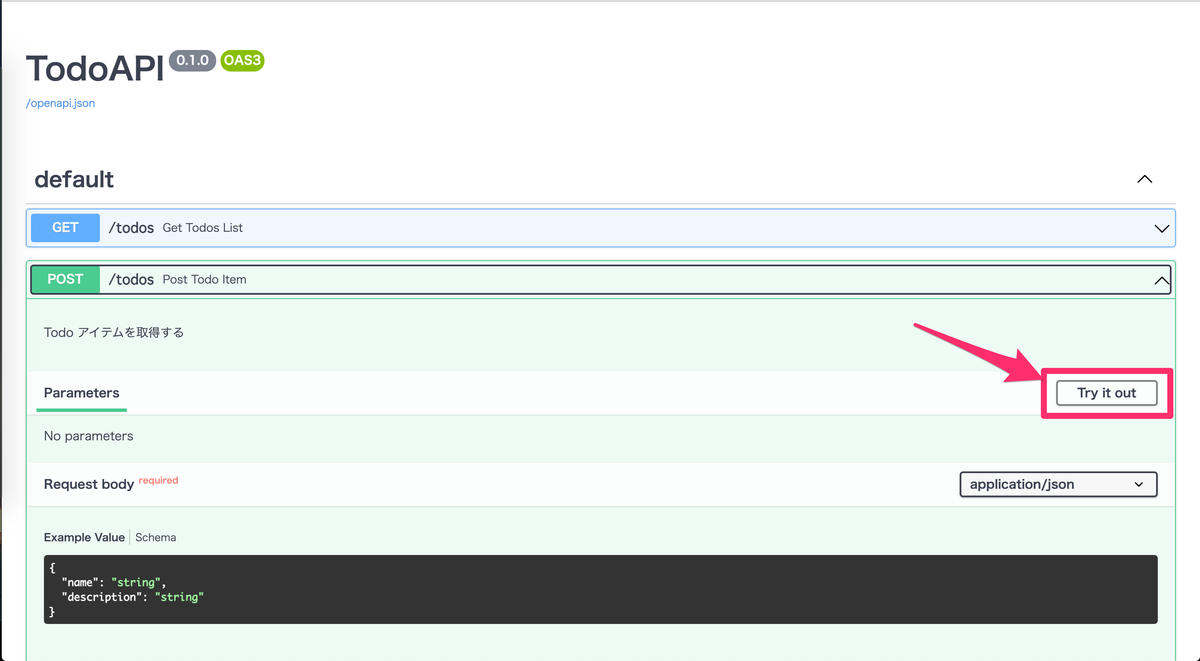
http://127.0.0.1:8000/docs にアクセスすると、自動生成された OpenAPI ドキュメントを確認することができます。
Todo を一件登録します。以下画像の通り、テストコマンドを実行します。


コンソール上でアイテムが登録されていることが確認できます。

以下コマンドを実行し、AWS にデプロイします。
amplify push -y
デプロイすると API Gateway のエンドポイントからも、OpenAPI ドキュメントを確認できます。
https://xxxxxxxxx.execute-api.ap-northeast-1.amazonaws.com/dev/docs
フロントエンド作成
以下コマンドを実行し、必要なライブラリをインストールします。
$ pwd
~my-app/src

$ npm install aws-amplify
以下を src/App.vue にコピーします
ローカル実行で挙動を確認
以下コマンドを実行して、ローカルで Vue を起動させます。 (バックエンドのAPIは、クラウド上のリソースを使用します)
$ npm run serve
以下画像の画面が表示され、 Todo を登録後、IDで登録した Todo が取得できれば OK です。

さいごに
FastAPI で実装した RESTAPI を Amplify で構築及びデプロイまで出来ました。
今回は紹介しなかったですが、フルスタックデプロイを使用すれば、フロントエンド もバックエンドも一緒にデプロイできるため、デリバリーをさらに高速化できます。
今後もいろいろ試していきたいと思います。
swx-go-kawano (執筆記事の一覧)