Retool というローコードツールを社内業務で活用してみたので、構築法を紹介します。
Retool とは
業務用Webアプリケーションのユーザインタフェースを、手早く作成できるOSSで、GitHub でデプロイ可能なソースコードが公開されています。提供元はサンフランシスコの企業です。 社内向けの業務ツールを提供する事が意識された製品で、いわゆる情シス部門の方にとって活用の動機が見出しやすいのではないでしょうか。 retool.com
Retool でできること
大きく分けて2つの事ができます。
1.リッチなユーザインタフェースをグラフィカルに作れる
こちらが構築時にデフォルトで提供されるサンプル画面です。それぞれの部品をマウス操作で配置して作成し、個々の部品や部品間のUI/UX設定などができます。

2.ユーザインタフェースに多様なデータソースを扱わせられる
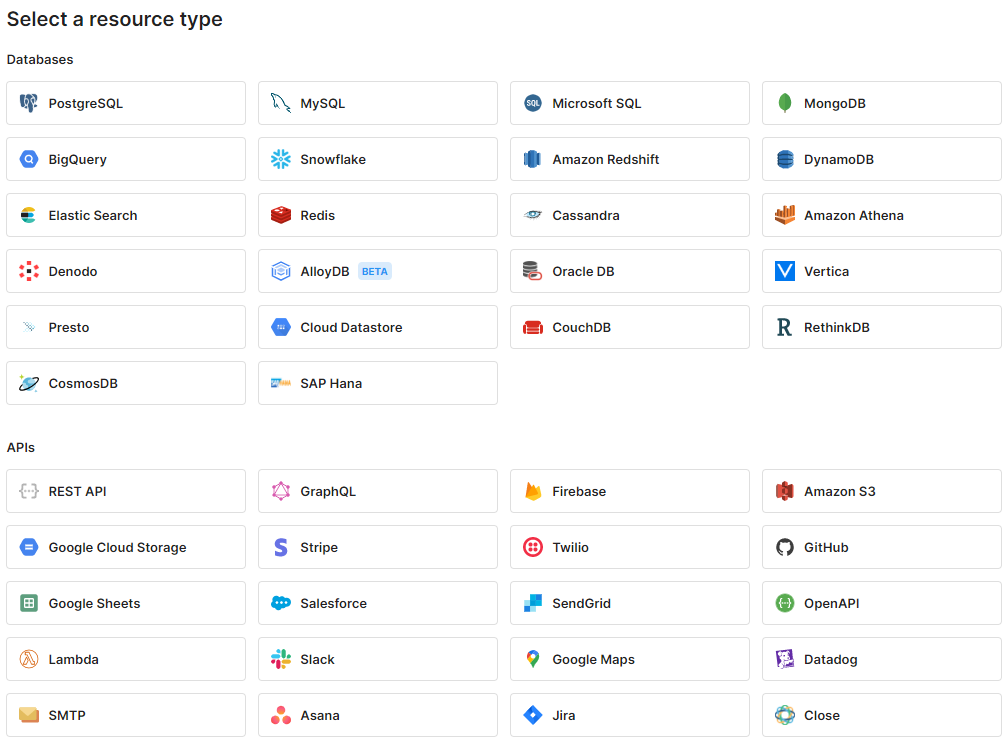
RDBをはじめ、NoSQLやWebAPIなど多くのデータソースを取り扱うことができます。

Retool のライセンス体系と入手元
ライセンス体系:
提供形態が複数ありますので 公式のライセンス情報 を予め確認しましょう。本記事では Self Hosted の Free版 を利用しました。Free版の利用に際しても、ユーザアカウントの登録とライセンスコードの入手は必要なので、予め入手してください。記事執筆時点では、 公式サイト ページ右上の Start for Free より登録・入手ができます。
入手元:
インストールするSelf Hosted 版 は GitHub で公開されており、今回は READMEの AWS Deploy With EC2 の手順を踏襲して構築します。
github.com
構築法
EC2 と RDS インスタンスの作成
Retoolを稼働させるサーバとしての EC2 インスタンスと、Retool 自身の動作に必要なシステムデータベースとなる RDS を作成します。本記事では、以下のスペックで構築しました。
EC2 インスタンスのスペック

- AMI: Canonical, Ubuntu, 22.04 LTS, amd64 jammy image build on 2023-05-16 (ami-0d52744d6551d851e)
- インスタンスタイプ: t2.medium
- ボリューム: gp2 30 GiB
当スペックのインスタンスでRetoolの業務用アプリを3つ作成し5名以下で1カ月間利用している場合の、平均的なリソース利用状況は以下の通りです。お試し目的でしたらスペックを絞っていただいても良いと思います。
$ df -h
Filesystem      Size  Used Avail Use% Mounted on
/dev/root        29G  9.2G   20G  32% /
tmpfs           2.0G     0  2.0G   0% /dev/shm
tmpfs           785M  872K  784M   1% /run
tmpfs           5.0M     0  5.0M   0% /run/lock
/dev/xvda15     105M  6.1M   99M   6% /boot/efi
tmpfs           393M  4.0K  393M   1% /run/user/1000
$
RDSのスペック
PostgreSQL 13.x の無料利用枠に収まるデフォルトでの構築で問題ありませんが、EC2からパスワード認証でアクセスできる必要がありますので、適したVPC配置、セキュリティグループ設定としてください。
後の手順で接続情報が必要となりますので控えておいてください。
EC2 インスタンスに Docker Service を入れる
Docker Service をインストールします。 docs.docker.com
$ sudo apt-get update
$ sudo apt-get -y install ca-certificates curl gnupg
$ sudo install -m 0755 -d /etc/apt/keyrings
$ curl -fsSL https://download.docker.com/linux/ubuntu/gpg | sudo gpg --dearmor -o /etc/apt/keyrings/docker.gpg
$ sudo chmod a+r /etc/apt/keyrings/docker.gpg
$  echo \
    "deb [arch="$(dpkg --print-architecture)" signed-by=/etc/apt/keyrings/docker.gpg] https://download.docker.com/linux/ubuntu \
    "$(. /etc/os-release && echo "$VERSION_CODENAME")" stable" | \
    sudo tee /etc/apt/sources.list.d/docker.list > /dev/null
$ sudo apt-get update
$ sudo apt-get install -y docker-ce docker-ce-cli containerd.io docker-buildx-plugin docker-compose-plugin
Docker Serviceの自動起動設定などをします。 docs.docker.com
$ sudo usermod -aG docker $USER
$ sudo systemctl enable docker.service
$ sudo systemctl enable containerd.service
権限付与を反映するためコンソールセッションに再ログインした後、Docker Compose をインストールします。 docs.docker.com
$ sudo apt-get update
$ sudo apt-get install docker-compose-plugin
ここまでのインストールが正常に済んだ事を確認してみましょう。 バージョンは執筆時点の情報であり、異なる場合がありますが問題ありません。
$ docker compose version
Docker Compose version v2.18.1
$ docker --version
Docker version 24.0.2, build cb74dfc
$ docker run hello-world

Hello from Docker!
This message shows that your installation appears to be working correctly.

To generate this message, Docker took the following steps:
 1. The Docker client contacted the Docker daemon.
 2. The Docker daemon pulled the "hello-world" image from the Docker Hub.
    (amd64)
 3. The Docker daemon created a new container from that image which runs the
    executable that produces the output you are currently reading.
 4. The Docker daemon streamed that output to the Docker client, which sent it
    to your terminal.

To try something more ambitious, you can run an Ubuntu container with:
 $ docker run -it ubuntu bash

Share images, automate workflows, and more with a free Docker ID:
 https://hub.docker.com/

For more examples and ideas, visit:
 https://docs.docker.com/get-started/

$
Retool を取得し初期設定する
Retool を取得する
Self Hosted 版の Retool を GitHub から Clone して、設定します。 github.com
$ git clone https://github.com/tryretool/retool-onpremise.git
$ cd retool-onpremise
Retool の設定ファイルを生成する
公式の手順 では install.sh を実行するようにかかれています。
内容を見ると https://get.docker.com/ のスクリプトを用いて
Docker Service や Docker Compose を導入する手順が含まれている事が分かりますが、
本記事では両者の導入を前述のインストールで行いましたので、以下の抜粋手順とします1。
$ cat install.sh
./get-docker.sh    # スキップしたい. Docker Service をインストールする処理
./get-docker-compose.sh  # スキップしたい. Docker Compose をインストールする処理
./docker_setup    # これだけ実行したい. 起動用の設定ファイルを docker.env を生成する処理
$
$ ./docker_setup
Hi! I'm here to help you set up a self-hosted Retool.

Just one question: Do you have a fully qualified domain pointed at your Retool server?

This is an optional question. If you have a domain that points to your Retool server, the installation scripts can request a Let's Encrypt HTTPS certificate for you automatically. If you do not provide one, a self-signed certificate will be used instead.

If you have just created a new cloud server in previous steps, now is a good time to point your fully qualified domain to your server's public address. Make sure the fully qualified domain resolves to the correct IP address before proceeding.

Please type your fully qualified domain below. Press enter to skip.
Enter it here: (default is your public ip address: <EC2 インスタンスのパブリックIPアドレス>)
Cool! Now add your license key in docker.env then run docker-compose up to launch Retool.
$
$ head docker.env
## For a complete list of all environment variables, see docs.retool.com/docs/environment-variables

## Set node environment to production
NODE_ENV=production

## Set the JWT secret for the API server
JWT_SECRET=************
$
設定ファイルに設定値を書き込む
生成された docker.env ファイルの、< > で囲まれた箇所を変更します。
$ cat docker.env
## For a complete list of all environment variables, see docs.retool.com/docs/environment-variables

## Set node environment to production
NODE_ENV=production

## Set the JWT secret for the API server
JWT_SECRET=*******

## Set and generate postgres credentials
POSTGRES_DB=<RDSのDB名>
POSTGRES_USER=<RDSのユーザ名>
POSTGRES_HOST=<RDSのホスト名>
POSTGRES_PORT=<RDSのポート番号>
POSTGRES_PASSWORD=<RDSのパスワード>

# Change 'xxx.xxx.xxx.xxx' to retool.yourcompany.com to set up SSL properly
DOMAINS=<EC2インスタンスのパブリックIPアドレス> -> http://api:3000

## Used to create links for your users, like new user invitations and forgotten password resets
## The backend tries to guess this, but it can be incorrect if there’s a proxy in front of the website
# BASE_DOMAIN=https://retool.yourwebsite.com

## Set key to encrypt and decrypt database passwords, etc.
ENCRYPTION_KEY=*******

## Google SSO configuration
# CLIENT_ID={YOUR GOOGLE CLIENT ID}

## License key
LICENSE_KEY=<予めRetoolから取得したライセンスキー>

## Uncomment this line if HTTPS is not set up
# COOKIE_INSECURE=true
$
利用するRetool のバージョンを指定する
利用したいRetoolのバージョンを次のページから選び、
Dockerfile に指定します。この記事では 2.108.14 を選択しました。
docs.retool.com
$ RETOOL_VERSION=2.108.14
## バージョンを Dockerfile に指定します
$ sed -i s/X.Y.Z/${RETOOL_VERSION}/ Dockerfile
## docker.env ファイルテンプレートを生成するスクリプトを実行します
$ ./setup_docker
Retool を起動する
$ docker-compose up -d   # Retoolを起動する
$ docker-compose ps     # 起動していること確認する
$ docker-compose logs -f  # コンテナ稼動ログを見る
$ docker-compose down  # Retool を終了する
http://{hostname}:3000/ へアクセスし、初回のログイン画面で新規ユーザ登録すると利用するDBの選択画面になります。 以後の用法は公式のDocsを参照すると、色々な作り方が分かります。 docs.retool.com
アプリを作ってみる
せっかくなので、総務省統計局の e-Stat の API からデータを取得してUIで表示してみた例を紹介します。
完成版はこのような動きをします。内容は API の使い方 に書かれている、東京の老年人口割合[65歳以上人口] の取得と表示です。

e-Stat の AppID を取得する
APIを利用するためのユーザアカウントを作成し、APIを利用するための appid を取得してください。
www.e-stat.go.jp
冒頭だけではありますが、作り方の流れは以下です。
データソースを作る
データソースである Resource に REST API を新規作成し、以下を設定します。
Base URL:http://api.e-stat.go.jp/rest/2.0/app- URL parameters
appId: 取得したappId

UI/UXを作る
Appを新規作成し、以下のようなコンポーネントを配置してみます。
- (1)
JSON Explorerを(2)に配置する - (3)
query1を作成する- (4) Resource:
e-Stats REST 2.0を選択する - (5) Action Type:
GEThttp://api.e-stat.go.jp/rest/2.0/app/json/getStatsData/?statsDataId=C0020050213000&cdCat01=%23A03503を指定する - (6) URL Parameters
- statsDataId:
C0020050213000 - cdCat01:
%23A03503
- statsDataId:
- (4) Resource:

- (7)
JSON Explorerをクリックする- (8)
Value:{{ query1.data }}を指定する
- (8)

- (9)
Buttonを配置する- (10)
Event HandlerをAddする- (11) ハンドラを編集する
- Action:
Control query - Query:
先程作成したquery1 - Method:
Trigger
- Action:
- (11) ハンドラを編集する
- (10)
コスト(おまけ)
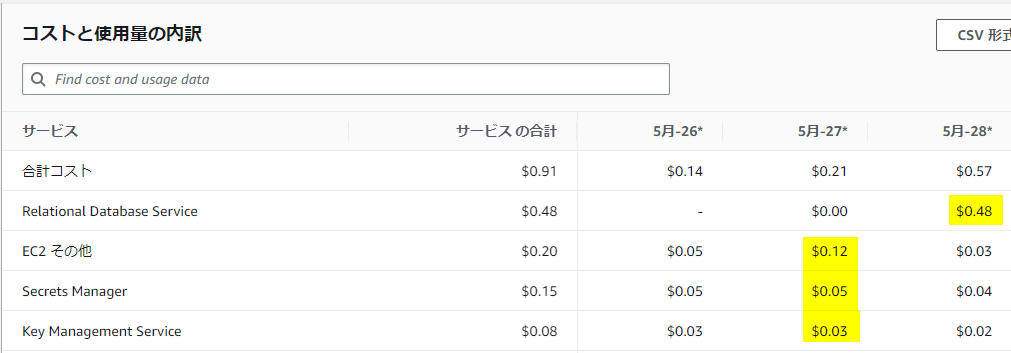
Cost Explorerで、今回の構築に要した採取してみました。構築期間はゆっくり(ブログを書くペース)で3日間, 利用料は 1日当たり $0.68 2 でした。お試しをする際の費用のご参考にしていただけたらと思います。

スクラッチでアプリを開発するほどではないが、ごく小規模に素早くツールを得て省力化ができると助かるシーンも多々あると思います。ぜひ仕事を減らして良いプライベートをお過ごしください。
-
なぜこのような記事にしたかといいますと、Ubuntu 以外でのディストリビューションでも Retool を構築できる方法を手順としたかったためです。たとえば、AWSを利用しているのであれば、Amazon Linux2 や先日GAした Amazon Linux 2023 なども選択肢に入れたくなりますが、
get.docker.comのスクリプトを使う手順では、サービス最適なディストリビューションには正常にインストールできないケースがあり、install.shで導入する手順を分解して理解しておくことで、更新への追従やサービスのメリットを取り入れるといった対応をしやすくするためです。このような点にメリットを見いだせない場合は、公式の./install.shを実行する手順を利用します。↩ -
執筆時にオンデマンドでEC2とRDSを順次作成していったので、サービス毎の24時間稼働コストである黄色網掛部の合計
$0.68が1日あたりの費用です。↩
Hiromitsu Sai(執筆記事の一覧)
コーポレートエンジニアリング部 プロセスエンジニアリング課 所属
絵とSFが好きです。

