コーヒーが好きな木谷映見です。
今回は、Systems Manager リモートホストへのポートフォワード機能を使って RDS for SQL Server に接続するというピンポイント検証です。
Windows ユーザーの皆様のお役に立てればと思います。
リモートホストへのポートフォワードについては以下記事もあわせてご参照いただけますと幸いです。
blog.serverworks.co.jp
構成図
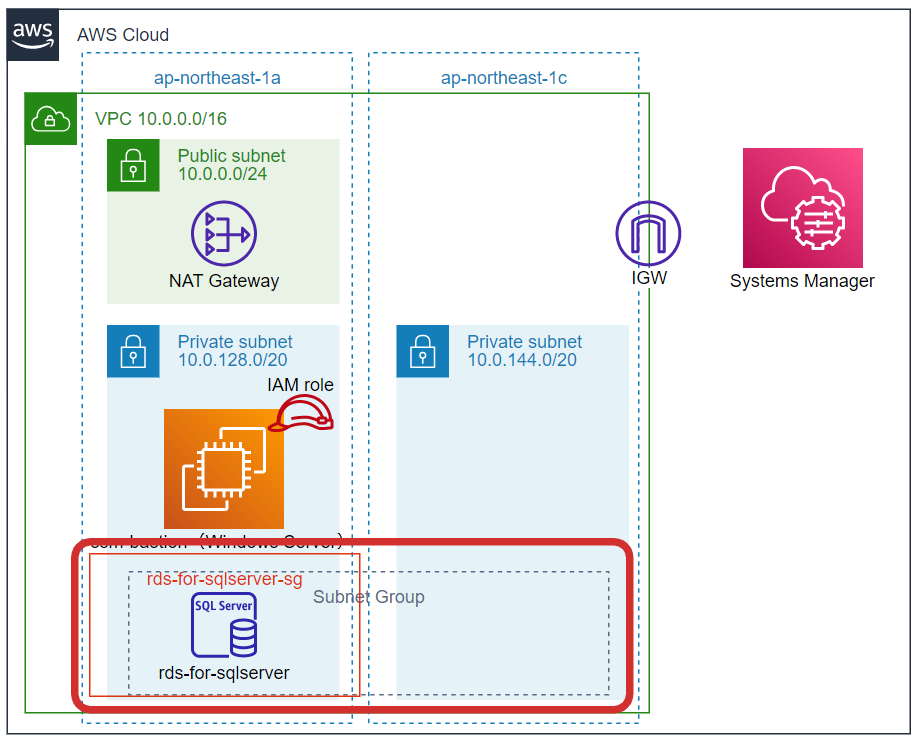
以下のような構成で実施します。
今回踏み台のような役割を担う ssm-bastion という EC2 インスタンスは SSM で管理される必要がありますので、SSM との通信経路を確保するために NAT Gateway を置いています。
ちなみに、今回この画像に登場する OS は全て Windows であると想定して検証します。私の手元の端末も Windows OS ですし、 ssm-bastion という EC2 インスタンスも Windows Server を使用します。

準備
VPC、サブネット、ルートテーブル、Internet Gateway、NAT Gateway を準備しておいてください。

今回の例では東京リージョンを使用します。
RDS for SQL Server の作成では 2 つ以上のアベイラビリティーゾーン(以下、AZ)にサブネットが必要ですので、2 つの AZ にサブネットを作成しています。
今回は Windows Server Update を定期的にインターネットに取りに行く想定で NAT Gateway を作成します。
そして NAT Gateway 経由で SSM ポートフォワードしていきます。
踏み台となる EC2 インスタンスの準備
リモートホストへの SSM ポートフォワードをするために、踏み台的な役割をしてくれる EC2 インスタンスを作成します。
この EC2 インスタンスは SSM で管理できるよう、SSM Agent が導入されている必要があります。
今回は SQL Server と親和性が高い Windows Server をたてます。
(もちろん Linux でも構いません)

| 項目 | 内容 | 備考 |
|---|---|---|
| 名前 | ssm-bastion | |
| AMI | ami-0eee6534cf84c69a5 | Windows_Server-2022-Japanese-Full-SQL_2022_Standard-2022.11.21。このインスタンスからも RDS for SQL Server に接続することがあると想定して、SQL Server を含んだ AMI を使用。この AMI はあらかじめ SSM エージェントが含まれている |
| インスタンスタイプ | m5.large | 2vCPU、8GiB メモリ |
| キーペア | 任意のキーペアを設定 | |
| VPC、サブネット | 作成した任意のプライベートサブネットを選択 | |
| セキュリティグループ | ssm-bastion-sg(アウトバウンドのすべてのトラフィック 0.0.0.0/0 許可) | SSM を使用するためにアウトバウンド 443 は制限しないようにする。インバウンド通信の許可は不要 |
| ストレージ | 65 GiB gp2 ルートボリューム | デフォルト |
| IAM ロール | IAM ポリシー AmazonSSMManagedInstanceCore を付与した IAM ロールを設定 |
SSM を使用するために必要 |
EC2 インスタンスを起動すると、Systems Manager のフリートマネージャーで確認できるようになっています。

RDS for SQL Server の作成
マネジメントコンソールで作成してもよいのですが、今回はAWS CLI で作成します。
CloudFormation で作成しようとしたのですが、RDS for SQL Server の照合順序(Collation、Japanese_CI_AS)をの設定をサポートするオプションが CloudFormation のリファレンス AWS::RDS::DBInstance で見つからなかったため、CLI で作成することにしました。
DB サブネットグループの作成
DB サブネットグループに含むサブネット ID をコピーしておいてください。
create-db-subnet-group — AWS CLI 2.9.6 Command Reference
実行コマンドは以下です。--subnet-ids にはコピーしておいたサブネット ID をいれてください。
aws rds create-db-subnet-group \
  --db-subnet-group-name "rds-subnetgp-sqlserver-se-15-0" \
  --db-subnet-group-description "rds-subnetgp-sqlserver-se-15-0" \
  --subnet-ids "subnet-0dcc011fa7c05d951" "subnet-022841f753bacdc5b" \
  --tags Key=Name,Value=rds-subnetgp-sqlserver-se-15-0
- 実行結果
[cloudshell-user@ip-10-0-181-1 ~]$ aws rds create-db-subnet-group \
>   --db-subnet-group-name "rds-subnetgp-sqlserver-se-15-0" \
>   --db-subnet-group-description "rds-subnetgp-sqlserver-se-15-0" \
>   --subnet-ids "subnet-0dcc011fa7c05d951" "subnet-022841f753bacdc5b" \
>   --tags Key=Name,Value=rds-subnetgp-sqlserver-se-15-0
{
    "DBSubnetGroup": {
        "DBSubnetGroupName": "rds-subnetgp-sqlserver-se-15-0",
        "DBSubnetGroupDescription": "rds-subnetgp-sqlserver-se-15-0",
        "VpcId": "vpc-06261122d9080ac9e",
        "SubnetGroupStatus": "Complete",
        "Subnets": [
            {
                "SubnetIdentifier": "subnet-022841f753bacdc5b",
                "SubnetAvailabilityZone": {
                    "Name": "ap-northeast-1a"
                },
                "SubnetOutpost": {},
                "SubnetStatus": "Active"
            },
            {
                "SubnetIdentifier": "subnet-0dcc011fa7c05d951",
                "SubnetAvailabilityZone": {
                    "Name": "ap-northeast-1c"
                },
                "SubnetOutpost": {},
                "SubnetStatus": "Active"
            }
        ],
        "DBSubnetGroupArn": "arn:aws:rds:ap-northeast-1:123456789012:subgrp:rds-subnetgp-sqlserver-se-15-0",
        "SupportedNetworkTypes": [
            "IPV4"
        ]
    }
}
[cloudshell-user@ip-10-0-181-1 ~]$
DB パラメータグループの作成と編集
create-db-parameter-group — AWS CLI 2.9.6 Command Reference
今回は 2022年12月時点で提供されている一番新しいバージョン SQL Server 2019 15.00.4236.7.v1 で RDS for SQL Server を作成する予定ですので、それに合わせたバージョンのパラメーターグループを作成します。
実行コマンドは以下です。
aws rds create-db-parameter-group \
  --db-parameter-group-name "rds-parametergp-sqlserver-se-15-0" \
  --db-parameter-group-family "sqlserver-se-15.0" \
  --description "for rds-for-sqlserver" \
  --tags Key=Name,Value=rds-parametergp-sqlserver-se-15-0
--db-parameter-group-family:今回作成したい RDS for SQL Server のバージョン"sqlserver-se-15.0"を入れる実行結果
[cloudshell-user@ip-10-0-181-1 ~]$ aws rds create-db-parameter-group \
>   --db-parameter-group-name "rds-parametergp-sqlserver-se-15-0" \
>   --db-parameter-group-family "sqlserver-se-15.0" \
>   --description "for rds-for-sqlserver" \
>   --tags Key=Name,Value=rds-parametergp-sqlserver-se-15-0
{
    "DBParameterGroup": {
        "DBParameterGroupName": "rds-parametergp-sqlserver-se-15-0",
        "DBParameterGroupFamily": "sqlserver-se-15.0",
        "Description": "for rds-for-sqlserver",
        "DBParameterGroupArn": "arn:aws:rds:ap-northeast-1:123456789012:pg:rds-parametergp-sqlserver-se-15-0"
    }
}
[cloudshell-user@ip-10-0-181-1 ~]$
パラメータグループの編集
modify-db-parameter-group — AWS CLI 2.9.6 Command Reference
SQL Server の default language オプションを日本語(3)に設定します。
default language オプションの詳細は Microsoft のサイトをご参照ください。
英語は(0)、フランス語は(2)です。
default language サーバー構成オプションの構成 - SQL Server | Microsoft Learn
実行コマンドは以下です。
aws rds modify-db-parameter-group \
  --db-parameter-group-name "rds-parametergp-sqlserver-se-15-0" \
  --parameters ParameterName="default language",ParameterValue="3",ApplyMethod="immediate"
- 実行結果
[cloudshell-user@ip-10-0-181-1 ~]$ aws rds modify-db-parameter-group \
>   --db-parameter-group-name "rds-parametergp-sqlserver-se-15-0" \
>   --parameters ParameterName="default language",ParameterValue="3",ApplyMethod="immediate"
{
    "DBParameterGroupName": "rds-parametergp-sqlserver-se-15-0"
}
[cloudshell-user@ip-10-0-181-1 ~]$
オプショングループの作成
オプショングループでは、DB エンジン固有の機能 (オプション) を指定できます。
今回オプショングループの中身は設定しませんが、後ほどオプションが設定したくなった時のために作成しておきます。
create-option-group — AWS CLI 2.9.6 Command Reference
実行コマンドは以下です。
aws rds create-option-group \
  --option-group-name "rds-optiongp-sqlserver-se-15-0" \
  --engine-name "sqlserver-se" \
  --major-engine-version "15.00" \
  --option-group-description "for rds-for-sqlserver" \
  --tags Key=Name,Value=rds-optiongp-sqlserver-se-15-0
--engine-name:今回作成する SQL Server Standard Edition を表す"sqlserver-se"を入れる--major-engine-version:今回作成する SQL Server のバージョンを表す"15.00"を入れる実行結果
[cloudshell-user@ip-10-0-181-1 ~]$ aws rds create-option-group \
>   --option-group-name "rds-optiongp-sqlserver-se-15-0" \
>   --engine-name "sqlserver-se" \
>   --major-engine-version "15.00" \
>   --option-group-description "for rds-for-sqlserver" \
>   --tags Key=Name,Value=rds-optiongp-sqlserver-se-15-0
{
    "OptionGroup": {
        "OptionGroupName": "rds-optiongp-sqlserver-se-15-0",
        "OptionGroupDescription": "for rds-for-sqlserver",
        "EngineName": "sqlserver-se",
        "MajorEngineVersion": "15.00",
        "Options": [],
        "AllowsVpcAndNonVpcInstanceMemberships": true,
        "OptionGroupArn": "arn:aws:rds:ap-northeast-1:123456789012:og:rds-optiongp-sqlserver-se-15-0"
    }
}
[cloudshell-user@ip-10-0-181-1 ~]$
RDS for SQL Server を作成する
RDS for SQL Server を作成する前に、RDS for SQL Server に付与するセキュリティグループを作成しておきます。
セキュリティグループは以下のように、踏み台の役割をする EC2 インスタンスに付与したセキュリティグループ(ssm-bastion-sg)からのインバウンド DB アクセスを許可してください。アウトバウンドは ssm-bastion-sg 同様 0.0.0.0/0 宛てのすべてのトラフィックを許可しておきます。
rds-for-sqlserver-sg
| タイプ | プロトコル | ポート範囲 | ソース | 説明 |
|---|---|---|---|---|
| MSSQL | TCP | 1433 | ssm-bastion-sg | from ssm-bastion |
セキュリティグループができたら、セキュリティグループ ID をコピーしておいてください。
 create-db-instance — AWS CLI 2.9.6 Command Reference
今回は 2022年12月時点で提供されている一番新しいバージョン SQL Server 2019 15.00.4236.7.v1 で RDS for SQL Server を作成します。
実行コマンドは以下です。
aws rds create-db-instance \
  --db-instance-identifier "rds-for-sqlserver" \
  --allocated-storage 20 \
  --db-instance-class "db.m5.large" \
  --engine "sqlserver-se" \
  --master-username "sqlserveradmin" \
  --master-user-password "xxxxxxxxxx" \
  --vpc-security-group-ids "sg-093d582b8ce7ba5ad" \
  --availability-zone "ap-northeast-1a" \
  --db-subnet-group-name "rds-subnetgp-sqlserver-se-15-0" \
  --preferred-maintenance-window "sat:16:00-sat:17:00" \
  --db-parameter-group-name "rds-parametergp-sqlserver-se-15-0" \
  --backup-retention-period 7 \
  --preferred-backup-window "15:00-15:30" \
  --port "1433" \
  --no-multi-az \
  --engine-version "15.00.4236.7.v1" \
  --no-auto-minor-version-upgrade \
  --license-model "license-included" \
  --option-group-name "rds-optiongp-sqlserver-se-15-0" \
  --character-set-name "Japanese_CI_AS" \
  --no-publicly-accessible \
  --tags Key=Name,Value=rds-for-sqlserver \
  --storage-type "gp2" \
  --no-storage-encrypted \
  --copy-tags-to-snapshot \
  --timezone "Tokyo Standard Time" \
  --no-enable-performance-insights \
  --deletion-protection \
  --max-allocated-storage 100 \
  --network-type "IPV4"
--allocated-storage 20 \:ストレージ容量は 20--engine "sqlserver-se" \:Standard Edition を選択--master-user-password "xxxxxxxxxx" \:8 文字以上 41 文字以下の任意のパスワード--vpc-security-group-ids "sg-093d582b8ce7ba5ad" \:作成しておいたセキュリティグループを指定。コピーしておいたセキュリティグループ ID を入れる--no-multi-az \:今回はマルチ AZ 構成にはせず、1台で構築--no-auto-minor-version-upgrade \:自動マイナーアップデートをオフ--character-set-name "Japanese_CI_AS" \:照合順序を設定--storage-type "gp2" \:ストレージタイプは gp2--no-storage-encrypted \:今回は暗号化しない--timezone "Tokyo Standard Time" \:タイムゾーンは東京--deletion-protection \:削除保護設定を有効化--max-allocated-storage 100 \:自動スケーリングの上限を 100 GiB とする実行結果
[cloudshell-user@ip-10-0-181-1 ~]$ aws rds create-db-instance \
>   --db-instance-identifier "rds-for-sqlserver" \
>   --allocated-storage 20 \
>   --db-instance-class "db.m5.large" \
>   --engine "sqlserver-se" \
>   --master-username "sqlserveradmin" \
>   --master-user-password "xxxxxxxxxxxx" \
>   --vpc-security-group-ids "sg-093d582b8ce7ba5ad" \
>   --availability-zone "ap-northeast-1a" \
>   --db-subnet-group-name "rds-subnetgp-sqlserver-se-15-0" \
>   --preferred-maintenance-window "sat:16:00-sat:17:00" \
>   --db-parameter-group-name "rds-parametergp-sqlserver-se-15-0" \
>   --backup-retention-period 7 \
>   --preferred-backup-window "15:00-15:30" \
>   --port "1433" \
>   --no-multi-az \
>   --engine-version "15.00.4236.7.v1" \
>   --no-auto-minor-version-upgrade \
>   --license-model "license-included" \
>   --option-group-name "rds-optiongp-sqlserver-se-15-0" \
>   --character-set-name "Japanese_CI_AS" \
>   --no-publicly-accessible \
>   --tags Key=Name,Value=rds-for-sqlserver \
>   --storage-type "gp2" \
>   --no-storage-encrypted \
>   --copy-tags-to-snapshot \
>   --timezone "Tokyo Standard Time" \
>   --no-enable-performance-insights \
>   --deletion-protection \
>   --max-allocated-storage 100 \
>   --network-type "IPV4"
{
    "DBInstance": {
        "DBInstanceIdentifier": "rds-for-sqlserver",
        "DBInstanceClass": "db.m5.large",
        "Engine": "sqlserver-se",
        "DBInstanceStatus": "creating",
        "MasterUsername": "sqlserveradmin",
        "AllocatedStorage": 20,
        "PreferredBackupWindow": "15:00-15:30",
        "BackupRetentionPeriod": 7,
        "DBSecurityGroups": [],
        "VpcSecurityGroups": [
            {
                "VpcSecurityGroupId": "sg-093d582b8ce7ba5ad",
                "Status": "active"
            }
        ],
        "DBParameterGroups": [
            {
                "DBParameterGroupName": "rds-parametergp-sqlserver-se-15-0",
                "ParameterApplyStatus": "in-sync"
            }
        ],
        "AvailabilityZone": "ap-northeast-1a",
        "DBSubnetGroup": {
            "DBSubnetGroupName": "rds-subnetgp-sqlserver-se-15-0",
            "DBSubnetGroupDescription": "rds-subnetgp-sqlserver-se-15-0",
            "VpcId": "vpc-06261122d9080ac9e",
            "SubnetGroupStatus": "Complete",
            "Subnets": [
                {
                    "SubnetIdentifier": "subnet-022841f753bacdc5b",
                    "SubnetAvailabilityZone": {
                        "Name": "ap-northeast-1a"
                    },
                    "SubnetOutpost": {},
                    "SubnetStatus": "Active"
                },
                {
                    "SubnetIdentifier": "subnet-0dcc011fa7c05d951",
                    "SubnetAvailabilityZone": {
                        "Name": "ap-northeast-1c"
                    },
                    "SubnetOutpost": {},
                    "SubnetStatus": "Active"
                }
            ]
        },
        "PreferredMaintenanceWindow": "sat:16:00-sat:17:00",
        "PendingModifiedValues": {
            "MasterUserPassword": "****"
        },
        "MultiAZ": false,
        "EngineVersion": "15.00.4236.7.v1",
        "AutoMinorVersionUpgrade": false,
        "ReadReplicaDBInstanceIdentifiers": [],
        "LicenseModel": "license-included",
        "OptionGroupMemberships": [
            {
                "OptionGroupName": "rds-optiongp-sqlserver-se-15-0",
                "Status": "pending-apply"
            }
        ],
        "CharacterSetName": "Japanese_CI_AS",
        "PubliclyAccessible": false,
        "StorageType": "gp2",
        "DbInstancePort": 0,
        "StorageEncrypted": false,
        "DbiResourceId": "db-EUD7V54K5V36QM5TYERMVFBXOY",
        "CACertificateIdentifier": "rds-ca-2019",
        "DomainMemberships": [],
        "CopyTagsToSnapshot": true,
        "MonitoringInterval": 0,
        "DBInstanceArn": "arn:aws:rds:ap-northeast-1:123456789012:db:rds-for-sqlserver",
        "Timezone": "Tokyo Standard Time",
        "IAMDatabaseAuthenticationEnabled": false,
        "PerformanceInsightsEnabled": false,
        "DeletionProtection": true,
        "AssociatedRoles": [],
        "MaxAllocatedStorage": 100,
        "TagList": [
            {
                "Key": "Name",
                "Value": "rds-for-sqlserver"
            }
        ],
        "CustomerOwnedIpEnabled": false,
        "BackupTarget": "region",
        "NetworkType": "IPV4",
        "StorageThroughput": 0
    }
}
[cloudshell-user@ip-10-0-181-1 ~]$
CLI の実行結果はすぐ表示されますが、RDS DB インスタンスを作成し始めて利用可能になるまで 20~25 分程度待ちます。
リモートセッション
自分の手元のローカル端末の準備
自分の手元のローカル端末にAWS CLIをインストールしておく
AWS CLI の最新バージョンをインストールまたは更新します。 - AWS Command Line Interface を参考に、自分の手元のローカル端末にAWS CLIをインストー ルします。
今回は手元の Windows 端末 で AWS CLI を使います。
以下のブログもあわせてご参照ください。
blog.serverworks.co.jp
AWS CLI のバージョンの確認をしておきます。
C:\Users\user>aws --version
aws-cli/2.9.7 Python/3.9.11 Windows/10 exe/AMD64 prompt/off

C:\Users\user>
自分の手元のローカル端末に IAM のクレデンシャル設定をして AWS CLI を実行できるようにしておく
"ssm:StartSession" Action を許可した IAM ユーザーで AWS CLI が実行できるよう、クレデンシャルを設定します。
今回検証のために「windows-cli-user」という IAM ユーザーを作成しました。
IAM ユーザー「windows-cli-user」には以下のようなアクセス許可を付与します。
{
    "Version": "2012-10-17",
    "Statement": [
        {
            "Effect": "Allow",
            "Action": [
                "ssm:StartSession"
            ],
            "Resource": "*"
        }
    ]
}
この IAM ユーザーのクレデンシャルを、手元の Windows クライアント端末に設定します。
手元の Windows クライアント端末にクレデンシャルを設定する方法は以下のリンクをご参照ください。
- サーバーワークスエンジニアブログ - Windows クライアント端末で AWS CLI を使えるようにする - Windows クライアント端末に IAM ユーザーのクレデンシャル設定
- aws configure を使用したクイック設定
自分の手元のローカル端末に SSM プラグインをインストールしておく
(オプション) AWS CLI 用の Session Manager プラグインをインストールする - AWS Systems Manager を参考に、自分の手元のローカル端末に SSM プラグインをインストールします。
私は手元の Windows クライアント端末に SSM プラグインをインストールするので、Windows に Session Manager プラグインをインストールする を参考にしてインストールします。
ブラウザに以下の URL を貼り付けて、インストーラをダウンロードします。
SessionManagerPluginSetup.exe がダウンロードできたら、実行します。

SSM プラグインをインストールできました。
SQL Server Management Studio (SSMS) のダウンロード
SQL Server に接続するために、 SQL Server Management Studio (SSMS) を、手元の Windows クライアント端末にインストールしておきます。
こちらのページを開いてください。
SQL Server Management Studio (SSMS) のダウンロード
「SQL Server Management Studio (SSMS) 18.12.1 の無料ダウンロード」をクリックしていただいてもよいのですが、少しスクロールすると日本語版のダウンロードリンクがありますので、こちらをインストールしていきます。

SSMS-Setup-JPN.exe がダウンロードできたら、実行します。
ウィザードに従って SSMS をインストールします。

ローカルポートで接続
ポート転送セッションを開始します。
セッションの開始 (リモートホストへのポート転送) を参照し、コマンドプロンプトを開いて CLI で以下のコマンドを実行します。
Windows と Linux&macOS でコマンドが違いますので注意してください。
今回は Windows のコマンドを記載しています。
--target には、ssm-bastion に該当するインスタンスのインスタンス ID を入れてください。
--parameters host には、RDS for SQL Server のエンドポイントをいれてください。
aws ssm start-session ^
    --target i-0d14a7a8806820579 ^
    --document-name AWS-StartPortForwardingSessionToRemoteHost ^
    --parameters host="rds-for-sqlserver.cno8jxqxarf4.ap-northeast-1.rds.amazonaws.com",portNumber="1433",localPortNumber="11433"
- 実行結果
C:\Users\user>aws ssm start-session ^
More?     --target i-0d14a7a8806820579 ^
More?     --document-name AWS-StartPortForwardingSessionToRemoteHost ^
More?     --parameters host="rds-for-sqlserver.cno8jxqxarf4.ap-northeast-1.rds.amazonaws.com",portNumber="1433",localPortNumber="11433"

Starting session with SessionId: windows-cli-user-0f24452cd5f4266d0
Port 11433 opened for sessionId windows-cli-user-0f24452cd5f4266d0.
Waiting for connections...
このコマンドプロンプトを開いた状態のまま、SSMS を開きます。
 接続情報は以下のように入力します。
| 項目 | 入力内容 | 備考 |
|---|---|---|
| サーバー名 | 127.0.0.1,11433 | DNS 名、カンマ、ローカルポート番号の順に入力。今回 DNS 名は 127.0.0.1 |
| 認証 | SQL Server 認証 | |
| ログイン | sqlserveradmin | RDS for SQL Server を作成したときのマスターユーザー名 |
| パスワード | ************ | sqlserveradmin|RDS for SQL Server を作成したときのマスターパスワード |
 接続できました。

試しにデータベースを作成してみましたが、これも成功しました。

このとき、CLI コマンドでセッションを張っているコマンドプロンプトの方には、
Connection accepted for session [windows-cli-user-xxxxxxxxxxxxxxxxx]
と表示が出ています。
C:\Users\user>aws ssm start-session ^
More?     --target i-0d14a7a8806820579 ^
More?     --document-name AWS-StartPortForwardingSessionToRemoteHost ^
More?     --parameters host="rds-for-sqlserver.cno8jxqxarf4.ap-northeast-1.rds.amazonaws.com",portNumber="1433",localPortNumber="11433"

Starting session with SessionId: windows-cli-user-005c292d514780322
Port 11433 opened for sessionId windows-cli-user-005c292d514780322.
Waiting for connections...

Connection accepted for session [windows-cli-user-005c292d514780322]
めでたし。
おまけ:Systems Manager のポートフォワード機能で Windows Server に接続する
自分の手元のローカル端末に SSM プラグインをインストールしておく までの設定ができていれば、 Systems Manager の(リモートホスト向けではない普通の)ポートフォワード機能で Windows Server に RDP 接続することもできます。

Windows と Linux&macOS でコマンドが違いますので注意してください。
今回は Windows のコマンドを記載しています。
--target には、ssm-bastion に該当するインスタンスのインスタンス ID を入れてください。
--parameters host には、RDS for SQL Server のエンドポイントをいれてください。
aws ssm start-session ^
    --target i-0d14a7a8806820579 ^
    --document-name AWS-StartPortForwardingSession ^
    --parameters portNumber="3389",localPortNumber="13389"
- 実行結果
C:\Users\user>aws ssm start-session ^
More?     --target i-0d14a7a8806820579 ^
More?     --document-name AWS-StartPortForwardingSession ^
More?     --parameters portNumber="3389",localPortNumber="13389"

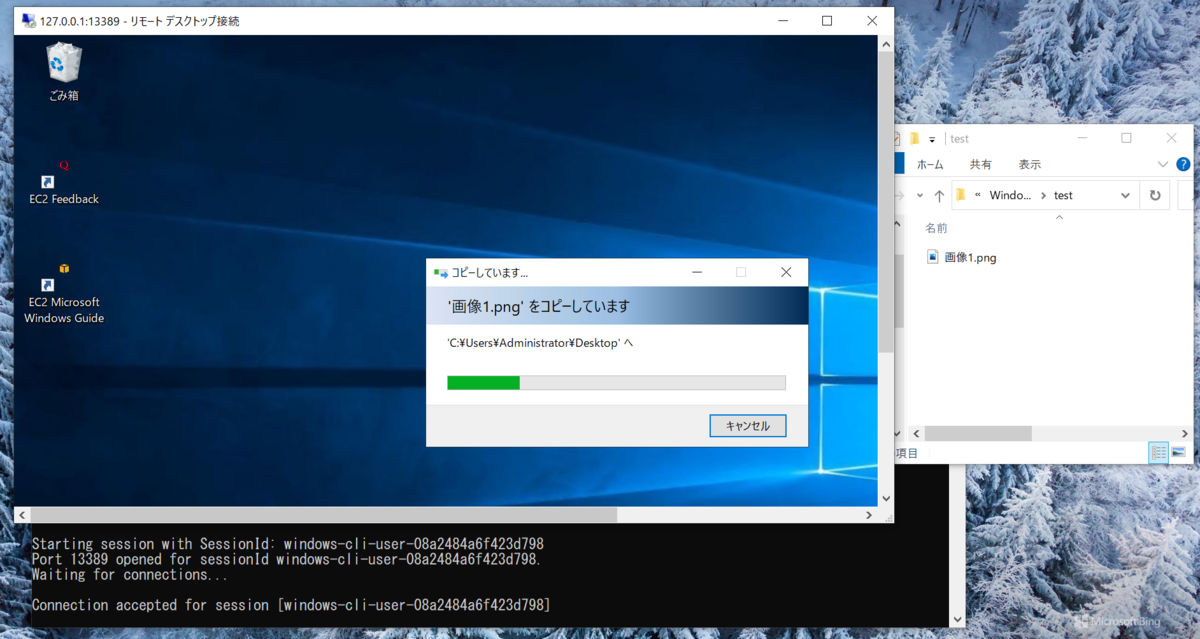
Starting session with SessionId: windows-cli-user-08a2484a6f423d798
Port 13389 opened for sessionId windows-cli-user-08a2484a6f423d798.
Waiting for connections...
パスワードはあらかじめ [EC2] - [インスタンス] - [ssm-bastion] - [接続] - [RDP クライアント] で、Windows Server を作成したときのキーペアを用いて生成しておいてください。
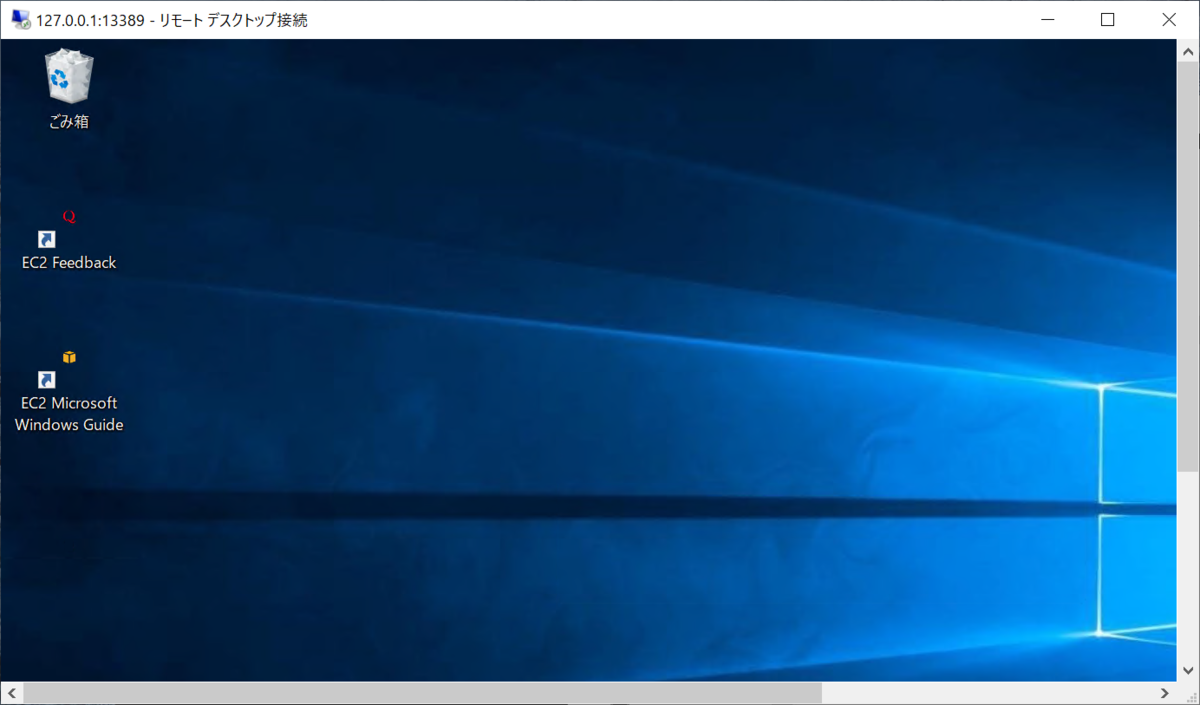
 「リモートデスクトップ接続」アプリで RDP 接続します。
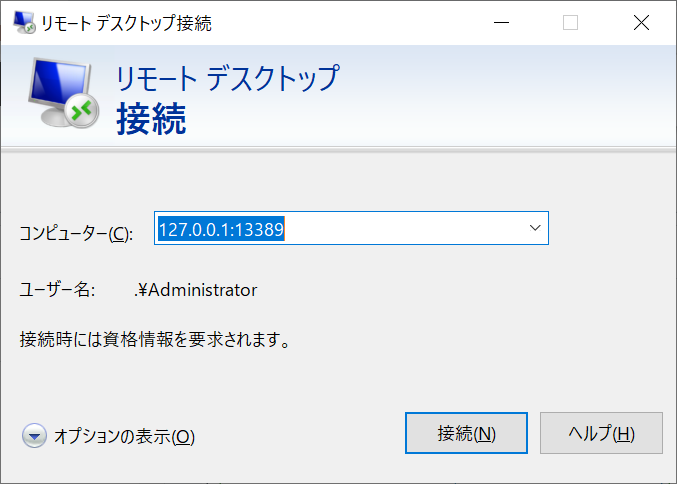
RDP 接続できました。
手元の Windows クライアント端末からファイルや画像をコピー & ペーストできます。
めでたし。
参考
Microsoft SQL Server の照合順序と文字セット - Amazon Relational Database Service
SSM Agent がプリインストールされた Amazon Machine Images (AMIs) - AWS Systems Manager
emi kitani(執筆記事の一覧)
AS部LX課。2022/2入社、コーヒーとサウナが好きです。執筆活動に興味があります。AWS認定12冠。

