

こんにちは、技術2課の芳賀です。2020年初のブログはSystems Managerのオートメーションについてです。
Windows ServerのWindowsUpdate、Update前後のAMIをオートメーションで自動化する為のカスタムオートメーションドキュメントを作成したので、このドキュメントの使用方法などについて解説したいと思います。
AWSで用意されたドキュメントを使用してオートメーションを実行する手順については、以前弊社の柳田が投稿していますのでこちらを参照ください。
http://blog.serverworks.co.jp/tech/2019/08/02/post-72746/
オートメーション処理フロー
今回、オートメーションで行う処理フローは以下になります。
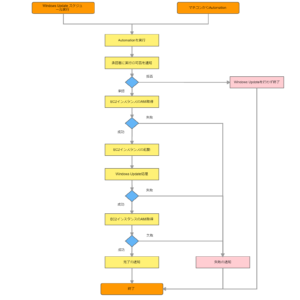
箇条書きの文章にすると、以下のような処理を行います。
①承認者にWindowsUpdateの実行可否を通知する。
②WindowsUpdate前のEC2インスタンスのAMIを取得する。
③対象のEC2インスタンスを起動する。
④WindowsUpdateを実施する。
⑤WindowsUpdate後のEC2インスタンスのAMIを取得する。
⑥成功可否を通知する。
ここではAWSマネージメントコンソールから手動でオートメーションを実行する場合の説明します。スケジュール実行する場合はCloudWatch Events、SSMのメンテナンスウィンドウなどを使用することで可能です。
1.作成するカスタムオートメーションドキュメント
いきなりですが今回は4つのオートメーションのドキュメントを作成します。
本当は1つのドキュメントで全ての処理を実現させたかったのですが、WindowsUpdateやAMI取得処理には時間がかかる為、進行中のステップ処理が完了する前に次のステップ処理が開始するという動きになってしまっていました。時間のかかる処理が完了するまで待機し次のステップ処理を実行する為に、時間のかかる処理毎にドキュメントを分け、メイン処理を行うドキュメントから各ドキュメントを呼び出すという方法にしました。この方法はAWSサポートに問い合わせて得たものなので有効かと思います。
以降、1-1~1-4のyaml形式のテキストがオートメーションのドキュメントになります。
1-1. MY-AutomationStart
- オートメーションで最初に実行されるドキュメントです。承認通知はここで定義されています。
- 承認処理は1200秒(20分)有効です。それを過ぎると以降の処理は実行しません。
ドキュメントを見るにはここをクリック
schemaVersion: '0.3'
parameters:
  TargetTag:
    type: String
    default: '{{ssm:EC2UpdateTag}}'
    description: >-
      WindowUpdateの対象となるEC2インスタンスのタグを指定します。Keyはパラメータストアの「EC2UpdateTag」を参照します(この項目で直接任意のKeyを指定することも可能です)。
      Valueは「ON」を指定する必要があります(この値は変更不可です)。
  NotificationArn:
    type: String
    default: '{{ssm:NotificationArn}}'
    description: >-
      Amazon
      SNSトピックのARNを指定します。パラメータストアの「NotificationArn」を参照しています(この項目では直接ARNを指定できません)。
  Approvers:
    type: String
    default: '{{ssm:Approvers}}'
    description: >-
      Amazon
      IAMユーザのARNを指定します。パラメータストアの「Approvers」を参照しています(この項目では直接ARNを指定することが可能です)。
  SeverityLevels:
    type: String
    default: 'Critical,Important,Moderate,Low'
    description: >-
      更新に関連付けられた1つ以上のMSRC重大度レベルを指定します。
      クリティカル(Critical)、重要(Important)、中(Moderate)、低(Low)をカンマ区切りでの指定が可能です。
mainSteps:
  - name: Approve
    action: 'aws:approve'
    timeoutSeconds: 1200
    onFailure: Abort
    inputs:
      NotificationArn: '{{NotificationArn}}'
      Message: >-
        「{{TargetTag}}」タグで「ON」を指定されているインスタンスに対してWindowsのUpdateを行います。
        WindowsのUpdateを許可しますか?拒否しますか?
      MinRequiredApprovals: 1
      Approvers:
        - '{{Approvers}}'
    nextStep: ExecuteDocument
  - name: ExecuteDocument
    action: 'aws:executeAwsApi'
    inputs:
      Service: ssm
      Api: StartAutomationExecution
      DocumentName: MY-AutomationProcess
      Parameters:
        SeverityLevels:
          - '{{SeverityLevels}}'
      TargetParameterName: InstanceIdIn
      Targets:
        - Key: 'tag:{{TargetTag}}'
          Values:
            - 'ON'
1-2. MY-AutomationProcess
- オートメーションで一連のメイン処理が実行されるドキュメントです。
- AWS所有のアクションや、1-3「MY-CreateImage」、1-4「MY-WindowsUpdate」ドキュメントを呼び出して実行します。
ドキュメントを見るにはここをクリック
schemaVersion: '0.3'
parameters:
  InstanceIdIn:
    type: String
  SeverityLevels:
    type: String
  NotificationArn:
    type: String
    default: '{{ssm:NotificationArn}}'
mainSteps:
  - name: CreateImageUpdateBefore
    action: 'aws:executeAwsApi'
    maxAttempts: 1
    onFailure: Abort
    timeoutSeconds: 60
    inputs:
      Service: ssm
      Api: StartAutomationExecution
      DocumentName: MY-CreateImage
      Parameters:
        InstanceId:
          - '{{InstanceIdIn}}'
        AddImageName:
          - UpdateBefore
    outputs:
      - Name: ExecutionId
        Selector: $.AutomationExecutionId
        Type: String
    nextStep: AwaitExecutionCreateImageUpdateBefore
  - name: AwaitExecutionCreateImageUpdateBefore
    action: 'aws:waitForAwsResourceProperty'
    timeoutSeconds: 3600
    onFailure: 'step:PublishSNSNotificationFailure'
    inputs:
      Service: ssm
      Api: GetAutomationExecution
      PropertySelector: $.AutomationExecution.AutomationExecutionStatus
      DesiredValues:
        - Success
      AutomationExecutionId: '{{ CreateImageUpdateBefore.ExecutionId }}'
    nextStep: StartEC2Instances
  - name: StartEC2Instances
    action: 'aws:executeAwsApi'
    maxAttempts: 1
    timeoutSeconds: 600
    onFailure: 'step:runWindowsUpdate'
    inputs:
      Service: ssm
      Api: StartAutomationExecution
      DocumentName: AWS-StartEC2Instance
      Parameters:
        InstanceId:
          - '{{InstanceIdIn}}'
    outputs:
      - Name: ExecutionId
        Selector: $.AutomationExecutionId
        Type: String
    nextStep: AwaitExecutionAfterStartEC2
  - name: AwaitExecutionAfterStartEC2
    action: 'aws:waitForAwsResourceProperty'
    timeoutSeconds: 3600
    onFailure: 'step:PublishSNSNotificationFailure'
    inputs:
      Service: ssm
      Api: GetAutomationExecution
      PropertySelector: $.AutomationExecution.AutomationExecutionStatus
      DesiredValues:
        - Success
      AutomationExecutionId: '{{ StartEC2Instances.ExecutionId }}'
    nextStep: runWindowsUpdate
  - name: runWindowsUpdate
    action: 'aws:executeAwsApi'
    maxAttempts: 1
    timeoutSeconds: 3600
    onFailure: Abort
    inputs:
      Service: ssm
      Api: StartAutomationExecution
      DocumentName: MY-WindowsUpdate
      Parameters:
        InstanceId:
          - '{{InstanceIdIn}}'
        SeverityLevels:
          - '{{SeverityLevels}}'
    outputs:
      - Name: ExecutionId
        Selector: $.AutomationExecutionId
        Type: String
    nextStep: AwaitExecutionAfterWindowsUpdate
  - name: AwaitExecutionAfterWindowsUpdate
    action: 'aws:waitForAwsResourceProperty'
    timeoutSeconds: 3600
    onFailure: 'step:PublishSNSNotificationFailure'
    inputs:
      Service: ssm
      Api: GetAutomationExecution
      PropertySelector: $.AutomationExecution.AutomationExecutionStatus
      DesiredValues:
        - Success
      AutomationExecutionId: '{{ runWindowsUpdate.ExecutionId }}'
    nextStep: CreateImageUpdateAfter
  - name: CreateImageUpdateAfter
    action: 'aws:executeAwsApi'
    maxAttempts: 1
    onFailure: 'step:PublishSNSNotificationFailure'
    timeoutSeconds: 60
    inputs:
      Service: ssm
      Api: StartAutomationExecution
      DocumentName: MY-CreateImage
      Parameters:
        InstanceId:
          - '{{InstanceIdIn}}'
        AddImageName:
          - UpdateAfter
    outputs:
      - Name: ExecutionId
        Selector: $.AutomationExecutionId
        Type: String
    nextStep: AwaitExecutionCreateImageUpdateAfter
  - name: AwaitExecutionCreateImageUpdateAfter
    action: 'aws:waitForAwsResourceProperty'
    timeoutSeconds: 3600
    onFailure: 'step:PublishSNSNotificationFailure'
    inputs:
      Service: ssm
      Api: GetAutomationExecution
      PropertySelector: $.AutomationExecution.AutomationExecutionStatus
      DesiredValues:
        - Success
      AutomationExecutionId: '{{ CreateImageUpdateAfter.ExecutionId }}'
    nextStep: PublishSNSNotificationSuccess
  - name: PublishSNSNotificationSuccess
    action: 'aws:executeAwsApi'
    inputs:
      Service: sns
      Api: Publish
      TopicArn: '{{NotificationArn}}'
      Message: 'インスタンスID: {{InstanceIdIn}} の処理が成功しました。'
    isEnd: true
  - name: PublishSNSNotificationFailure
    action: 'aws:executeAwsApi'
    inputs:
      Service: sns
      Api: Publish
      TopicArn: '{{NotificationArn}}'
      Message: 'インスタンスID: {{InstanceIdIn}}の処理が失敗しました。'
    isEnd: true
1-3. MY-CreateImage
- WindwosUpdate対象のインスタンスに対して、AMIを取得する処理が定義されたドキュメントです。
- 「My-AutomationProcess」より、WindowsUpdateの前後でAMIが取得されるよう実行されます。
- 「インスタンスID」+「_ 」+「UpdateBefore/UpdateAfter」+「_ 」+「オートメーション実行ID」の規則でAMIが作成されます。
ドキュメントを見るにはここをクリック
description: Creates a new Amazon Machine Image (AMI) from an Amazon EC2 instance
schemaVersion: '0.3'
parameters:
  InstanceId:
    type: String
    description: (Required) The ID of the Amazon EC2 instance.
  NoReboot:
    type: Boolean
    default: false
    description: (Optional) Do not reboot the instance before creating the image.
  AutomationAssumeRole:
    type: String
    default: ''
    description: >-
      (Optional) The ARN of the role that allows Automation to perform the
      actions on your behalf.
  AddImageName:
    type: String
    default: ''
    description: (Optional) Character string assigned to AMI name.
  NotificationArn:
    type: String
    default: '{{ssm:NotificationArn}}'
mainSteps:
  - name: createImage
    action: 'aws:createImage'
    onFailure: 'step:PublishSNSNotificationFailure'
    inputs:
      InstanceId: '{{ InstanceId }}'
      ImageName: '{{ InstanceId }}_{{AddImageName}}_{{automation:EXECUTION_ID}}'
      NoReboot: '{{ NoReboot }}'
    isEnd: true
  - name: PublishSNSNotificationFailure
    action: 'aws:executeAwsApi'
    inputs:
      Service: sns
      Api: Publish
      TopicArn: '{{NotificationArn}}'
      Message: 'インスタンスID: {{InstanceId}}の{{AddImageName}}_AMI取得処理が失敗しました。'
    isEnd: true
1-4. MY-WindowsUpdate
- WindowsUpdate対象のインスタンスについて、Updateする処理が定義されたドキュメントです。
ドキュメントを見るにはここをクリック
description: 'You can create a [link to another webpage](https://aws.amazon.com/ ).'
schemaVersion: '0.3'
parameters:
  InstanceId:
    type: String
  SeverityLevels:
    type: String
  NotificationArn:
    type: String
    default: '{{ssm:NotificationArn}}'
mainSteps:
  - name: runWindowsUpdate
    action: 'aws:runCommand'
    maxAttempts: 1
    timeoutSeconds: 3600
    onFailure: 'step:PublishSNSNotificationFailure'
    inputs:
      DocumentName: AWS-InstallWindowsUpdates
      InstanceIds:
        - '{{InstanceId}}'
      Parameters:
        Action: Install
        AllowReboot: 'True'
        SeverityLevels: '{{SeverityLevels}}'
    isEnd: true
  - name: PublishSNSNotificationFailure
    action: 'aws:executeAwsApi'
    inputs:
      Service: sns
      Api: Publish
      TopicArn: '{{NotificationArn}}'
      Message: 'インスタンスID: {{InstanceId}}のWindowsUpdate処理が失敗しました。'
    isEnd: true
1-5.時間のかかる処理で待機するアクションについて
時間のかかる処理の後に続けて処理を行う場合、以下のアクションを使用することで処理完了まで待機させ、次の処理を実行させるという実装が可能になります。
aws:waitForAwsResourceProperty – AWS リソースプロパティで待機する
上記アクションより、GetAutomationExecution API を呼び出し、ステータスが Success になるまで待機させるという記述になります。「1-2. MY-AutomationProcess」のドキュメント内で具体的な記述が確認できます。
2.オートメーションのドキュメント作成
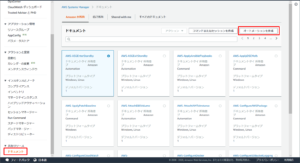
「1.」に記載したオートメーションドキュメントを作成します。Systems Managerのサービスより「ドキュメント」の「オートメーションを作成」を選択します。
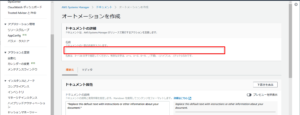
以下のような画面が表示されるのでドキュメントの名前を入力します。「1.」の項目名でそれぞれ入力します。
 オートメーションのドキュメント作成方法としては、ドキュメントビルダーでステップ単位で処理を選択・入力する方法と、直接エディタでJSON形式、YAML形式で書く方法の2パターンあります。
ドキュメントビルダーを使用したオートメーションドキュメントの作成
「構築元」、「エディタ」のタブがあり「構築元」がドキュメントビルダーの画面(デフォルトで選択)、「エディタ」がJSON形式、YAML形式で直接記述する画面になります。
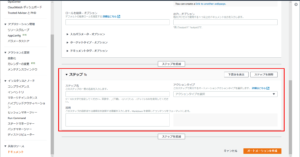
以下、ドキュメントビルダーの入力画面です。「ステップを追加」を選択することでオートメーションで実行するアクションを追加することができます。
 当初はドキュメントビルダーを使用してオートメーションのドキュメントの作成を考えていましたが、残念なことに今回のような複雑なオートメーションを実現させる場合は、ドキュメントビルダーでの作成はなかなか難しく断念し、直接エディタで編集することにしました。
以下、JSON形式、YAML形式でドキュメントの内容を書くエディタの画面です。「編集」を選択し「1.」のドキュメントをそのまま貼り付けて「オートメーションの作成」を選択します。

エディタで編集する場合、「オートメーションを作成」でドキュメントを一旦保存しないとドキュメントビルダーが選択できなくなる為、その点注意が必要です。更新(新しいバージョンを作成)すれば、再度ドキュメントビルダー、エディタを選択することができます。(ドキュメントはバージョン管理される仕様のようで、更新する場合必ずバージョンが+1されます)
3.オートメーションの実行に必要なIAMロール
今回WindowsのEC2インスタンスに対してオートメーションを実行する場合、必要なIAMロールをアタッチする必要があります。以下をもとにIAMロールを作成します
IAMロールには以下のポリシーをアタッチする必要があります。作成したIAMロールは対象のEC2にアタッチします。
※すでにEC2に何らかのIAMロールがアタッチされている場合は、以下のポリシーをIAMロールに含めてください。
- AmazonSSMManagedInstanceCore
- AmazonSSMAutomationRole
IAMロールの信頼関係は以下のように設定する必要があります。
{
  "Version": "2012-10-17",
  "Statement": [
    {
      "Effect": "Allow",
      "Principal": {
        "Service": [
          "ec2.amazonaws.com",
          "ssm.amazonaws.com"
        ]
      },
      "Action": "sts:AssumeRole"
    }
  ]
}
4.カスタムオートメーションドキュメントで使用するパラメータ
今回のオートメーションではパラメータストアに設定した値を参照して実行するようなドキュメントになっています。パラメータストアに値を持つことでドキュメントを直接更新せず、オートメーションの通知先などを変更することができます。
Automationで使用するパラメータストアの設定
| 名前(KEY) | 値(VALUE) | 種類 | 備考 |
| EC2UpdateTag | WinUpdate | String | WindowsUpdate対象のEC2に付与するタグです。 Key: WinUpdate 、Value:ONを設定することでAutomationの対象になります。 |
| NotificationArn | arn:aws:sns:xxxxxxxxxxxxxxxxxxxx | String | SNSトピックのARNを設定します。SNSトピックに設定されたメールアドレスに対してAutomationの承認通知が送信されます。 |
| Approvers | arn:aws:iam:xxxxxxxxxxxxxxxxxxxx | String | Automationの承認通知を受けるIAMユーザのARNを設定します。 |
※SNSトピック、IAMユーザは事前に作成しておく必要があります。
5.オートメーションの実行
作成したドキュメントをもとに、オートメーションを実行します。「自動化」の「オートメーションの実行」を選択します。
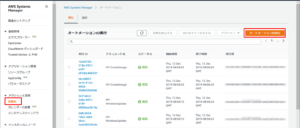
「自己所有」のドキュメントより「MY-AutomationStart」を選択し、「次へ」を選択します。 ドキュメントバージョンはデフォルトのままで構いません。

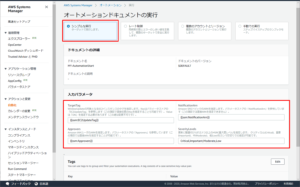
「シンプルな実行」を選択し、「実行」を選択します。 入力パラメータはパラメータストアより取得するよう変数がデフォルトで入力されているため、特に変更する必要はありません。 「SeverityLevels」については、Windows Updateの重要度に応じて変更可能です。

「MY-AutomationStart」のオートメーションが実行され、「Approve」ステップ(承認メール)のステータスが「待機中」になります。 SNSに設定したメールアドレスへ承認メールが送られます。
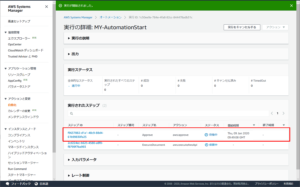
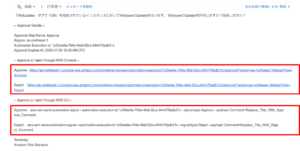
AWS ConsoleまたはAWS CLIより承認/拒否するためのURL、CLIコマンドが承認メールとして送られてきます。
- AWS Consoleの場合、URLよりAWS Consoleの画面に遷移し、承認/拒否を選択することができます。(Approve/RejectのURLが送付されてきますが、URLを選択した時点で承認/拒否の処理は実行されるわけではありません)
- AWS CLIの場合、CLIがインストールされたコンソールよりコマンドを実行することで承認/拒否の処理が実行されます。
ここではAWS Consoleでの承認/拒否の手順を説明します。
URLを選択すると承認/拒否の画面に遷移します。 決定事項の「承認」を選択、「送信」を選択します。
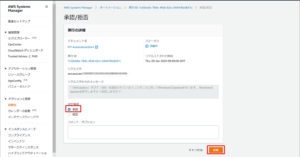
「待機中」だったステップのステータスが「成功」になります。
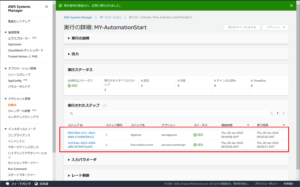
「MY-AutomationStart」のオートメーションより、他のオートメーション処理が実行されるつくりになっている為、 オートメーションの画面を確認するとステータスが「進行中」になっている他のオートメーション処理も確認できます。 他のオートメーション処理というのは、AMIの取得、WindowsUpdateなどの処理になります。
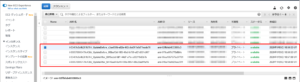
「進行中」だったステータスがすべて「成功」になればオートメーションの実行は完了です。
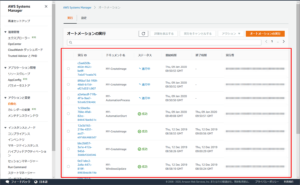
WindowsUpdate前後のAMIが取得されていることが確認できます。 WindowsUpdate前後の判断はAMI名の「UpdateBefore/UpdateAftre」で可能です。
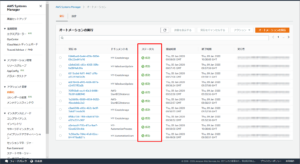
WindowsUpdateをする際、対象インスタンスを起動する必要があるため起動中になります。 残念ながら停止中だったインスタンスを覚えていて停止するような処理になっていない為、必要があれば手動で停止させる必要があります。

対象のインスタンス毎に処理が完了した旨メールで通知されます。
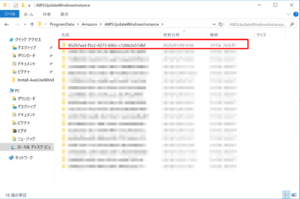
 WindowsUpdate有無を確認します。オートメーションでWindowsUpdateを実行した場合、WindowUpdate画面の最終更新日時が更新されないため、以下のログを確認します。
※AWSサポートに問い合わせた結果、上記は想定通りの動きとのことでした。再起動を伴う更新の場合、最終更新日が更新されるようです。
C:\ProgramData\Amazon\AWSUpdateWindowsInstance<コマンド ID>\Install-AwsUwiWindowsUpdates.log
※コマンド ID は、マネジメントコンソールより確認できます。
 更新が無い場合は、以下のような出力になります。
| 01/09/2020 09:56:40 UTC | Info | Searching for Windows Updates. 01/09/2020 09:56:42 UTC | Info | Found 0 available Windows Updates. |
更新がある場合は、以下のような出力になります。
| 01/09/2020 09:56:40 UTC | Info | Searching for Windows Updates. 01/09/2020 09:56:42 UTC | Info | Found 4 available Windows Updates. |
参考リンク
Systems Manager Automation アクションのリファレンス
Systems Manager Automation ドキュメントの詳細リファレンス
AWS Systems Manager API Reference
最後に
今回初めてオートメーションを使用してみました。公式ドキュメントを読んでAPIを理解するのは骨が折れますが、他サービスのテンプレートなどと同様に一度作成すれば何度でも流用可能です。また、上記参考リンクのAPIを参考にすることで、さらに複雑なことをオートメーションで実装できるかと思います。処理順を守らなければならないオートメーションの実装が必要で方法がなかなか見つからない場合、記載したドキュメントを参考にして頂ければ幸いです。