

今回の検証内容
今回は動的ルーティング(BGP)でVPNする方法を検証します。
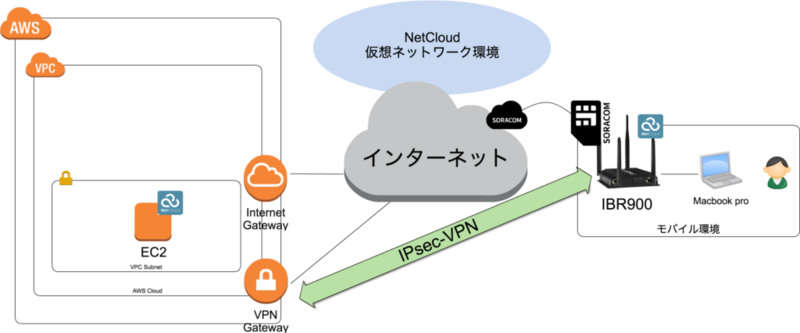
前回と同じく、下記の構成で検証しました。
構築手順
以下に構築手順を記載します。
前提条件
- AWSで基本的な構成(VPC,Subnet,ec2等)は作成済み
- IBR900のNetCloud OSのバージョンは、6.4.0(2017-08-03)
AWS側の設定
まず、AWS側でVPN設定をします。
カスタマーゲートウェイの作成
[AWSマネージメントコンソール] VPC > 仮想プライベートゲートウェイ > 仮想プライベートゲートウェイの作成
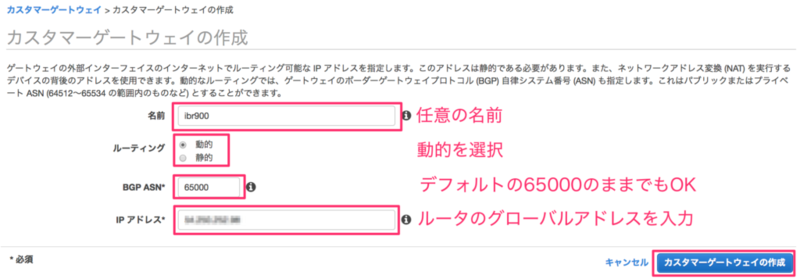
上記画像のような設定を入れてください。
今回はルーティングで動的を選びます。
仮想プライベートゲートウェイの作成
[AWSマネージメントコンソール] VPC > 仮想プライベートゲートウェイ > 仮想プライベートゲートウェイの作成
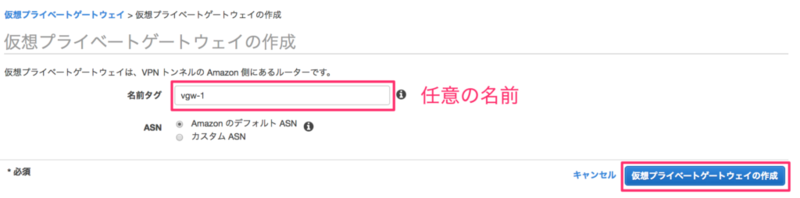
上記画像のように適当な名前を入れるだけですね。
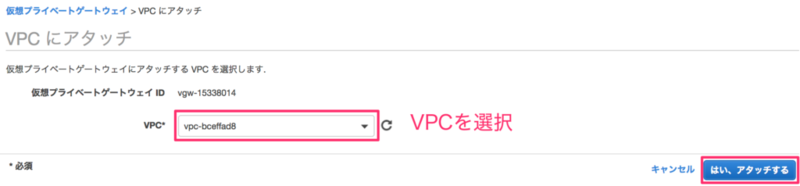
仮想プライベートゲートウェイをVPCにアタッチ
上記で作成したVGWをVPCにアタッチします。
[AWSマネージメントコンソール] VPC > カスタマーゲートウェイ > 仮想プライベートゲートウェイのアタッチ
VPN接続の作成
[AWSマネージメントコンソール] VPC > VPN接続 > VPN接続の作成
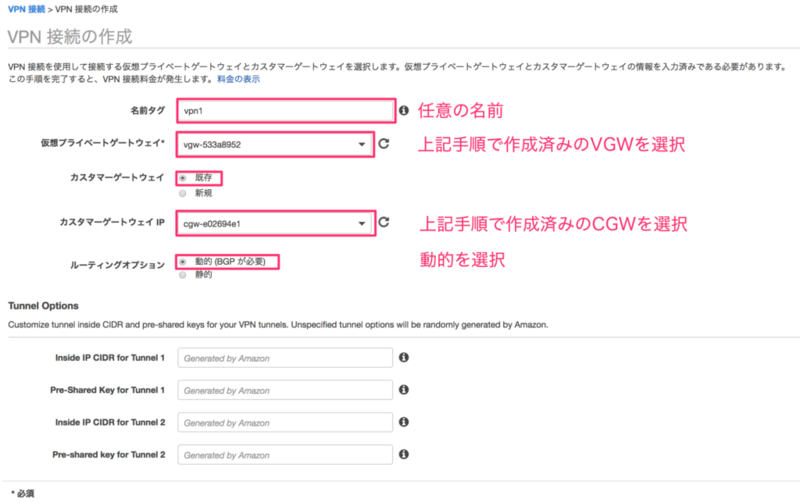
上記画像のような設定を入れてください。
ルーティングオプションで、「動的(BGPが必要)」を選びます。
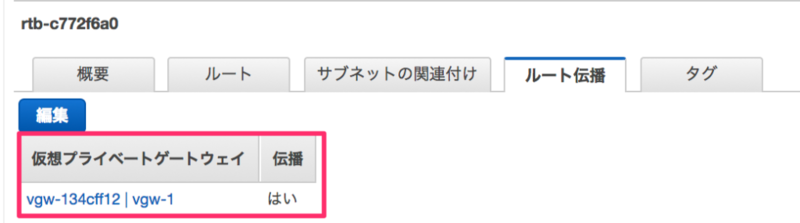
ルート伝播
EC2マシンがあるサブネットで使用しているルートテーブルを編集して、VGWからルート伝播されるようにしてください。
これによってVGWがBGP経由で取得したルート情報をこのサブネットにも伝播します。
今回の例でいうと、ルーターから広報されるPrefix宛の通信がVGWに向きます。
[AWSマネージメントコンソール] > VPC > ルートテーブル
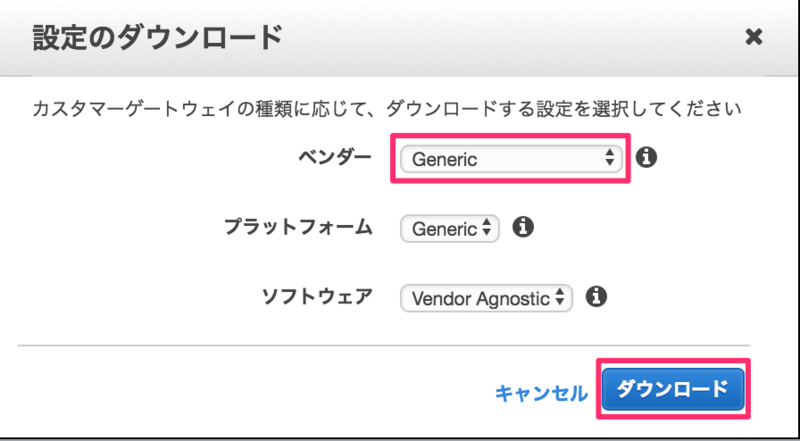
VPN接続の設定をダウンロード
作成したVPN接続を選択し、設定のダウンロードをクリックしてください。
ベンダーの項目にCheckpointとかCiscoとか出てきますが、Cradlepointは無いので、Genericを選びます。
テキスト形式の設定ファイルがダウンロードできます。
[AWSマネージメントコンソール] VPC > VPN接続
このファイルを参照しつつ、Cradlepointルータを設定します。
長々と英語で書いてあるのですが、必要なパラメータを抜粋します。
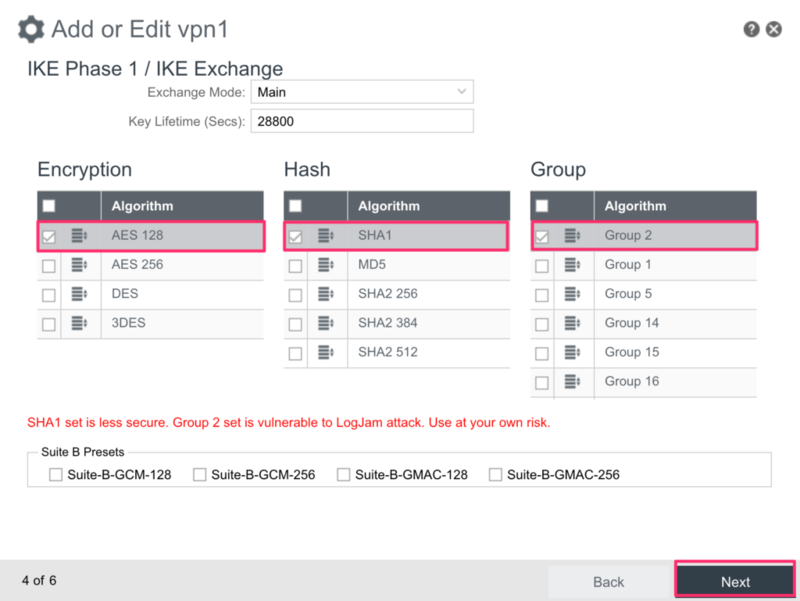
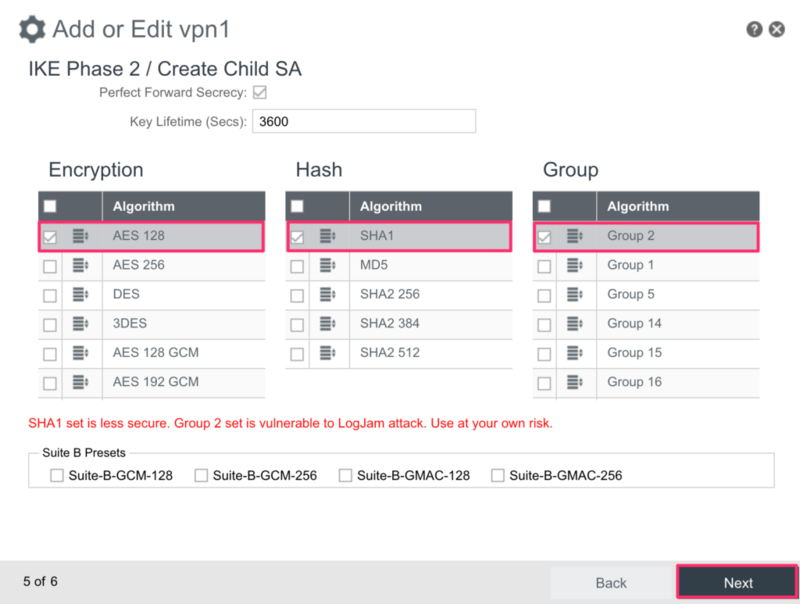
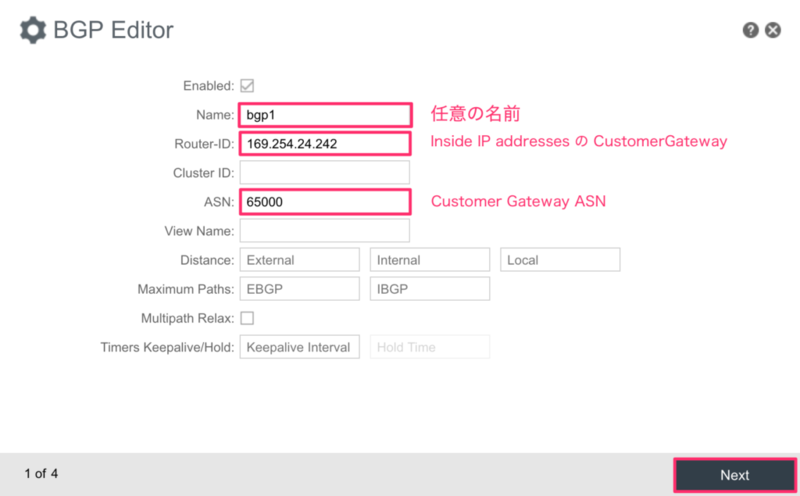
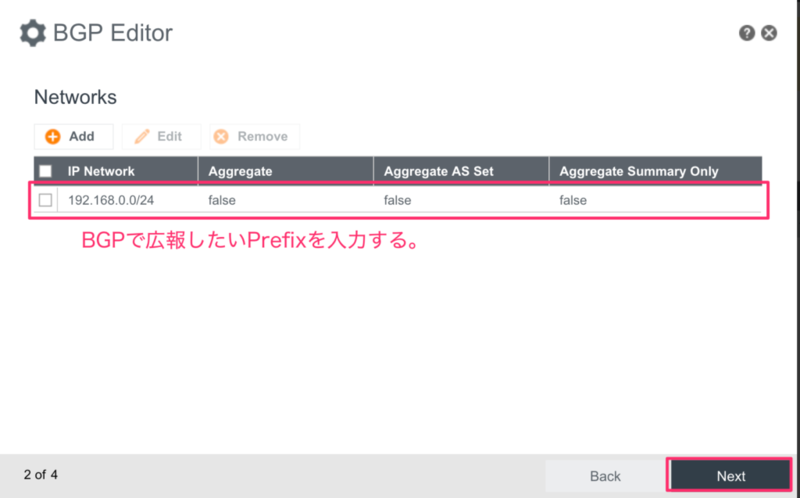
IPSec Tunnel #1
================================================================================
#1: Internet Key Exchange Configuration
– IKE version : IKEv1
– Authentication Method : Pre-Shared Key
– Pre-Shared Key : xxxxxxxxxxxxxxxxxxxxxxxxxx
– Authentication Algorithm : sha1
– Encryption Algorithm : aes-128-cbc
– Lifetime : 28800 seconds
– Phase 1 Negotiation Mode : main
– Diffie-Hellman : Group 2

#2: IPSec Configuration

– Protocol : esp
– Authentication Algorithm : hmac-sha1-96
– Encryption Algorithm : aes-128-cbc
– Lifetime : 3600 seconds
– Mode : tunnel
– Perfect Forward Secrecy : Diffie-Hellman Group 2

#3: Tunnel Interface Configuration

Outside IP Addresses:
– Customer Gateway : xx.xx.xx.xx
– Virtual Private Gateway : yy.yy.yy.yy

Inside IP Addresses
– Customer Gateway : 169.254.24.242/30
– Virtual Private Gateway : 169.254.24.241/30

#4: Border Gateway Protocol (BGP) Configuration:

BGP Configuration Options:
– Customer Gateway ASN : 65000
– Virtual Private Gateway ASN : 10124
– Neighbor IP Address : 169.254.24.241
ライセンスの有効化
実はIBR900でBGPを使うにはPrime LicenseまたはEnterprise Licenseを有効化する必要があります。
各ライセンスの比較はこちらに記載があります。
また、ライセンス設定はルーターではなく、NCM(NetCloud Manager)で行います。
[NCM GUI] APPLICATIONS

今回は左上のNetCloud Manager(NCM) Enterpriseで「Try」というボタンを押したところ、「Buy Enterprise」と変化し、EnterpriseライセンスのTrialが開始できました。
なお、ライセンスを有効化した後、ルーターの再起動が必要です。
ライセンスが有効化されていないルーターはNCMで下記のような表示が出ます。

IBR900側の設定
VPN設定
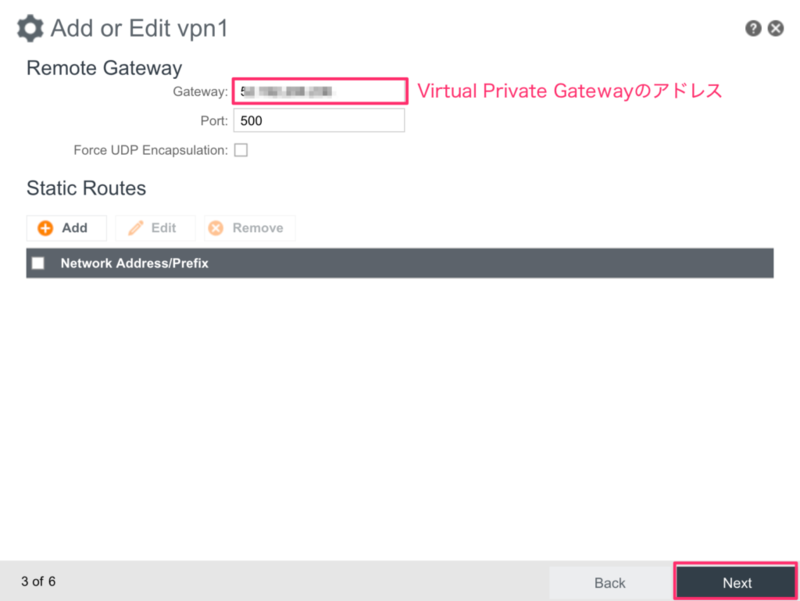
IPアドレスや暗号設定などは、上記でダウンロードした設定ファイルに従い、設定します。
[IBR900 GUI] NETWORKING -> Tunnels -> IPsec VPN
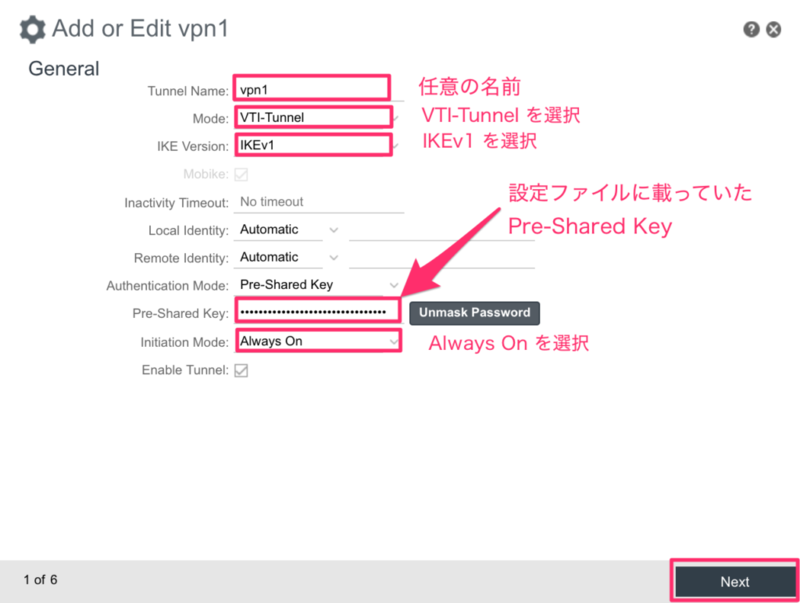
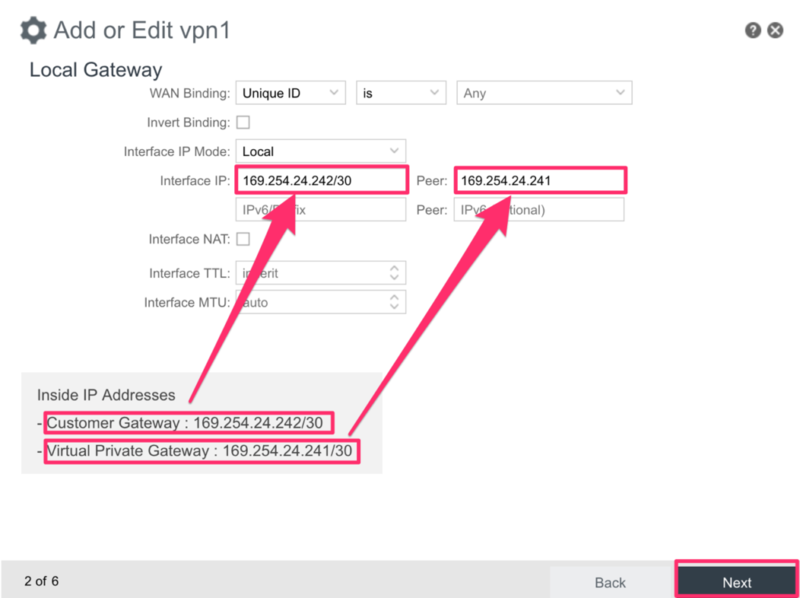
上記のように設定ファイルのInside IP Addressesを参照し、入力してください。
上記まで設定できると次のような画面になります。

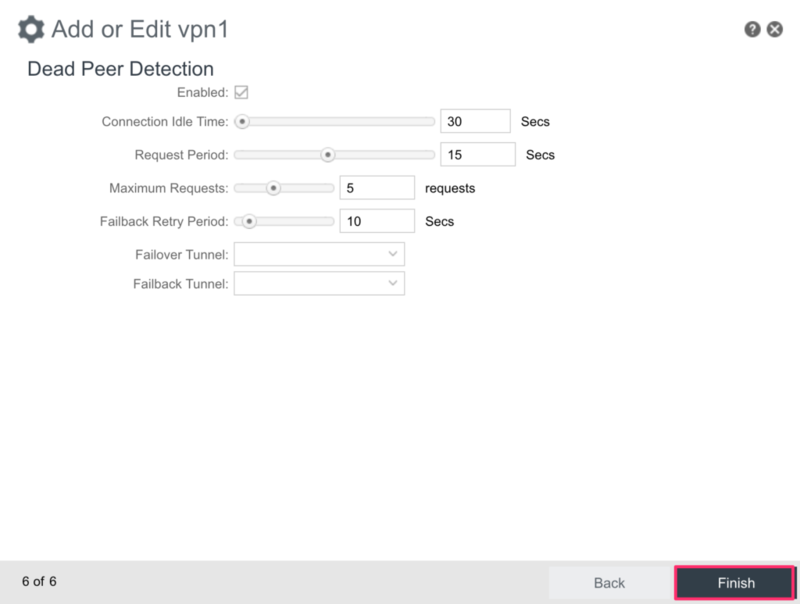
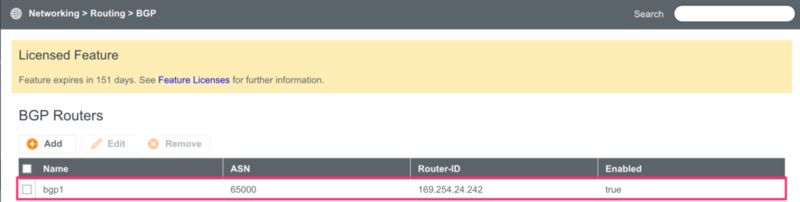
BGP設定
[IBR900 GUI] NETWORKING > Routing > BGP

上手く設定できると下記のような画面になります。
Firewall Zoneの追加
Firewall Zoneを追加します。
[IBR900 GUI] SECURITY > Zone Firewall > Zone Definition

Firewall
下記のように設定します。
これでVPN経由の双方向通信を全て許可することになります。
[IBR900 GUI] SECURITY > Zone Firewall > Zone Forwarding
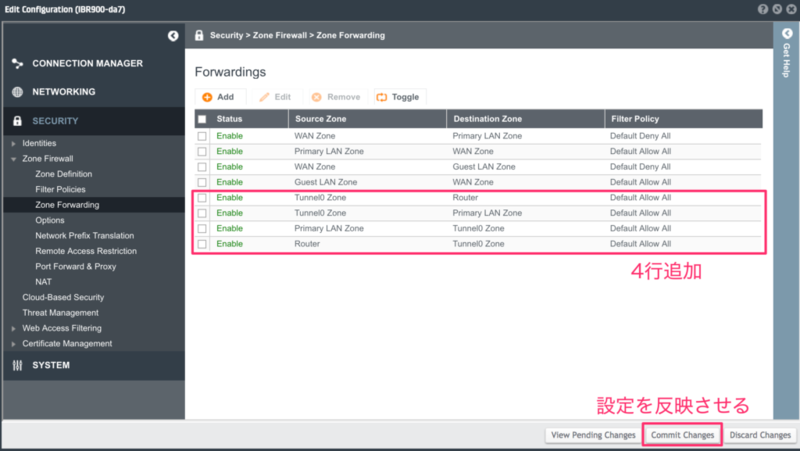
なお、NCM経由でルーターにログインしている場合、設定変更を反映させるためには「Commit Changes」が必要です。
参考ページ
NCOS: Virtual Tunnel Interface (VTI) IPSec VPN
まとめ
Cradlepoint社のルーターも動的ルーティング(BGP)でAWSとVPNできることが確認できました。
Cradlepoint社のルーターはAmazon でテスト済みのカスタマーゲートウェイデバイス に含まれません。
そのようなルーターでも今回のような手順でTryしてみれば上手くいく可能性が高そうです。
参考にしていただければ幸いです。
おまけ
Cradlepoint社ルーターは基本的にGUI設定のみで設定可能ですが、sshでログインし、CLI操作することもできます。
例えば、下記のようにBGPのステータスを取得できます。
GUIだけだとDebugが難しい時は使ってみるといいかもしれません。
[admin@IBR900-da7: /]$ bgp show ip bgp

BGP table version is 0, local router ID is 169.254.24.242
Status codes: s suppressed, d damped, h history, * valid, > best, = multipath,
i internal, r RIB-failure, S Stale, R Removed
Origin codes: i - IGP, e - EGP, ? - incomplete

Network Next Hop Metric LocPrf Weight Path
*> 10.10.0.0/16 169.254.24.241 100 0 10124 i
*> 192.168.0.0 0.0.0.0 0 32768 i

Total number of prefixes 2
[admin@IBR900-da7: /]$ bgp show ip bgp neighbors

BGP neighbor is 169.254.24.241, remote AS 10124, local AS 65000, external link
BGP version 4, remote router ID 169.254.24.241
BGP state = Established, up for 00:31:27
Last read 00:00:06, hold time is 30, keepalive interval is 10 seconds
Neighbor capabilities:
4 Byte AS: advertised and received
Route refresh: advertised and received(old & new)
Address family IPv4 Unicast: advertised and received
Graceful Restart Capabilty: advertised
Message statistics:
Inq depth is 0
Outq depth is 0
Sent Rcvd
Opens: 1 1
Notifications: 0 0
Updates: 1 3
Keepalives: 190 189
Route Refresh: 0 0
Capability: 0 0
Total: 192 193
Minimum time between advertisement runs is 30 seconds

For address family: IPv4 Unicast
Community attribute sent to this neighbor(both)
1 accepted prefixes

Connections established 1; dropped 0
Last reset never
Local host: 169.254.24.242, Local port: 40475
Foreign host: 169.254.24.241, Foreign port: 179
Nexthop: 169.254.24.242
Nexthop global: ::
Nexthop local: ::
BGP connection: non shared network
Read thread: on Write thread: off
渡辺 信秀(記事一覧)
2017年入社 / 地味な内容を丁寧に書きたい