Hello,
I'm Akihiro, work for the Customer Support Division.
In this year, as a Serverworks' Zabbix specialist, I would like to share my knowledge of Zabbix both in Japanese and English, and hopefully end up with making a presentation at Zabbix Conference held in Latvia.
I got the Zabbix compatible sensor kit introduced by Kodai of Zabbix Japan which is not on sale right now.
"IoT" might remind you as AWS IoT, but today as Zabbix, handling sensor data.
In this article, I introduce the procedure to collect environment data of network equipment using this sensor kit with Zabbix.
Zabbix can collect information on network equipment and server hardware by SNMP and IPMI,
By using it, I will be able to gather inside and outside data and know what is going on to the equipment.
Hardware list
Controller
This supports SNMPv1 and Zabbix (active) agent. It uses USB miniB terminal as power supplied and connects a network cable and a sensor cable.
Sensor
FLS-THP Temperature, humidity, barometric pressure sensor
 This sensor collects temperature, humidity and barometric pressure data.
Controller and sensor connect with UTP cable of category 5 (or higher), power supplied.
Since the communication protocol is not TCP / IP, it is not possible to interpose a switch or hub between two.
FLS-T15 Temperature Sensor 1.5m Cable
The tip of this UTP cable is a temperature sensor. You can measure the temperature of the narrow place or near rack-mount server.
Setting of the beginning
IP Settings
Set a IP address of the controller. The Default IP of the controller is set to 192.168.1.100/24.
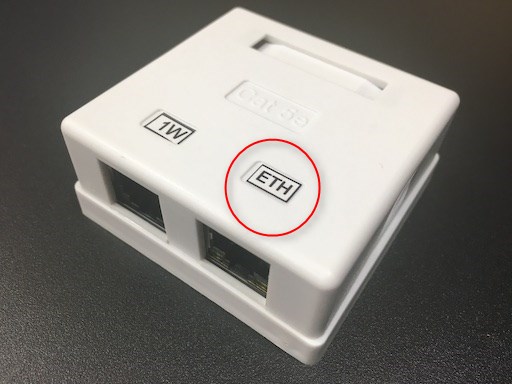
Set the work computer to 192.168.1.x/ 24 and connect it to the port labeled [ETH].
Accessing http://192.168.1.100 by browser , you see startup screen, shown below.
Go to http://192.168.1.100/unlock1234. This will unlock access to the configuration screen.
After unlocking, Access http://192.168.1.100:8080 and make the setting.
Set a static local IP address in [IP Settings], or check [DHCP Enable] in [Network Options] to activate DHCP option.
Zabbix Agent Settings
 In [Active Agent Settings], check [Active Agent Enabled] and enter Zabbix Server information to connect. Also set [Host Name] for Zabbix Agent.
Sensor Connecting
Connect the sensor to the port labeled [ 1W ] on the controller. When connecting multiple sensors, use distribution connector to cascade connection.
Sensor Settings
After connecting the sensor, you will enter the controller management screen in the same way as when setting the IP address.
Select [Senser Config].
Copy the 16-digit sensor ID of [New SN].
sensor ID Example [421125170122151C]
Paste the copied sensor ID to [Stored SN] and save it with [Submit].
Confirm sensor
When the sensor setting is completed, check the TOP screen of the controller.
The value of registered sensor will be displayed.
Registering with Zabbix
I assume that you have already built Zabbix.
For instructions on building Zabbix, please refer to this manual.
Host Settings
Since the sensor kit runs as a Zabbix agent, you need to register host IP address in [Agent Interface].
Item Settings
Register an agent type as "Zabbix agent (active)".
The item keys of each sensor are as follows;
| Sensor Type | Item Key | Type of information |
|---|---|---|
| Temperature sensor | temp.N | Numeric(float) |
| Humidity sensor | hum.N | Numeric(float) |
| Atmospheric pressure sensor | press.N | Numeric(float) |
| Contact sensor (A connector ON / OFF status) | in.a.N | Numeric(unsigned) |
| Contact sensor (A connector ON count) | cnt.a.N | Numeric(unsigned) |
| Contact sensor (B connector ON / OFF status) | in.b.N | Numeric(unsigned) |
| Contact sensor (B connector ON count) | cnt.b.N | Numeric(unsigned) |
(N = corresponding to 01, 02 ... 08 of the [Stored SN] of the controller)
Confirm Sensor Data
When registration of the item is completed, sensor data is collected by Zabbix.
And More
Since this sensor unit is wired connection, it is not suitable for applications where it is arranged in large quantity by wireless connection.
However, when acquiring environmental data near IT equipment such as network rack, it is worth to use.
Next time, I would like to introduce a way to combine with collected data and AWS IoT with grafana.


