

こんにちは。「Cygwinなんか捨ててMacに来いよ」とカウンター勧誘された竹永です。
フルスペックMac Proがホシイナァー(棒読み)
せっかくCygwinにs3cmdをインストールしたので、今度はOctopressもガガッとインストールしてS3にブログを作ってみましょう。
前提条件
- s3cmdがインストールされている
- Gitがインストールされている
- Ruby 1.9.3がインストールされている
- bundlerがインストールされている
- Web Hostingが有効になっているS3 Bucketがある
S3 BucketのWeb Hostingを有効にする方法は、過去に素晴らしい記事が投稿されているので、ぜひ参考にしてください。
ちなみに、rbenvでRubyのインストールが出来ないなぁ…という時は、コマンドの頭に
LANG=C
をつけるとインストールできるかもしれません。
さっそくインストール
Octopress公式のリポジトリから、Octopress本体を持ってきます。
$ git clone https://github.com/imathis/octopress.git
Cloning into 'octopress'...
remote: Reusing existing pack: 10339, done.
remote: Counting objects: 33, done.
remote: Compressing objects: 100% (33/33), done.
remote: Total 10372 (delta 12), reused 2 (delta 0)
Receiving objects: 100% (10372/10372), 2.74 MiB | 306 KiB/s, done.
Resolving deltas: 100% (4959/4959), done.
Octopressの動作に必要なGemをBundlerでインストールします。
$ cd octopress
$ bundle install
Using rake (0.9.2.2)
Using RedCloth (4.2.9)
Using chunky_png (1.2.5)
Using fast-stemmer (1.0.1)
Using classifier (1.3.3)
Using fssm (0.2.9)
Using sass (3.2.9)
Using compass (0.12.2)
Using directory_watcher (1.4.1)
Using haml (3.1.7)
Using kramdown (0.13.8)
Using liquid (2.3.0)
Using syntax (1.0.0)
Using maruku (0.6.1)
Using posix-spawn (0.3.6)
Using yajl-ruby (1.1.0)
Using pygments.rb (0.3.4)
Using jekyll (0.12.0)
Using rack (1.5.2)
Using rack-protection (1.5.0)
Using rb-fsevent (0.9.1)
Using rdiscount (2.0.7.3)
Using rubypants (0.2.0)
Using sass-globbing (1.0.0)
Using tilt (1.3.7)
Using sinatra (1.4.2)
Using stringex (1.4.0)
Using bundler (1.5.3)
Your bundle is complete!
Use `bundle show [gemname]` to see where a bundled gem is installed.
次にCygwinで動くようにコードを少し手直しします。
Rakefileの31行目あたりにある下記のコードを…
if (/cygwin|mswin|mingw|bccwin|wince|emx/ =~ RUBY_PLATFORM) != nil
  puts '## Set the codepage to 65001 for Windows machines'
  `chcp 65001`
end
このように書き直します。
if (/cygwin|mswin|mingw|bccwin|wince|emx/ =~ RUBY_PLATFORM) != nil
  puts '## Set the codepage to 65001 for Windows machines'
  `chcp.com 65001`  # ←← chcpの後ろに".com"を足すだけ!!
end
環境によっては修正しなくてもインストールできますが、初期状態に近いCygwinだとダメだったので修正しました。
あとは、初期テーマをインストールして完了です。
$ rake install
## Set the codepage to 65001 for Windows machines
## Copying classic theme into ./source and ./sass
mkdir -p source
cp -r .themes/classic/source/. source
mkdir -p sass
cp -r .themes/classic/sass/. sass
mkdir -p source/_posts
mkdir -p public
S3にアップロードできるようにする
またもやコードの修正と追加です。Rakefileにいろいろコードを追加します。
まずは12行目あたりにあるコードを以下のように書き換えます。
deploy_default = "rsync"
↓
deploy_default = "s3"
次に、先ほど書き換えた行のあとに、下記のコードを追加します。
## -- S3 Deploy config -- ##
s3_bucket  = "hogehoge"  # アップロード先のBucket名
s3_delete  = true# 削除済みのファイルをS3から削除する場合はtrue
s3_reduced = false   # Reduced Redundancy Storageを使用する場合はtrue
最後に、270行あたりのところにある
desc "Update configurations to support publishing to root or sub directory"
の上の空いているところに下記のコードを追加します。
desc "Deploy website to Amazon S3"
task :s3 do
  puts "## Deploying website via s3cmd"
  exclude = ""
  if File.exists?('./s3-exclude')
exclude = "--exclude-from '#{File.expand_path('./s3-exclude')}'"
  end
  ok_failed system("s3cmd sync --no-preserve --guess-mime-type --no-mime-magic #{exclude} #{'--delete-removed' if s3_delete == true} #{'--reduced-redundancy' if s3_reduced == true} #{public_dir}/* s3://#{s3_bucket}/")
end
これでコードの追加が終わったので、ブログ記事をS3にアップロードできます。
記事を書いてデプロイ!
rake new_post["タイトル(半角英数字)"]で記事の追加ができます。
$ rake new_post["hoge fuga hungaaa"]
## Set the codepage to 65001 for Windows machines
mkdir -p source/_posts
Creating new post: source/_posts/2014-02-28-hoge-fuga-hungaaa.markdown
一番下の行に作成された記事ファイルへのパスが書いてありますので、これを編集して記事にします。
いい感じの記事ができたら早速デプロイしてみましょう。
rake gen_deployでブログ完成です。
$ rake gen_deploy
## Set the codepage to 65001 for Windows machines
## Generating Site with Jekyll
directory source/stylesheets/
   create source/stylesheets/screen.css
Configuration from /home/Administrator/octopress/_config.yml
Building site: source -> public
Successfully generated site: source -> public
## Deploying website via s3cmd
public/assets/jwplayer/glow/controlbar/background.png -> s3://hogehoge/assets/jwplayer/glow/controlbar/background.png  [1 of 61]
 141 of 141   100% in0s  1974.85 B/s  done
public/assets/jwplayer/glow/controlbar/blankButton.png -> s3://hogehoge/assets/jwplayer/glow/controlbar/blankButton.png  [2 of 61]
 82 of 82   100% in0s  1855.96 B/s  done
…
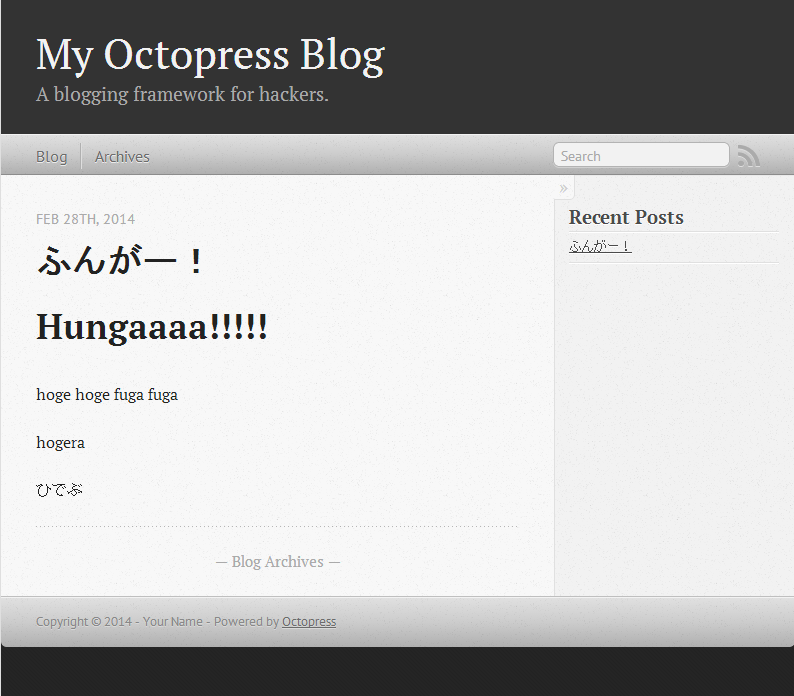
S3のページを見てみると、そこにはおされなブログが表示されます。
デフォルトテーマがおされって素晴らしい。
最後に
今回はOctopressのインストールと記事作成とデプロイしか行っていませんが、設定を変更して「ブログのタイトル」「作成者」「プロフィール」や、デザインの変更・編集を行うことができます。
カスタマイズし放題なので自分らしいブログを作ってみると楽しいと思います。
WindowsでもCygwinを使えば黒い画面だけでブログを作れるのはいいですね。