

サーバーワークスの村上です。
今年のNBAプレイオフは例年より盛り上がっている感があっていいですね。第8シードのチームが第1シードのチームを下したのは1994年以来らしいですよ。
我らが八村選手も1996年のマジック・ジョンソン以来、レイカーズで「プレイオフで2戦連続20点以上獲ったベンチプレイヤー」になりましたね。最高。
Rui's the first Laker with back-to-back 20-point playoff games off the bench since Magic Johnson (1996). pic.twitter.com/VSkIWr5tlG
— Los Angeles Lakers (@Lakers) 2023年4月20日
こんなときは、やはりONTAPのSnapMirrorで盛り上がりたいものです。
- このブログの概要と結論
- SnapMirrorとは
- SnapMirrorの使いどころ
- 環境構成
- SnapMirrorの設定方法
- SnapMirrorでレプリケーションされたことを確認する
このブログの概要と結論
- SnapMirrorとはDRやデータ移行の目的で利用されるデータレプリケーション機能
- このブログでは別リージョンにあるFSxどうしでSnapMirrorを設定
- デフォルトのSnapMirror Policyは
MirrorAndVaultなので、最新のファイルと日次および週次スナップショットがレプリケーションされる - SnapMirrorをスケジュール実行したいときはscheduleオプションを使おう
SnapMirrorとは
SnapMirrorとはDRやデータ移行の目的で利用されるデータレプリケーション機能です。
NetApp ONTAPの機能である重複排除や圧縮が効いた状態でレプリケーションされます。レプリケーションは非同期で実行されますが、後述するスケジュール機能で短いRPOを実現できます。
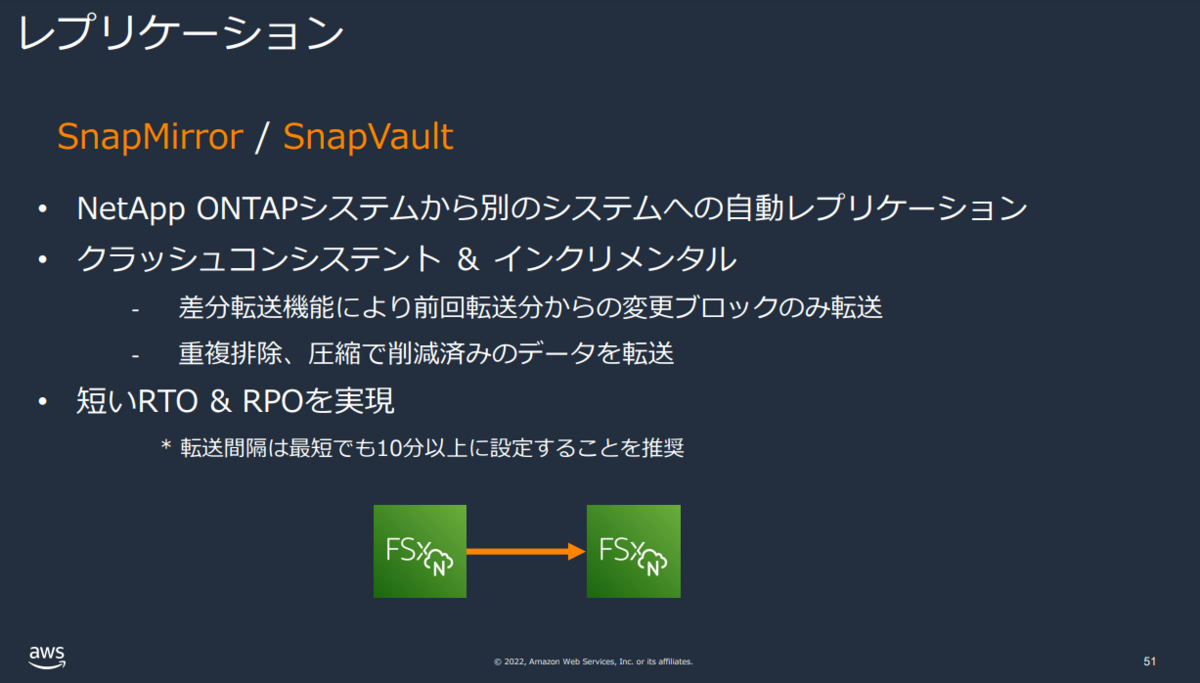
SnapMirrorの使いどころ
SnapMirrorのユースケースとして、オンプレミス環境のストレージからAmazon FSx for NetApp ONTAPへの移行が一番に挙げられるかと思います。
公式ドキュメントも移行を想定して記載されています。
また、Amazon FSx for NetApp ONTAP内のデータを、DR対策として別リージョンにレプリケーションする際にもSnapMirrorが必要になるかと考えます。
背景として、バックアップのクロスリージョンコピーが未サポートであるという点が挙げられます。以下は、AWS Backupの公式ドキュメントですが、FSx for ONTAPのCross-Region backupは未サポートとなっています(ブログ執筆時点)。
環境構成
このブログは以下の構成でSnapMirrorを検証してみました。
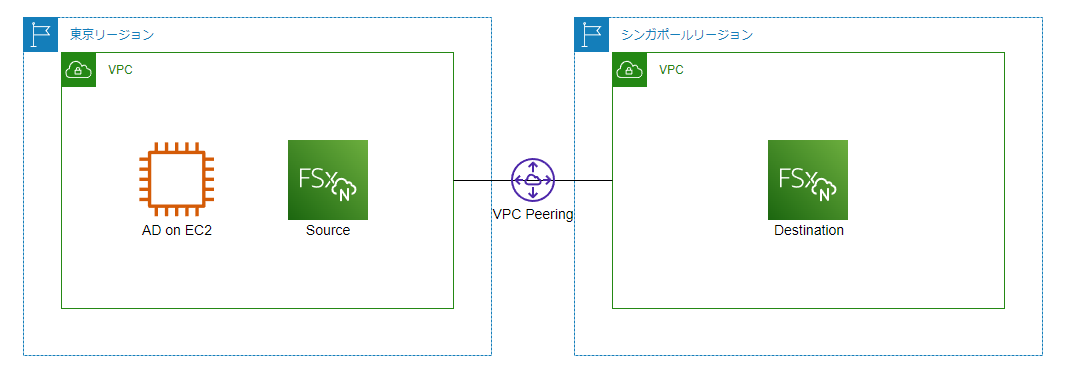
- 東京およびシンガポールリージョンにFSx for ONTAP作成
- どちらも東京リージョンにあるADに参加
- 東京リージョンにあるFSx for ONTAPからシンガポールリージョンにあるFSx for ONTAPへデータをレプリケーション
SnapMirrorの設定方法
ここから公式ドキュメントを参考にSnapMirrorを設定します。
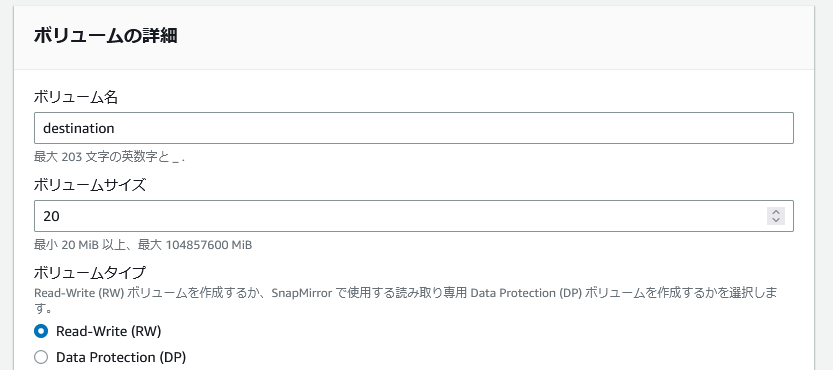
レプリケーション先のボリュームを作成する
レプリケーション先のボリュームは、ボリュームタイプがData Protection (DP)である必要があります。これはSnapMirror で使用する読み取り専用ボリュームです。
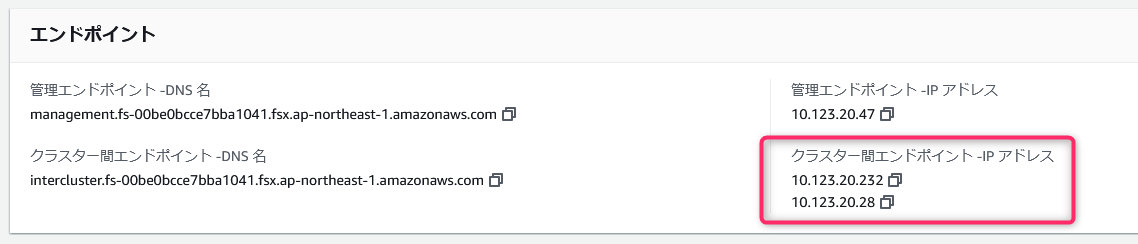
クラスター間エンドポイントのIPアドレスを確認する
続いて、クラスター間エンドポイントのIPアドレスを確認します。
ドキュメントのようにONTAP CLIを利用してもいいですが、レプリケーション元・レプリケーション先どちらもFSx for ONTAPなのでマネジメントコンソールからも確認可能です。
これをレプリケーション元・レプリケーション先両方で実施します。
ONTAP CLIで確認する場合は以下のようにnetwork interface showコマンドを実行します。
FsxId00be0bcce7bba1041::> network interface show -role intercluster
            Logical    Status     Network            Current       Current Is
Vserver     Interface  Admin/Oper Address/Mask       Node          Port    Home
----------- ---------- ---------- ------------------ ------------- ------- ----
FsxId00be0bcce7bba1041
            inter_1      up/up    10.123.20.232/24   FsxId00be0bcce7bba1041-01
                                                                   e0e     true
            inter_2      up/up    10.123.20.28/24    FsxId00be0bcce7bba1041-02
                                                                   e0e     true
私の環境の場合、クラスター間エンドポイントのIPアドレスは以下のとおりでした。
- 東京リージョン(レプリケーション元)のFSx for ONTAP
- 10.123.20.232
- 10.123.20.28
- シンガポールリージョン(レプリケーション先)のFSx for ONTAP
- 192.168.128.169
- 192.168.142.226
クラスターピアリングを確立する
さきほど調べたクラスター間エンドポイントのIPアドレスを使って、クラスターピアリングを設定します。
レプリケーション先のFSx for ONTAPでのピアリング設定
レプリケーション元のクラスター間エンドポイントのIPアドレスを指定し、cluster peer createコマンドを実行し、パスフレーズを設定します。
FsxId04340e39728bdc6d7::> cluster peer create -address-family ipv4 -peer-addrs 10.123.20.232 10.123.20.28

Notice: Use a generated passphrase or choose a passphrase of 8 or more characters. To ensure the authenticity of the
        peering relationship, use a phrase or sequence of characters that would be hard to guess.

Enter the passphrase:
Confirm the passphrase:

Notice: Now use the same passphrase in the "cluster peer create" command in the other cluster.
レプリケーション元のFSx for ONTAPでのピアリング設定
レプリケーション元でも同様のコマンドを実行します。さきほど設定したパスフレーズをこちらでも入力します。
FsxId00be0bcce7bba1041::> cluster peer create -address-family ipv4 -peer-addrs 192.168.128.169 192.168.142.226

Notice: Use a generated passphrase or choose a passphrase of 8 or more characters. To ensure the authenticity of the
        peering relationship, use a phrase or sequence of characters that would be hard to guess.

Enter the passphrase:
Confirm the passphrase:
ピアリングできたことを確認
cluster peer showコマンドでピアリング設定を確認します。以下のようにAvailableと表示されていれば、うまく設定できています。
FsxId00be0bcce7bba1041::> cluster peer show
Peer Cluster Name         Cluster Serial Number Availability   Authentication
------------------------- --------------------- -------------- --------------
FsxId04340e39728bdc6d7    1-80-000011           Available      ok
SVM ピアリング関係を作成する
クラスターでピアリングを作成した次は、SVMどうしでピアリングを設定します。
レプリケーション先のFSx for ONTAPでピアリングを設定
まず、レプリケーション先のFSxで、vserver peer createコマンドを実行します。
以下のように実行します。
vserver peer create -vserver レプリケーション先のSVM名 -peer-vserver レプリケーション元のSVM名 -peer-cluster レプリケーション元のFSxId -applications snapmirror -local-name レプリケーション元SVMの任意の名前
FsxId04340e39728bdc6d7::> vserver peer create -vserver destination -peer-vserver source -peer-cluster FsxId00be0bcce7bba1041 -applications snapmirror -local-name Source

Info: [Job 72] 'vserver peer create' job queued
レプリケーション元のFSx for ONTAPでピアリングを承諾
次に、レプリケーション元のFSxで、vserver peer acceptコマンドを実行します。
以下のように実行します。
vserver peer accept -vserver レプリケーション元のSVM名 -peer-vserver レプリケーション先のSVM名 -local-name レプリケーション先SVMの任意の名前
FsxId00be0bcce7bba1041::> vserver peer accept -vserver source -peer-vserver destination -local-name Destination

Info: [Job 42] 'vserver peer accept' job queued
ピアリングできたことを確認
vserver peer showコマンドで確認します。
以下はレプリケーション元FSxで実行したコマンドですが、Peer Vserverとして、レプリケーション先SVMの任意の名前Destinationが表示されていることが分かります。
FsxId00be0bcce7bba1041::> vserver peer show
            Peer        Peer                           Peering        Remote
Vserver     Vserver     State        Peer Cluster      Applications   Vserver
----------- ----------- ------------ ----------------- -------------- ---------
source  Destination peered       FsxId04340e39728bdc6d7
                                                       snapmirror     destination
SnapMirror 関係を作成する
最後にsnapmirror createコマンドでSnapMirrorの設定を行います。このコマンドはあくまでSnapMirrorの設定を行うもので、次のsnapmirror initializeを行うまでデータ転送は開始されません。
転送時の帯域やスケジュールの設定、SnapMirror Policyの設定などが可能です。詳細は以下をご確認ください。
ここではAWSの公式ドキュメントのとおり、スケジュールやSnapMirror Policyの設定は行わずに実行します。
実行するコマンドは以下のとおりです。レプリケーション先のFSxで実行します。
snapmirror create -source-path レプリケーション元SVMの任意の名前:レプリケーション元のvolume名 -destination-path レプリケーション先SVMのSVM名:レプリケーション先のvolume名 -vserver レプリケーション先のSVM名 -throttle unlimited
FsxId04340e39728bdc6d7::> snapmirror create -source-path Source:source -destination-path destination:destination -vserver destination -throttle unlimited
Operation succeeded: snapmirror create for the relationship with destination "destination:destination".
(参考)SnapMirror Policyについて
SnapMirror Policyはどのスナップショットをレプリケーションするか選択するための設定です。
どのようなSnapMirror Policyがあるか確認してみました。
FsxId04340e39728bdc6d7::> snapmirror create -policy ?
  Asynchronous
  AutomatedFailOver
  CloudBackupDefault
  Continuous
  DPDefault
  DailyBackup
  FSxPolicy
  MirrorAllSnapshots
  MirrorAllSnapshotsDiscardNetwork
  MirrorAndVault
  MirrorAndVaultDiscardNetwork
  MirrorLatest
  SnapCenterAutomatedFailOver
  SnapCenterSync
  StrictSync
  Sync
  Unified7year
  XDPDefault
けっこう種類がありますね。
例えば、全てのスナップショットをレプリケーションしたい場合は、SnapMirror PolicyはMirrorAllSnapshotsを選択すればよさそうですね。
今回は特にSnapMirror Policyは指定しませんでした。この場合SnapMirror Policyはどの設定になっているのか確認してみます。
すると、以下のようにSnapMirror Policy: MirrorAndVaultとなっていました。
FsxId04340e39728bdc6d7::> snapmirror show -instance

                            Source Path: Source:source
                       Destination Path: destination:destination
                      Relationship Type: XDP
                Relationship Group Type: none
                    SnapMirror Schedule: -
                 SnapMirror Policy Type: mirror-vault
                      SnapMirror Policy: MirrorAndVault
                            Tries Limit: -
                      Throttle (KB/sec): unlimited
                           Mirror State: Snapmirrored
                    Relationship Status: Idle
                File Restore File Count: -
                 File Restore File List: -
                      Transfer Snapshot: -
                      Snapshot Progress: -
                         Total Progress: -
    Percent Complete for Current Status: -
              Network Compression Ratio: -
                    Snapshot Checkpoint: -
                        Newest Snapshot: snapmirror.d9b17a48-e702-11ed-a8fa-b5b3af4dc8a7_2148947520.2023-04-30_075635
              Newest Snapshot Timestamp: 04/30 07:56:35
                      Exported Snapshot: snapmirror.d9b17a48-e702-11ed-a8fa-b5b3af4dc8a7_2148947520.2023-04-30_075635
            Exported Snapshot Timestamp: 04/30 07:56:35
                                Healthy: true
                       Unhealthy Reason: -
                Destination Volume Node: FsxId04340e39728bdc6d7-01
                        Relationship ID: a7f21c8f-e721-11ed-a8fa-b5b3af4dc8a7
                   Current Operation ID: -
                          Transfer Type: -
                         Transfer Error: -
                       Current Throttle: -
              Current Transfer Priority: -
                     Last Transfer Type: update
                    Last Transfer Error: -
                     Last Transfer Size: 16.84KB
Last Transfer Network Compression Ratio: 1:1
                 Last Transfer Duration: 0:0:4
                     Last Transfer From: Source:source
            Last Transfer End Timestamp: 04/30 07:56:39
                  Progress Last Updated: -
                Relationship Capability: 8.2 and above
                               Lag Time: 0:32:14
           Identity Preserve Vserver DR: -
                 Volume MSIDs Preserved: -
                 Is Auto Expand Enabled: -
           Number of Successful Updates: 1
               Number of Failed Updates: 0
           Number of Successful Resyncs: 0
               Number of Failed Resyncs: 0
            Number of Successful Breaks: 0
                Number of Failed Breaks: 0
                   Total Transfer Bytes: 45946
         Total Transfer Time in Seconds: 8
                 FabricLink Source Role: -
               FabricLink Source Bucket: -
                   FabricLink Peer Role: -
                 FabricLink Peer Bucket: -
                    FabricLink Topology: -
             FabricLink Pull Byte Count: -
             FabricLink Push Byte Count: -
          FabricLink Pending Work Count: -
                      FabricLink Status: -
MirrorAndVaultとは、最新のファイルと日次および週次スナップショットをレプリケーションする設定のようです。言い換えると毎時間作成されるスナップショットはレプリケーションしないということですね。
A unified Asynchronous SnapMirror and SnapVault policy for mirroring the latest active file system and daily and weekly snapshots.
データの転送
話を戻して、実際のデータ転送に移ります。snapmirror initializeコマンドで転送を開始します。
レプリケーション先のFSxで以下のように実行します。
snapmirror initialize -destination-path レプリケーション先SVM名:レプリケーション先volume名 -source-path レプリケーション元SVMの任意の名前:レプリケーション元volume名
FsxId04340e39728bdc6d7::> snapmirror initialize -destination-path destination:destination -source-path Source:source
Operation is queued: snapmirror initialize of destination "destination:destination".
(参考)SnapMirrorの定期実行について
初回以降、再度SnapMirrorを実行するには、snapmirror updateコマンドを実行するか、スケジュール設定をします。
スケジュールの設定は、SnapMirrorを設定する際(snapmirror create)に指定するか、あとからsnapmirror modifyで指定することも可能です。
AWSの公式ドキュメントではsnapmirror modify -destination-path DestSVM:vol1 -schedule hourlyのように、1時間ごとにSnapMirrorが行われる設定が紹介されています。
他にどのようなスケジュールが設定できるのでしょうか。NetApp社のドキュメントでは、job schedule cron createで定義できると記載されています。
You define and name a schedule using the job schedule cron create command.
https://docs.netapp.com/us-en/ontap-cli-9101/snapmirror-create.html
では、どのようなjob scheduleがデフォルトで用意されているのか確認してみます。
FsxId04340e39728bdc6d7::> job schedule show
Cluster Vserver  Name        Type      Description
------- -------- ----------- --------- ---------------------------------------
FsxId04340e39728bdc6d7
        FsxId04340e39728bdc6d7
                 10min       cron      @:00,:10,:20,:30,:40,:50
                 12-hourly   cron      @0:15,12:15
                 5min        cron      @:00,:05,:10,:15,:20,:25,:30,:35,:40,:45,:50,:55
                 6-hourly    cron      @0:15,6:15,12:15,18:15
                 8hour       cron      @2:15,10:15,18:15
                 Application Templates ASUP Dump
                             interval  Every 1d
                 Auto Balance Aggregate Scheduler
                             interval  Every 1h
                 Balanced Placement Model Cache Update
                             interval  Every 7m30s
                 RepositoryBalanceMonitorJobSchedule
                             interval  Every 10m
                 daily       cron      @0:10
                 hourly      cron      @:05
                 monthly     cron      1@0:20
                 pg-15-minutely
                             cron      @:10,:25,:40,:55
                 pg-6-hourly cron      @3:03,9:03,15:03,21:03
                 pg-daily    cron      @0:10
                 pg-daily-set2
                             cron      @6:25
                 pg-daily-set3
                             cron      @12:40
                 pg-daily-set4
                             cron      @18:55
                 pg-hourly   cron      @:07
                 pg-hourly-set2
                             cron      @:22
                 pg-hourly-set3
                             cron      @:37
                 pg-hourly-set4
                             cron      @:52
                 pg-remote-15-minutely
                             cron      @:00,:15,:30,:45
                 pg-remote-6-hourly
                             cron      @3:08,9:08,15:08,21:08
                 pg-remote-daily
                             cron      @0:15
                 pg-remote-hourly
                             cron      @:12
                 pg-remote-weekly
                             cron      Sun@0:20
                 pg-weekly   cron      Sun@0:15
                 pg-weekly-set2
                             cron      Tue@4:30
                 pg-weekly-set3
                             cron      Thu@10:44
                 pg-weekly-set4
                             cron      Sat@16:59
                 weekly      cron      Sun@0:15
32 entries were displayed.
5分ごとから月次まで、さまざまな種類がありそうです。基本はこれらで大丈夫そうですね。
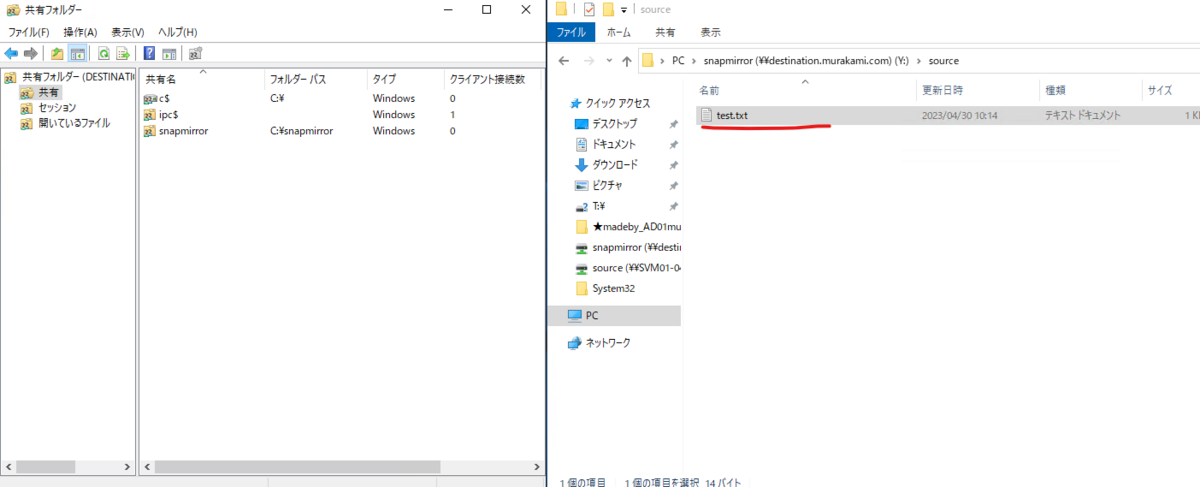
SnapMirrorでレプリケーションされたことを確認する
レプリケーション先のボリュームにはマウントするためのジャンクションパスがありませんので、まずはジャンクションパスを作成します(/snapmirrorで作成しました)。
FsxId04340e39728bdc6d7::> volume mount -vserver destination -volume destination -junction-path /snapmirror

FsxId04340e39728bdc6d7::> volume show -vserver destination -fields junction-path
vserver     volume      junction-path
----------- ----------- -------------
destination destination /snapmirror
destination destination_root
                        /
2 entries were displayed.
レプリケーション先のボリュームをマウントしてみると、うまくレプリケーションされていることが確認できました。
以上、ご参考になれば嬉しいです。