

こんにちは、Enterprise Cloud部 技術1課 宮形 です。今回BLOGでは、Amazon EC2 上で動作する Windows IIS の Webサーバーに SSL/TLSパブリック証明書 を導入する手順をご紹介します。Let's Encrypt というフリー(無料)で商用利用できる証明書サービスを利用します。

経緯
サーバーワークスへ入社してAWSばかりを触るようになり、SSL/TLSパブリック証明書は ACM (AWS Certificate Manager) を使うことがほぼデフォルトになりました。以前やっていたパブリック証明書のリクエストや導入、バインド割り当て等をする機会が無くなってしまいました。
当然サーバーワークスへ入社してくる新入社員も、ACMしか触ったことが無い方が殆どです。「証明局」「CSR」「バインド」といった仕組みや用語を知る機会が殆どあまりありません。そこで社内で下記タイトルでワークショップ形式の勉強会を行うことになりました。
- Let's Encrypt で作る!無料パブリック証明書を導入したWebサーバー
クラウド活用が進むにつれ不要になりゆく技術なのかもしれませんが、クラウドが登場する前のことを知ることは、お客様へ最適なAWSを提案するうえでとても大事な知識だと思います。
本BLOGはそのワークショップの内容ご紹介となります。BLOGご覧なった方でAWSをご利用できる環境があり、パブリック証明書の従来導入方法をやってみたい!という方は是非ご参考いただけると幸いです。
構成図
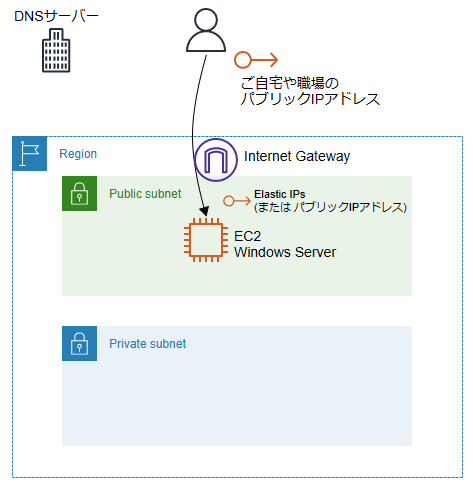
AWS構成図としては下記のようになります。IISをインストールしてWebサーバーとする EC2 をパブリックサブネットへ配置します。ロードバランサー等は経由せず、ご自分のパソコン等クライアントから直接Webサーバーへアクセスする構成です。Let's Encrypt で利用するためのDNSサーバーが必要となります。
必要なもの
- IIS をインストールできる Windows Server EC2
- EC2へインターネット経由でパブリックIPで接続できる VPC 環境
- インターネットで利用できる独自ドメインとDNSサーバー (Amazon Route 53 でもOK)
導入手順
IIS へインターネット経由でアクセスするための FQDN をあらかじめ決めておきます。
| FQDN例 |
|---|
| study1.hogehoge.com |
Windows Server の EC2 を作成し、サーバー内で IIS のインストールまで済ませておきます。インストール方法をご存知無い場合は 前回のワークショップBLOG 等ご参考ください。
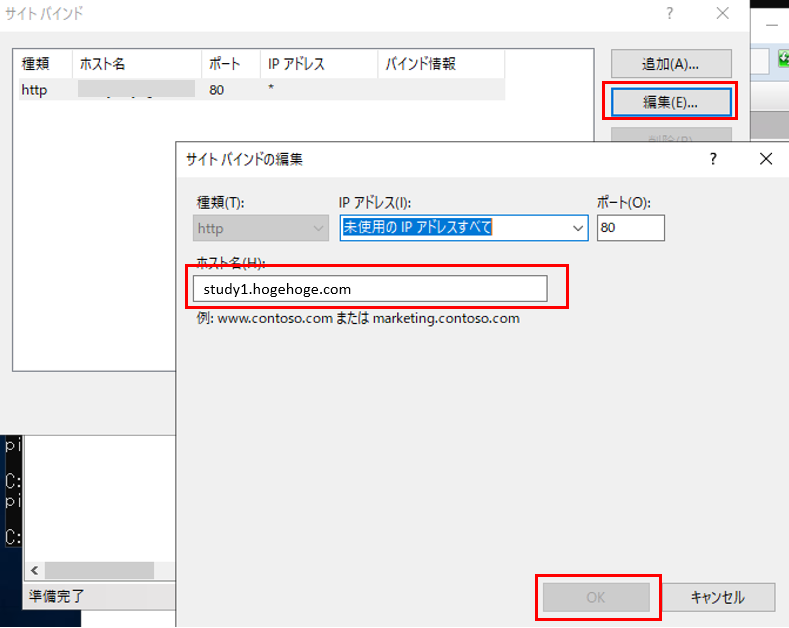
Let's Encrypt の仕様のため IISマネージャーより「バインドの編集」よりホスト名として、決めておいた FQDN を設定しておきます。

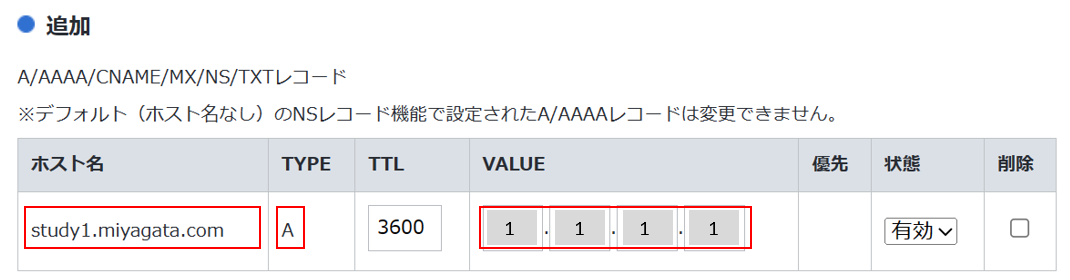
ご利用するドメインのFQDNに対してAレコードを設定しておきます。Aレコードは EC2 の Elastic IPs (またはパブリックIP) とします。下記画面は お名前.com の設定抜粋です。
下記サイトより Let's Encrypt のパブリック証明書のリクエストと導入を行うユーティリティ win-acme を入手します。
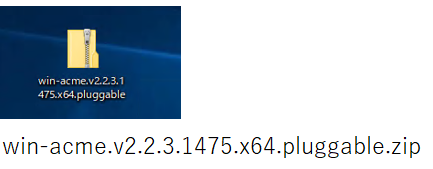
ZIPファイルを Windows Server の EC2 上にコピーして任意ディレクトリに解凍します。本例では C:\win-acme.v2.2.3.1475.x64.pluggable というディレクトリとしました。wacs.exe を管理者権限で実行します。

こんな感じでコマンドプロンプトでの対話が始まるので、環境に合わせて応答します。途中にドメイン所有の本人確認があり、いくつか方法を試したのですが確実に上手くいって、AWS ACM と同じ手法となるDNS検証を選びました。
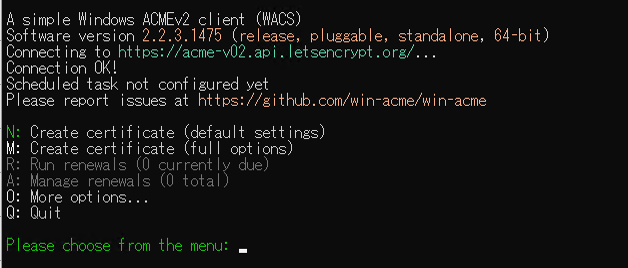
下記は本BLOGの例になります。途中でDNS検証用レコードの指示が出るところまで進めます。
 A simple Windows ACMEv2 client (WACS)
 Software version 2.2.3.1492 (release, pluggable, standalone, 64-bit)
 Connecting to https://acme-v02.api.letsencrypt.org/...
 Connection OK!
 Scheduled task not configured yet
 Please report issues at https://github.com/win-acme/win-acme

 N: Create certificate (default settings)
 M: Create certificate (full options)
 R: Run renewals (0 currently due)
 A: Manage renewals (0 total)
 O: More options...
 Q: Quit

 Please choose from the menu: (★ M を入力)

 Running in mode: Interactive, Advanced

 Please specify how the list of domain names that will be included in the
 certificate should be determined. If you choose for one of the "all bindings"
 options, the list will automatically be updated for future renewals to
 reflect the bindings at that time.

 1: Read bindings from IIS
 2: Manual input
 3: CSR created by another program
 C: Abort

 How shall we determine the domain(s) to include in the certificate?: (★ 2 を入力)

Description:         A host name to get a certificate for. This may be a
                     comma-separated list.

 Host: study1.hogehoge.com  (★ ご利用するドメインのFQDNを入力)

 Source generated using plugin Manual: study1.hogehoge.com

 Friendly name '[Manual] study1.hogehoge.com'. <Enter> to accept or type desired name: <Enter> (★ Enter を入力)

 By default your source identifiers are covered by a single certificate. But
 if you want to avoid the 100 domain limit, want to prevent information
 disclosure via the SAN list, and/or reduce the operational impact of a single
 validation failure, you may choose to convert one source into multiple
 certificates, using different strategies.

 1: Separate certificate for each domain (e.g. *.example.com)
 2: Separate certificate for each host (e.g. sub.example.com)
 3: Separate certificate for each IIS site
 4: Single certificate
 C: Abort

 Would you like to split this source into multiple certificates?: (★ 4 を入力)

 The ACME server will need to verify that you are the owner of the domain
 names that you are requesting the certificate for. This happens both during
 initial setup *and* for every future renewal. There are two main methods of
 doing so: answering specific http requests (http-01) or create specific dns
 records (dns-01). For wildcard identifiers the latter is the only option.
 Various additional plugins are available from
 https://github.com/win-acme/win-acme/.

 1: [http] Save verification files on (network) path
 2: [http] Serve verification files from memory
 3: [http] Upload verification files via FTP(S)
 4: [http] Upload verification files via SSH-FTP
 5: [http] Upload verification files via WebDav
 6: [dns] Create verification records manually (auto-renew not possible)
 7: [dns] Create verification records with acme-dns (https://github.com/joohoi/acme-dns)
 8: [dns] Create verification records with your own script
 9: [tls-alpn] Answer TLS verification request from win-acme
 C: Abort

 How would you like prove ownership for the domain(s)?: (★ 6 を入力)

 After ownership of the domain(s) has been proven, we will create a
 Certificate Signing Request (CSR) to obtain the actual certificate. The CSR
 determines properties of the certificate like which (type of) key to use. If
 you are not sure what to pick here, RSA is the safe default.

 1: Elliptic Curve key
 2: RSA key
 C: Abort

 What kind of private key should be used for the certificate?: (★ 2 を入力)

 When we have the certificate, you can store in one or more ways to make it
 accessible to your applications. The Windows Certificate Store is the default
 location for IIS (unless you are managing a cluster of them).

 1: IIS Central Certificate Store (.pfx per host)
 2: PEM encoded files (Apache, nginx, etc.)
 3: PFX archive
 4: Windows Certificate Store (Local Computer)
 5: No (additional) store steps

 How would you like to store the certificate?: (★ 4 を入力)

 1: [WebHosting] - Dedicated store for IIS
 2: [My] - General computer store (for Exchange/RDS)
 3: [Default] - Use global default, currently WebHosting

 Choose store to use, or type the name of another unlisted store: (★ 3 を入力)

 1: IIS Central Certificate Store (.pfx per host)
 2: PEM encoded files (Apache, nginx, etc.)
 3: PFX archive
 4: Windows Certificate Store (Local Computer)
 5: No (additional) store steps

 Would you like to store it in another way too?: (★ 5 を入力)

 With the certificate saved to the store(s) of your choice, you may choose one
 or more steps to update your applications, e.g. to configure the new
 thumbprint, or to update bindings.

 1: Create or update bindings in IIS
 2: Start external script or program
 3: No (additional) installation steps

 Which installation step should run first?: (★ 1 を入力)

 This plugin will update *all* binding using the previous certificate in both
 Web and FTP sites, regardless of whether those bindings were created manually
 or by the program itself. Therefor you'll never need to run this installation
 step twice.

 During initial setup, it will try to make as few changes as possible to IIS
 to cover the source identifiers. If new bindings are needed, by default it
 will create those at the same site where the HTTP binding for that host was
 found.

 1: Default Web Site

 Choose site to create new bindings: 1

 1: Create or update bindings in IIS
 2: Start external script or program
 3: No (additional) installation steps

 Add another installation step?: (★ 3 を入力)

Terms of service:    C:\ProgramData\win-acme\acme-v02.api.letsencrypt.org\LE-SA-v1.3-September-21-2022.pdf

 Open in default application? (y/n*) - (★ 上記PDFファイルを確認した後で n を入力)

 Do you agree with the terms? (y*/n) - (★ 利用規約に同意のうえ y を入力)

 Enter email(s) for notifications about problems and abuse (comma-separated): hogehoge@serverworks.co.jp  (★ ご利用者のメールアドレスを入力)

 Plugin Manual generated source study1.hogehoge.com with 1 identifiers
 Plugin Single created 1 order
 [study1.hogehoge.com] Authorizing...
 [study1.hogehoge.com] Authorizing using dns-01 validation (Manual)

Domain:              study1.hogehoge.com
Record:              _acme-challenge.study1.hogehoge.com
Type:                TXT
Content:             "wtQqNvAP090xoztxxxxxxxxxxxxxxxxxxxxxxxxxxxx"
Note:                Some DNS managers add quotes automatically. A single set
                     is needed.

 Please press <Enter> after you've created and verified the record (★ 上記DNS検証用レコードを控える)
画面指示に従い、DNSサーバーに検証用レコード(TXT)を設定します。

DNSサーバーの反映には時間かかるので、nslookup コマンド等で名前解決できるようになるまで待ちます。
nslookup -type=TXT _acme-challenge.study1.hogehoge.com
DNS検証用レコードの名前解決できるようになれば、Enterキーを入力して処理を続けます。
 Please press <Enter> after you've created and verified the record (★ Enter を入力)

 [study1.hogehoge.com] Preliminary validation succeeded
 [study1.hogehoge.com] Preliminary validation succeeded
 [study1.hogehoge.com] Authorization result: valid

Domain:              study1.hogehoge.com
Record:              _acme-challenge.study1.hogehoge.com
Type:                TXT
Content:             "wtQqNvAP090xoztxxxxxxxxxxxxxxxxxxxxxxxxxxxx"

 Please press <Enter> after you've deleted the record (★ Enter を入力)

 Downloading certificate [Manual] study1.hogehoge.com
 Store with CertificateStore...
 Installing certificate in the certificate store
 Adding certificate [Manual] study1.hogehoge.com @ 2023/4/18 to store WebHosting
 Installing with IIS...
 Adding new https binding *:443:study1.hogehoge.com
 Committing 1 https binding changes to IIS while updating site 1
 Adding Task Scheduler entry with the following settings
 - Name win-acme renew (acme-v02.api.letsencrypt.org)
 - Path C:\Users\Administrator\Desktop\win-acme.v2.2.3.1492.x64.pluggable
 - Command wacs.exe --renew --baseuri "https://acme-v02.api.letsencrypt.org/"
 - Start at 09:00:00
 - Random delay 04:00:00
 - Time limit 02:00:00

 Do you want to specify the user the task will run as? (y/n*) - no (★ n を入力)

 Adding renewal for [Manual] study1.hogehoge.com
 Next renewal due after 2023/6/12
 Certificate [Manual] study1.hogehoge.com created

 N: Create certificate (default settings)
 M: Create certificate (full options)
 R: Run renewals (0 currently due)
 A: Manage renewals (1 total)
 O: More options...
 Q: Quit

 Please choose from the menu:  (★ Q を入力)
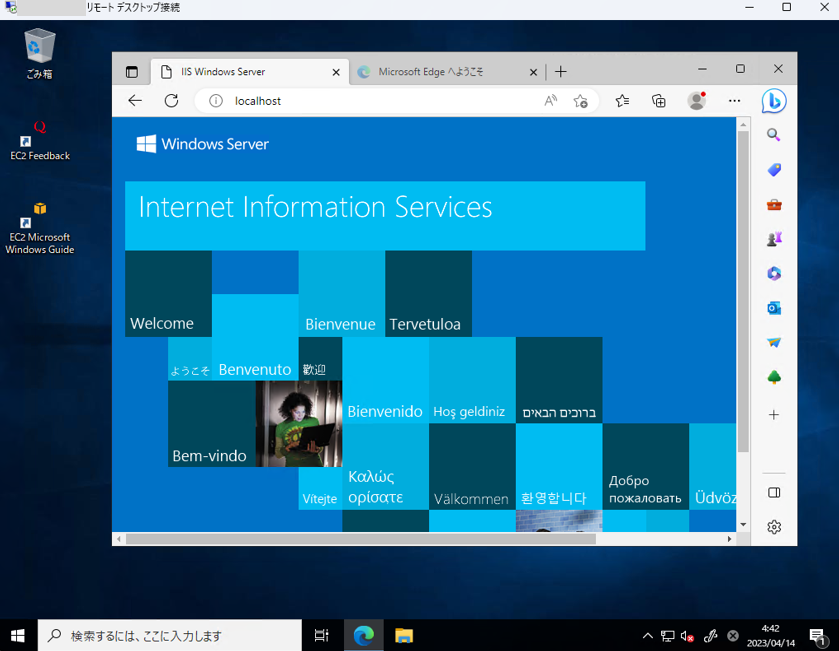
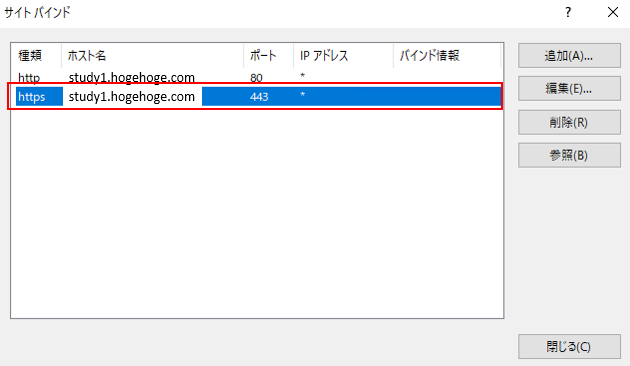
以上でパブリック証明書の入手は完了です。自動的にIIS Webサイトにも導入されます。 IISマネージャーより「バインドの編集」の画面を確認すると、先ほど無かった https が追加されています。
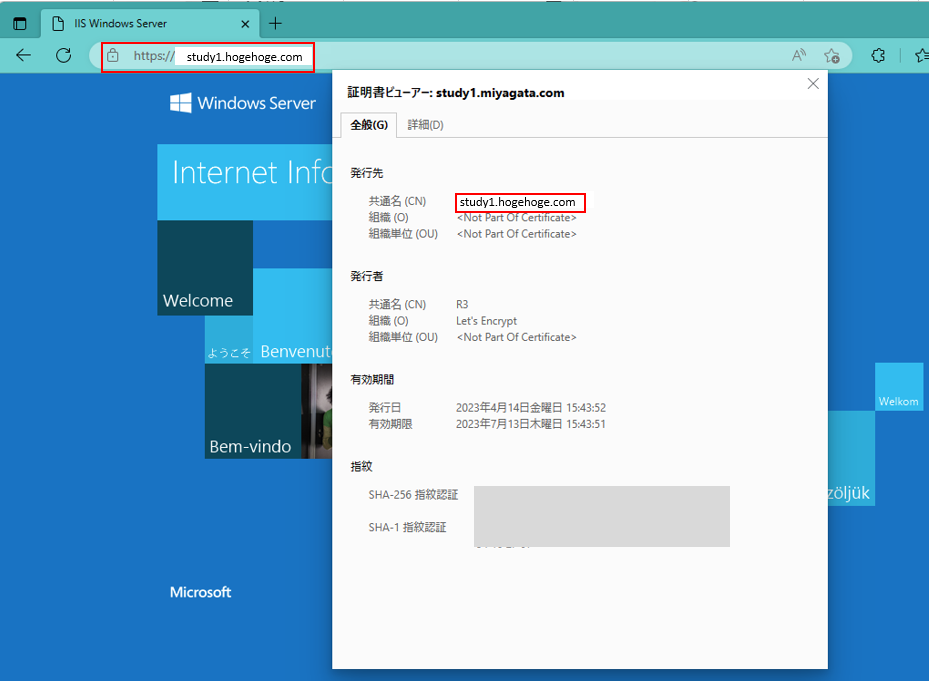
ご自分のパソコン等から、ご利用するドメインのFQDNでWebサイトへアクセスしてみるとブラウザにエラーなく https でサイトが表示できることを確認できます。また証明書ビューアー等から、Let's Encrypt から発行された証明書であることがうかがえます。
まとめ
AWS には ACM (AWS Certificate Manager) という強力かつ優れた証明書サービスがありますし、ELB (Elastic Load Balancing) でSSL終端を簡単に構築できるので、今回BLOGの手順のようにWebサーバー直にパブリック証明書を導入する機会も少なくなりました。
煩雑面倒であった証明書の導入や運用管理から解放されることは素晴らしいのですが、原理を知る機会少なくなってきたのも寂しいところです。こういうったBLOGやワークショップで時々思い出してもらったり再認識してもらえるとイイと思いました。