

山の写真を 1枚

EKS on Fargate を Terraform で作成する
意外とブログが無いので書くことにしました
EKSクラスターを Terraform を使って作成し
Pod を全て Fargate を使って起動するまでの流れになります
EKS on Fargate については以下に公式ドキュメントがあります
AWS Fargate - Amazon EKS
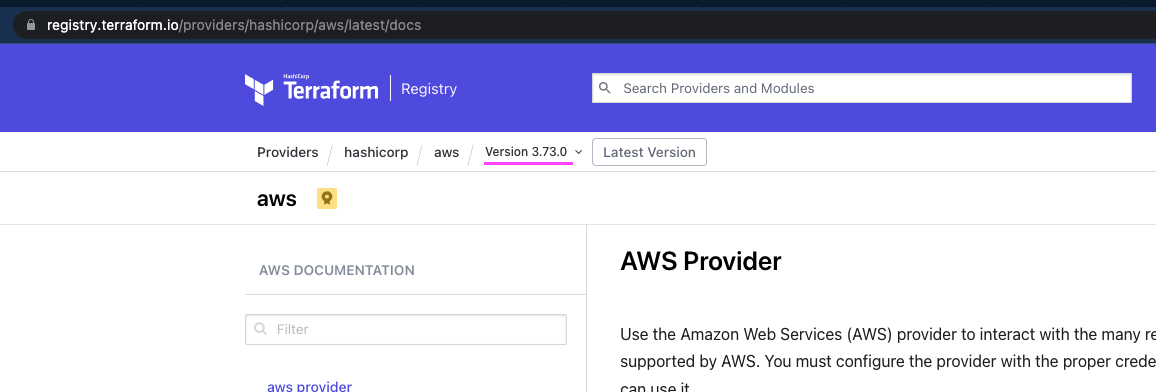
Terraform の公式ドキュメントは以下にあります
Terraform Registry
リポジトリ
以下の公開リポジトリにソースの全量を入れています
cloneしてお使いください
GitHub - yamazoon0207/terraform_eks_on_fargate: EKS on Fargate をTerraform を使って作成するサンプル
Terraformを実行するIAMユーザーの認証情報
最初にTerraformを実行するIAMユーザーの認証情報を設定しておきます
設定
aws configure
確認
aws sts get-caller-identity
Terraformを実行するIAMユーザーになっています

Terraform のバージョン
Terraform のバージョンは 2022/1/26時点 の最新 1.1.4 を使用します

Terraform のバージョンを固定するために tfenv を設定しておきます
インストールしていない方はこちらから
echo 1.1.4 > .terraform-version #.terraform-versionファイル作成
tfenv install #.terraform-versionに記載したバージョンのTerraforをインストール
tfenv use #.terraform-versionに記載したバージョンのTerraformを使用するように設定
念のため Terraform のバージョンが 1.1.4 以外だと実行出来ないようにしておきます
main.tf (抜粋)
terraform {
  required_version = "= 1.1.4"
AWS Provider のバージョン
2022/1/26時点 の最新 3.73.0 を使用します
念のため AWS Provider のバージョンが 3.73.0 以外だと実行出来ないようにしておきます
main.tf (抜粋)
provider "aws" {
  region             = "us-west-2"
}

terraform {
  required_version = "= 1.1.4"
  required_providers {
    aws = {
      source  = "hashicorp/aws"
      version = "~> 3.73.0"
    }
  }
}
AWS の利用リージョン
- 検証のためコスト重視でオレゴンにします
- us-west-2
main.tf (抜粋)
provider "aws" {
  region             = "us-west-2"
}
作成リソース1:VPC
このあたりを参考に Terraform ファイルを作成しました
Terraform Registry
- EKSのクラスターをデプロイするためのプライベートサブネット 3つ
- パブリックサブネット にある NAT Gateway を使用して インターネット と通信可能
- 3つのAZに 1つずつ作成
- NAT Gateway を配置するためのパブリックサブネット 3つ
- Internet Gateway を使用して インターネット と通信可能
- 3つのAZに 1つずつ作成
vpc.tf
module "vpc" {
  source  = "terraform-aws-modules/vpc/aws"
  version = "3.11.0"

  name = "yamamoto-vpc"
  cidr = "10.0.0.0/16"

  azs             = ["us-west-2a", "us-west-2b", "us-west-2c"]
  private_subnets = ["10.0.1.0/24", "10.0.2.0/24", "10.0.3.0/24"]
  public_subnets  = ["10.0.101.0/24", "10.0.102.0/24", "10.0.103.0/24"]

  enable_nat_gateway = true

  tags = {
    Terraform   = "true"
    Environment = "dev"
  }
}
作成リソース2:EKSクラスター
このあたりを参考に Terraform ファイルを作成しました
Terraform Registry
- EKSクラスター
- 作成したプライベートサブネットに配置 (subnet_ids = module.vpc.private_subnets)
- IAM ロールへのポリシーアタッチ後に作成 (depends_on = )
- EKSクラスター用の IAM ロール
- EKSクラスター用のポリシーをアタッチ
eks.tf
resource "aws_eks_cluster" "yamamoto" {
  name     = "yamamoto-eks"
  role_arn = aws_iam_role.yamamoto.arn

  vpc_config {
    subnet_ids = module.vpc.private_subnets
  }

  depends_on = [
    aws_iam_role_policy_attachment.yamamoto-AmazonEKSClusterPolicy,
    aws_iam_role_policy_attachment.yamamoto-AmazonEKSVPCResourceController,
  ]
}

output "endpoint" {
  value = aws_eks_cluster.yamamoto.endpoint
}

output "kubeconfig-certificate-authority-data" {
  value = aws_eks_cluster.yamamoto.certificate_authority[0].data
}

resource "aws_iam_role" "yamamoto" {
  name = "eks-cluster-yamamoto"

  assume_role_policy = jsonencode({
    Statement = [{
      Action = "sts:AssumeRole"
      Effect = "Allow"
      Principal = {
        Service = "eks.amazonaws.com"
      }
    }]
    Version = "2012-10-17"
  })
}

resource "aws_iam_role_policy_attachment" "yamamoto-AmazonEKSClusterPolicy" {
  policy_arn = "arn:aws:iam::aws:policy/AmazonEKSClusterPolicy"
  role       = aws_iam_role.yamamoto.name
}

# Optionally, enable Security Groups for Pods
# Reference: https://docs.aws.amazon.com/eks/latest/userguide/security-groups-for-pods.html
resource "aws_iam_role_policy_attachment" "yamamoto-AmazonEKSVPCResourceController" {
  policy_arn = "arn:aws:iam::aws:policy/AmazonEKSVPCResourceController"
  role       = aws_iam_role.yamamoto.name
}
作成リソース3:Fargate Profile
このあたりを参考に Terraform ファイルを作成しました
Terraform Registry
- Fargateプロファイル
- 名前空間(NAMESPACE) が「kube-system」「yamamoto」のワークロードを実行する
- Pod 実行用の IAM Role へのポリシーアタッチ と EKS クラスターの作成が完了した後に作成
- Pod 実行用の IAM Role
- eks-fargate-pods.amazonaws.com 用の Role
fargate_profile_kube-system.tf
resource "aws_eks_fargate_profile" "kube_system" {
  cluster_name           = aws_eks_cluster.yamamoto.name
  fargate_profile_name   = "kube-system"
  pod_execution_role_arn = aws_iam_role.kube_system.arn
  subnet_ids             = module.vpc.private_subnets

  selector {
    namespace = "kube-system"
    #labels = {
    #  "k8s-app" : "kube-dns"
    #}
  }

  selector {
    namespace = "yamamoto"
  }
  depends_on = [
    aws_iam_role_policy_attachment.kube-system-AmazonEKSFargatePodExecutionRolePolicy,
    aws_eks_cluster.yamamoto,
  ]

}

resource "aws_iam_role" "kube_system" {
  name = "eks-fargate-profile-kube-system"

  assume_role_policy = jsonencode({
    Statement = [{
      Action = "sts:AssumeRole"
      Effect = "Allow"
      Principal = {
        Service = "eks-fargate-pods.amazonaws.com"
      }
    }]
    Version = "2012-10-17"
  })
}

resource "aws_iam_role_policy_attachment" "kube-system-AmazonEKSFargatePodExecutionRolePolicy" {
  policy_arn = "arn:aws:iam::aws:policy/AmazonEKSFargatePodExecutionRolePolicy"
  role       = aws_iam_role.kube_system.name
}
terraform apply
terraform apply してTerraform ファイルのリソースを実際に作成していきます
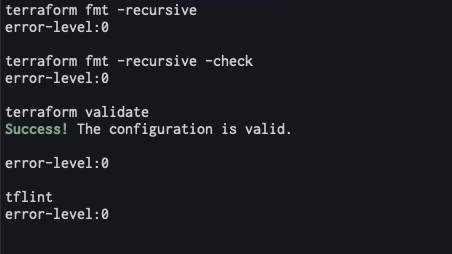
その前に以下のコマンドを使った事前確認をします
- terraform fmt -recursive
- Terrafomファイルのフォーマットを綺麗にする
- terraform fmt -recursive -check
- Terrafomファイルのフォーマットが綺麗になっているかを確認
- terraform validate
- Terrafomファイルのバリデーション確認
- tflint
- Terrafom plan 等では分からない主要なクラウドプロバイダー(AWS / Azure / GCP)で発生する可能性のあるエラー(不正なインスタンスタイプなど)を見つける
- インストールしていない方はこちらから GitHub - terraform-linters/tflint: A Pluggable Terraform Linter
コマンドをシェルにまとめました
init.sh
#!/bin/bash -
terraform init
echo terraform fmt -recursive
terraform fmt -recursive
echo error-level:$?
echo
echo terraform fmt -recursive -check
terraform fmt -recursive -check
echo error-level:$?
echo
echo terraform validate
terraform validate
echo error-level:$?
echo
echo tflint
tflint
echo error-level:$?
echo
実行します
. ./init.sh
大丈夫だったようです
VPC、 EKSクラスター、Fargate Profile を作成します
terraform plan # 確認
terraform apply # 実行
成功しました

VPC、EKSクラスター、Fargate Profile が作成できました
CoreDNS のデプロイ (手動)
次に CoreDNSを Fargate で動かすように変更しないといけません
参考
Amazon EKS を使用した AWS Fargate の使用開始 - Amazon EKS
By default, CoreDNS is configured to run on Amazon EC2 infrastructure on Amazon EKS clusters. If you want to only run your pods on Fargate in your cluster, complete the following steps.
和訳: デフォルトでは、CoreDNSはAmazonEKSクラスターのAmazonEC2インフラストラクチャで実行されるように設定されています。クラスタ内のFargateでのみポッドを実行する場合は、次の手順を実行します。
実際に CoreDNS の Pod の状態を確認すると以下のように Pending 状態になっていました

AWSマネジメントコンソールの以下からも確認できます (準備完了:0)

以下の手順で
~/.kube/config の更新をして kubectl を使用できるようにし
kubectl で CoreDNS を修正デプロイします
kubectl のインストール方法は以下に
kubectlのインストールおよびセットアップ | Kubernetes
# ~/.kube/config を更新
aws eks --region <リージョン> update-kubeconfig --name <EKSクラスター名>

# coredns を Fargate で動かすように変更
kubectl patch deployment coredns \
    -n kube-system \
    --type json \
    -p='[{"op": "remove", "path": "/spec/template/metadata/annotations/eks.amazonaws.com~1compute-type"}]'

# coredns 再デプロイ
kubectl rollout restart -n kube-system deployments/coredns

# 確認
kubectl get pods --all-namespaces
Runningになりました

AWSマネジメントコンソールの以下からも確認できます (準備完了:2)

CoreDNS用のノードも増えています
fargate で起動すると "fargate"と頭に付きます

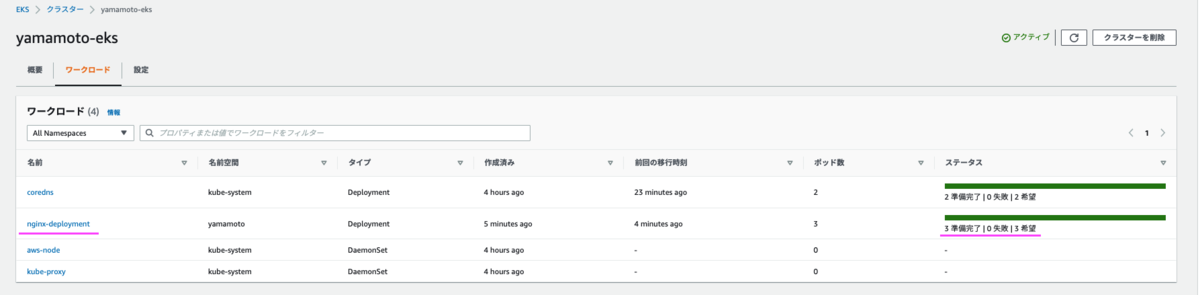
サンプルPodのデプロイ
名前空間:yamamoto に サンプルの nginx コンテナを 3台作成するマニフェストファイルを作成しました
sample-nginx.yaml
apiVersion: v1
kind: Namespace
metadata:
  name: yamamoto
---
apiVersion: v1
kind: Service
metadata:
  name: service-sample-nginx
  namespace: yamamoto
  labels:
    app: sample-nginx
spec:
  selector:
    app: sample-nginx
  ports:
    - protocol: TCP
      port: 80
      targetPort: 80
---
apiVersion: apps/v1
kind: Deployment
metadata:
  name: nginx-deployment
  namespace: yamamoto
  labels:
    app: sample-nginx
spec:
  selector:
    matchLabels:
      app: sample-nginx
  replicas: 3
  template:
    metadata:
      labels:
        app: sample-nginx
    spec:
      containers:
      - name: nginx
        image: nginx:1.19.2
        ports:
        - containerPort: 80
適用していきます
kubectl apply -f sample-nginx.yaml

作成した結果を確認します
kubectl get pods --all-namespaces

AWSマネジメントコンソールの以下からも確認できます (準備完了:3)
まとめ
EKSクラスターを Terraform を使って作成し Pod を全て Fargate を使って起動する流れを紹介しました