こんにちは。技術4課の河野です。
今回は、Vue.js 初学者が、TOTP(Time-based One-Time Password)の実装にチャレンジした記録になります。
やりたいこと
ユーザーがログイン時に TOTPを設定及びTOTPを使用した認証までを実装します。
イメージとしては、IAMユーザーの仮装MFAデバイスの有効化をした際のログインの挙動を実現したいです。
環境
- macOS(Catalina 10.15.6)
- @vue/cli 4.5.3
- @aws-amplify/cli 4.27.3
実践
Vue プロジェクト作成
まずは、Vue.js でweb画面を表示します。
vue createで Vue プロジェクトを作成します。
$ vue create amplify-totp-app
? Please pick a preset: Default ([Vue 2] babel, eslint)

....

🎉  Successfully created project amplify-totp-app.
👉  Get started with the following commands:

 $ cd amplify-totp-app
 $ npm run serve
「Successfully」が表示されていることを確認して、 コメントで表示されている通りに、コマンドを入力します。
 $ cd amplify-totp-app
 $ npm run serve
http://localhost:8080/にアクセスします。

上記の画面が開けばOKです。
確認後は、Ctrl + Cで動作を停止しておきます。
Amplify アプリ作成
amplify init でAmplifyの初期セットアップを行います。
$ cd amplify-totp-app
$ amplify init
Note: It is recommended to run this command from the root of your app directory
? Enter a name for the project amplifytotpapp
? Enter a name for the environment dev
? Choose your default editor: Visual Studio Code
? Choose the type of app that you're building javascript
Please tell us about your project
? What javascript framework are you using vue
? Source Directory Path:  src
? Distribution Directory Path: dist
? Build Command:  npm run-script build
? Start Command: npm run-script serve
Using default provider  awscloudformation

For more information on AWS Profiles, see:
https://docs.aws.amazon.com/cli/latest/userguide/cli-multiple-profiles.html

? Do you want to use an AWS profile? Yes
? Please choose the profile you want to use default
認証機能のバックエンドリソースを追加
amplify add authで、バックエンドに認証機能を追加します。
Using service: Cognito, provided by: awscloudformation

 The current configured provider is Amazon Cognito.

 Do you want to use the default authentication and security configuration? Manual configuration
 Select the authentication/authorization services that you want to use: User Sign-Up & Sign-In only (B
est used with a cloud API only)
 Please provide a friendly name for your resource that will be used to label this category in the proj
ect: amplifytotpappxxxxxxxx
 Please provide a name for your user pool: amplifytotpappxxxxxxxx
 Warning: you will not be able to edit these selections.
 How do you want users to be able to sign in? Username
 Do you want to add User Pool Groups? No
 Do you want to add an admin queries API? No
 Multifactor authentication (MFA) user login options: ON (Required for all logins, can not be enabled
later)
 For user login, select the MFA types: Time-Based One-Time Password (TOTP)
 Please specify an SMS authentication message: Your authentication code is {####}
 Email based user registration/forgot password: Enabled (Requires per-user email entry at registration
)
 Please specify an email verification subject: Your verification code
 Please specify an email verification message: Your verification code is {####}
 Do you want to override the default password policy for this User Pool? No
 Warning: you will not be able to edit these selections.
 What attributes are required for signing up? Email
 Specify the app's refresh token expiration period (in days): 30
 Do you want to specify the user attributes this app can read and write? No
 Do you want to enable any of the following capabilities?
 Do you want to use an OAuth flow? No
? Do you want to configure Lambda Triggers for Cognito? No
Successfully added resource amplifytotpappxxxxxxxx locally
amplify push でデプロイします。
$ amplify push
ログインページの作成
Amplifyの公式ドキュメントを参考に、ログインページを作成します。
まずは、必要なライブラリをインストールします。
npm install aws-amplify @aws-amplify/ui-vue @aws-amplify/auth @aws-amplify/core
src/main.jsを開き、以下のように編集します。
import Vue from 'vue'
import App from './App.vue'
import Amplify, * as AmplifyModules from 'aws-amplify'
import { AmplifyPlugin } from 'aws-amplify-vue'
import aws_exports from './aws-exports'
Amplify.configure(aws_exports)

Vue.use(AmplifyPlugin, AmplifyModules)

// It's important that you instantiate the Vue instance after calling Vue.use!

new Vue({
  render: h => h(App)
}).$mount('#app')
src/App.vueを開き、以下のように編集します。
<template>
  <div id="app">
    <amplify-authenticator v-if!="signedIn"></amplify-authenticator>
    <div v-if="signedIn && user">
      <amplify-sign-out></amplify-sign-out>
      <div>Hello, {{user.username}}</div>
    </div>
  </div>
</template>

<script>
import { onAuthUIStateChange } from '@aws-amplify/ui-components'
import { Auth } from '@aws-amplify/auth'
import { AmplifyEventBus } from 'aws-amplify-vue'


export default {
  name: 'app',
  async beforeCreate() {
    try {
      this.user = await Auth.currentAuthenticatedUser()
      this.signedIn = true
    } catch (err) {
      this.signedIn = false
    }
    // 認証ステータスが変わった時に呼び出されるイベントを登録
    AmplifyEventBus.$on('authState', async  info => {
      if (info === 'signedIn') {
        this.signedIn = true
        this.user = await Auth.currentAuthenticatedUser()
      } else {
        this.signedIn = false
        this.user = undefined
      }
    });
  },
  data() {
    return {
      user: undefined,
      signedIn: undefined
    }
  },
  beforeDestroy() {
    return onAuthUIStateChange;
  }
}
</script>

<style>
#app {
  font-family: Avenir, Helvetica, Arial, sans-serif;
  -webkit-font-smoothing: antialiased;
  -moz-osx-font-smoothing: grayscale;
  text-align: center;
  color: #2c3e50;
  margin-top: 60px;
}
</style>
<amplify-authenticator></amplify-authenticator>のコンポーネントを使用することで、ログインの挙動を実装することができます。また、Cognito 側で MFA を必須としているため、
それに応じた画面(MFAの設定画面やコード認証)も表示してくれます。そのため、「サインイン / サインアウト」でそれぞれコンポーネントを「表示する / しない」のロジックを組んであげれば
OKです。
ログインユーザーを作成
Cognito からユーザーを作成します。
マネジメントコンソールにログインして、Cognito のユーザープールの設定画面からユーザーを作成します。


ログインの挙動を確認
npm run serve で開発サーバを立ち上げて http://localhost:8080/にアクセスします。
先ほど作成したユーザーでサインインします。

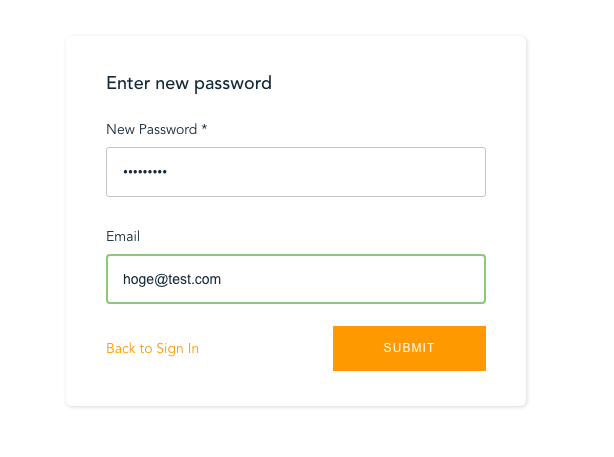
パスワードを再作成して、メールアドレスを登録します。

MFA の設定画面が表示されました。「SET MFA」を押します。


QRコードが表示されましたが、読み取ると値が入っていません....
コンソールのログをよく見ると、エラーが表示されています。
ConsoleLogger.js?36de:97 [ERROR] 35:10.343 SetMfa - not authenticated
はい。ここでめちゃくちゃハマったわけですが、GitHubにこんな Issue がありました。 https://github.com/aws-amplify/amplify-js/issues/2371
Describe the bug aws-amplify-vue SetMFA component does not support registering TOTP generator for pools with compulsory TOTP MFA
何やらMFAを必須にすると、コンポーネントがうまく動作しないらしいです。 時間が経ってしまってIssueはクローズされていますが、全く同じ現象が発生しています...
MFAの設定変更
今回の現象を回避するために、Cognito のコンソール画面で、MFAを「必須」から「省略可能」に変更します。

ログイン画面の修正
src/App.vueを開き、以下のように編集します。
<template>
  <div id="app">
    <div v-if = "signedIn">
      <div v-if="mfaPreference === 'NOMFA'">
        <amplify-set-mfa v-bind:mfaConfig="mfaConfig"></amplify-set-mfa>
      </div>
      <div v-else-if="mfaPreference === 'SOFTWARE_TOKEN_MFA'">
        <amplify-sign-out></amplify-sign-out>
        <div>Hello, {{user.username}}</div>
      </div>
    </div>
    <div v-else>
      <amplify-authenticator></amplify-authenticator>
    </div>
  </div>
</template>
<script>

import { onAuthUIStateChange } from '@aws-amplify/ui-components'
import { Auth } from '@aws-amplify/auth'
import { AmplifyEventBus } from 'aws-amplify-vue'

export default {
  name: 'app',
  data() {
    return {
      signedIn: false,
      user: undefined,
      mfaConfig: {
        mfaTypes: [
          'TOTP'
        ]
      },
      mfaPreference: null
    }
  },
  methods: {
  },
  async beforeCreate() {
    // Auth.currentAuthenticatedUser()でユーザ情報を取得する。
    // 取得できなければ認証ステータスをfalseに設定する
    try {
      this.user = await Auth.currentAuthenticatedUser()
      this.signedIn = true
      Auth.getPreferredMFA(this.user,{
      bypassCache: false
      }).then((data) => {
        this.mfaPreference = data
      })
    } catch (err) {
      this.signedIn = false
    }
    // 認証ステータスが変わった時に呼び出されるイベントを登録
    AmplifyEventBus.$on('authState', async  info => {
      if (info === 'signedIn') {
        let cognitUser = await Auth.currentAuthenticatedUser()
        this.signedIn = true
        this.user = cognitUser
        Auth.getPreferredMFA(this.user,{
        bypassCache: false
        }).then((data) => {
          this.mfaPreference = data
        })
      } else {
        this.signedIn = false
        this.user = undefined
      }
    });
  },
  beforeDestroy() {
    return onAuthUIStateChange;
  }
}
</script>

<style>
#app {
  font-family: Avenir, Helvetica, Arial, sans-serif;
  -webkit-font-smoothing: antialiased;
  -moz-osx-font-smoothing: grayscale;
  text-align: center;
  color: #2c3e50;
  margin-top: 60px;
}
</style>
<amplify-set-mfa></amplify-set-mfa>のコンポーネントを表示する処理を加えています。先ほどは、MFAを必須にしていたために必要なかったのですが、オプションに変更したことで
明示的にかいてあげる必要があります。また、初回ログインのみ MFA 設定画面を表示させるようにロジックを組んでいます。
ログインの挙動を確認(2回目)
先ほど作成したユーザーでサインインします。

MFA の設定画面が表示されました。ラジオボタンにチェックを入れて「SET MFA」を押します。

QRコードが表示され、MFAデバイスで読み取ることができました! コードを入力して「VERIFY TOKEN」を押します。

ユーザー名が表示されていることが確認できました。

「サインアウト」を押して、もう一度サインインします。 MFAを設定しているので、2回目以降はコードを入力する画面が表示されます。 コードを入力して、「CONFIRM」を押します。

サインインできました!

最後に
今回のテーマに関する記事があまりヒットしなかったので、ブログとして書かせていただきました。 誰かのお役に立てれば幸いです。

