

こんにちは。ディベロップメントサービス2課の長谷です。 今回はTerraformでの基礎的ネットワークの構築と構築環境にssh接続するまでの流れをご紹介したいと思います。
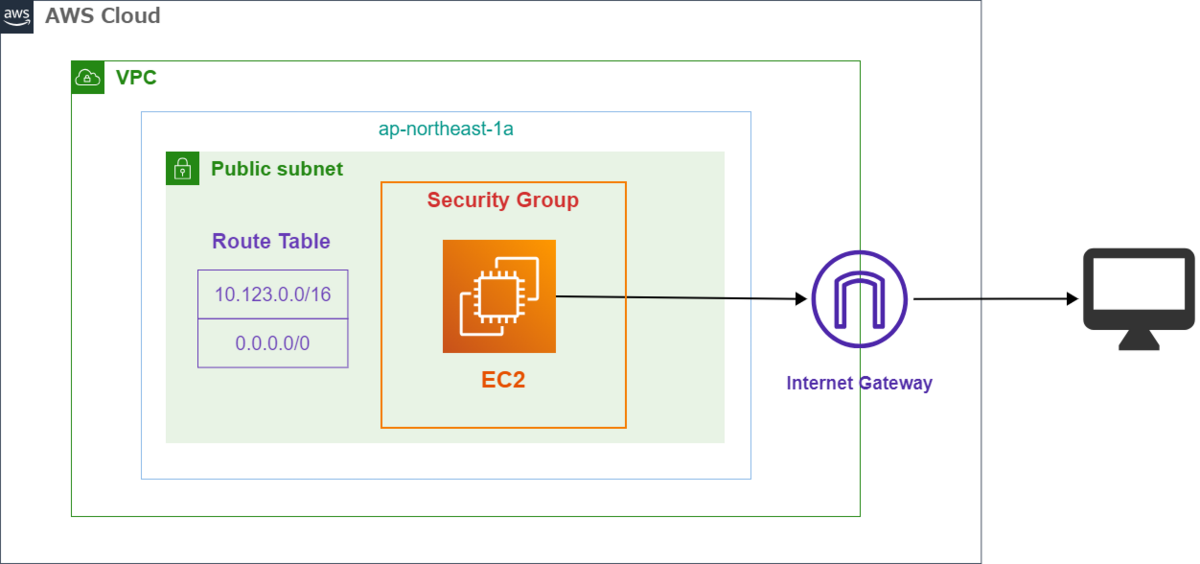
Terraformで作成するリソースの構成図
自分のPCからEC2インスタンスにSSH接続できるようにする環境のイメージです。 VPCを作成してその中にEC2インスタンスを起動し、そのインスタンスにインターネット経由でアクセスできる環境を構築します。
ディレクトリ構造
今回は実際のプロジェクトを考え、管理面やチームでの作業効率の観点からディレクトリを構造化してみました。 ディレクトリ構造は以下になります。
terraform_handson
│
├── environments
│   ├── dev
│   │   └── main.tf
│   ├── prd
│   └── stg
├── modules
    ├── ec2
    │   ├── main.tf
    │   ├── output.tf
    │   └── variables.tf
    ├── vpc
        ├── main.tf
        ├── output.tf
        └── variables.tf
実行環境
本記事に記載している手順は以下の環境にて実施しています。
- OSバージョン:Amazon Linux 2023
- VS CodeからSSHで既存のEC2に接続し、その環境上で今回紹介する構築を実行しています。
- AWS CLIバージョン:2.9.19
- Terraformバージョン:1.6.2
- AWS Providerバージョン:5.37.0
AWS Providerについては下記をご参照ください。 registry.terraform.io
環境準備
AWS CLIをインストール
インストール完了後、ターミナルでaws --versionを実行し、AWS CLIが使用できることを確認します。 下記のように、AWS CLIのバージョンが表示されればインストール完了です。
>aws --version
aws-cli/2.9.19 Python/3.9.16 Linux/6.1.21-1.45.amzn2023.x86_64 source/x86_64.amzn.2023 prompt/off
IAMユーザーとアクセスキーの作成
今回はテスト用として管理者権限(AdministratorAccess)を持つユーザーを新規に作成します。 既存で使用できるユーザーがあればそちらを使用して問題ありません。
IAMユーザーの作成が完了したら、この後のステップでアクセスキー IDとシークレットアクセスキーが必要になりますので、作成します。 作成が完了したら、参照できるようにテキストエディタなどにコピペして保存しておきます。
AWS CLI 認証情報の設定
ターミナルでaws configureを実行し、AWS CLI 認証情報を設定します。
>aws configure
AWS Access Key ID [None]: 上記で作成した [アクセスキー ID]
AWS Secret Access Key [None]: 上記で作成した [シークレットアクセスキー]
Default region name [None]: ap-northeast-1
Default output format [None]: 何も入力せずにEnterキーを押下
次にaws configure listを実行し、AWS CLI 認証情報が設定されたことを確認します。
>aws configure list
      Name                    Value             Type    Location
      ----                    -----             ----    --------
   profile                <not set>             None    None
access_key     ****************QS6W shared-credentials-file
secret_key     ****************/TKD shared-credentials-file
    region           ap-northeast-1      config-file    ~/.aws/config
念のため、aws iam get-userも実行し、IAMユーザー情報も正常に設定されているか確認します。
>aws iam get-user
{
    "User": {
        "Path": "/",
        "UserName": "UserName",
        "UserId": "xxxxxxxxxxxxxxxxx",
        "Arn": "arn:aws:iam::xxxxxxxxxxxx:user/UserName",
        "CreateDate": "2023-03-07T09:32:27+00:00",
        "PasswordLastUsed": "2024-03-22T06:13:57+00:00"
    }
}
Terraformのインストール
下記の公式サイトにアクセスし、Linux > Amazon Linux 記載されているコマンドを実行してTerraformをインストールします。 (WindowsやmacOSを使用されている方は自身の環境にあったパッケージをダウンロードしてください。)
ターミナルにて、terraform -vを実行してインストールされていることを確認します。
>terraform -v
Terraform v1.6.2
on linux_amd64
.tfファイルの作成
ディレクトリ構造に従って下記の.tfファイルを作成してください。
main.tf(root)
main.tf(root) (path:terraform_handson/environments/dev/main.tf)
各モジュールの定義と、外部からモジュールに渡す変数の定義等を記述します
locals {
  prefix = "terraform_handson"
}

#==========================================#
# Base Network Resource
#==========================================#
module "vpc" {
  source = "../../modules/vpc"
  prefix = local.prefix
}

module "ec2" {
  source                = "../../modules/ec2"
  vpc_id                = module.vpc.id
  subnet_id             = module.vpc.a_id
  prefix                = local.prefix
  bastion_ami           = "ami-020283e959651b381"
}
EC2モジュール
main.tf (path:terraform_handson/modules/ec2/main.tf)
#==========================================#
# EC2
#==========================================#

resource "aws_instance" "bastion" {
  ami                         = var.bastion_ami
  instance_type               = "t2.micro"
  disable_api_termination     = false
  subnet_id                   = var.subnet_id
  key_name                    = "dev-linux"
  vpc_security_group_ids      = [aws_security_group.bastion.id]

  tags = {
    Name = "${var.prefix}-bastion"
  }
}

#==========================================#
# Security Group
#==========================================#

resource "aws_security_group" "bastion" {
  name        = "${var.prefix}-bastion-sg"
  description = "Security group for EC2"
  vpc_id      = var.vpc_id

  tags = {
    Name = "${var.prefix}-bastion"
  }

  ingress {
    from_port   = "22"
    protocol    = "tcp"
    to_port     = "22"
    cidr_blocks = ["0.0.0.0/0"]
  }

  egress {
    from_port   = 0
    to_port     = 0
    protocol    = "-1"
    cidr_blocks = ["0.0.0.0/0"]
  }
}
今回、キーペアは既存のもの(dev-linux)を使用しています。 ご自身で作成していただき、key_nameにキーペア名を記載してください。 新規キーペアを作成する設定については、今後別の記事でご紹介できればと思います。
variables.tf (path:terraform_handson/modules/ec2/variables.tf)
main.tf(root)で定義した変数を受け取るように設定します。
variable "vpc_id" {
  type        = string
  description = "vpc id"
}

variable "subnet_id" {
  type        = string
  description = "subnet id"
}

variable "prefix" {
  type        = string
  description = "resource prefix"
}

variable "bastion_ami" {
  type        = string
  description = "resource prefix"
}
VPCモジュール
main.tf (path:terraform_handson/modules/vpc/main.tf)
#==========================================#
# VPC
#==========================================#

resource "aws_vpc" "main" {
  cidr_block                       = "10.1.0.0/16"
  enable_dns_support               = "true"
  enable_dns_hostnames             = "true"
  instance_tenancy                 = "default"
  assign_generated_ipv6_cidr_block = "false"

  tags = {
    Name = "${var.prefix}-main"
  }
}

#==========================================#
# Internet Gateway
#==========================================#

resource "aws_internet_gateway" "main" {
  vpc_id = aws_vpc.main.id

  tags = {
    Name = "${var.prefix}-main"
  }
}

#==========================================#
# Public Subnet
#==========================================#

resource "aws_subnet" "public_a" {
  vpc_id                  = aws_vpc.main.id
  cidr_block              = "10.1.30.0/24"
  map_public_ip_on_launch = true
  availability_zone       = "ap-northeast-1a"

  tags = {
    Name = "${var.prefix}-public-a"
  }
}

#==========================================#
# Route Table
#==========================================#

resource "aws_route_table" "public" {
  vpc_id = aws_vpc.main.id

  tags = {
    "Name" = "${var.prefix}-public"
  }
}

resource "aws_route" "default" {
  route_table_id         = aws_route_table.public.id
  destination_cidr_block = "0.0.0.0/0"
  gateway_id             = aws_internet_gateway.main.id
}

resource "aws_route_table_association" "public_a" {
  route_table_id = aws_route_table.public.id
  subnet_id      = aws_subnet.public_a.id
}
outputs.tf (path:terraform_handson/modules/vpc/outputs.tf)
他のモジュールに変数を共有するためoutputsで設定します。 ここで設定した変数はmain.tf(root)を中継し、必要とする各モジュールへと渡されます。
output "id" {
  value = aws_vpc.main.id
}

output "a_id" {
  value = aws_subnet.public_a.id
}
variables.tf (path:terraform_handson/modules/vpc/variables.tf)
variable "prefix" {
  type        = string
  description = "resource prefix"
}
各リソースの作成
.tfファイルの作成が完了したら、Terraformのコマンドを使用してリソース作成します。
terraform init
Terraformの設定に必要なプラグインやモジュールをダウンロードし、Terraformの環境を初期化します。
コマンド実行ディレクトリ:terraform_handson/environments/dev
>terraform init
Initializing the backend...
Initializing modules...

Initializing provider plugins...
- Reusing previous version of hashicorp/aws from the dependency lock file
- Using previously-installed hashicorp/aws v5.37.0

Terraform has been successfully initialized!

You may now begin working with Terraform. Try running "terraform plan" to see
any changes that are required for your infrastructure. All Terraform commands
should now work.

If you ever set or change modules or backend configuration for Terraform,
rerun this command to reinitialize your working directory. If you forget, other
commands will detect it and remind you to do so if necessary.
terraform fmt
.tfファイルの中身を自動的に整形してくれます。 -recursive を付けることで、.tfファイル全体にフォーマットをかけることができます。
コマンド実行ディレクトリ:terraform_handson
>terraform fmt -recursive
terraform validate
.tfファイルの構文と設定の妥当性をチェックをしてくれます。
コマンド実行ディレクトリ:terraform_handson/environments/dev
>terraform validate
Success! The configuration is valid.
terraform plan
Terraformがリソースを作成、変更、削除する前に実行計画を確認できます。
コマンド実行ディレクトリ:terraform_handson/environments/dev
>terraform plan
module.vpc.aws_vpc.main: Refreshing state... [id=xxxxxxxxxxxxxxxxx]
module.public_subnet.aws_route.default: Refreshing state... [id=xxxxxxxxxxxxxxxxx]
module.public_subnet.aws_route_table.public: Refreshing state... [id=xxxxxxxxxxxxxxxxx]
module.public_subnet.aws_route_table_association.public_a: Refreshing state... [id=xxxxxxxxxxxxxxxxx]
module.security_group.aws_security_group.bastion: Refreshing state... [id=xxxxxxxxxxxxxxxxx]
module.internet_gateway.aws_internet_gateway.main: Refreshing state... [id=xxxxxxxxxxxxxxxxx]
module.public_subnet.aws_subnet.public_a: Refreshing state... [id=xxxxxxxxxxxxxxxxx]
module.ec2.aws_instance.bastion: Refreshing state... [id=xxxxxxxxxxxxxxxxx]

Terraform used the selected providers to generate the following execution plan. Resource actions are indicated with the
following symbols:
  + create
  - destroy
-/+ destroy and then create replacement

Terraform will perform the following actions:

以下略
terraform apply
実際にリソースの追加・更新・削除が実行されます。 Enter a value:が表示されたあとにyesを入力してEnterキーを押下すると、リソースの作成が開始されます。
コマンド実行ディレクトリ:terraform_handson/environments/dev
>terraform apply

略

Do you want to perform these actions?
  Terraform will perform the actions described above.
  Only 'yes' will be accepted to approve.

  Enter a value:

略

Apply complete! Resources: 8 added, 0 changed, 0 destroyed.
EC2にSSH接続
作成したEC2のパブリックIPアドレスにSSH接続してみます。 SSH接続時に使用する秘密鍵は、EC2モジュールでも述べた既存のカギを使用します。
以下のように、EC2に接続できれば完了です。

各リソースの削除
terraform destroy
これまでに作成したリソースはterraform destroyで一括して削除できます。 こちらもapplyと同様に、コマンドを実行するとEnter a value:が表示されますので、yesを入力してEnterキーを押下します。
コマンド実行ディレクトリ:terraform_handson/environments/dev
>terraform destroy

略

Do you want to perform these actions?
  Terraform will perform the actions described above.
  Only 'yes' will be accepted to approve.

  Enter a value:

略

Destroy complete! Resources: 8 destroyed.
さいごに
以上がTerraformを使った基本的なネットワーク構築の一通りの流れでした。 今後も、初心者でも試せる手法や簡単なリソースの構築などを発信していきますので、引き続きご覧いただければ幸いです!