

こんにちは!サーバーワークスの松井です!
サーバーレスでAPIを作成し 、WEBページからボタンを押してAPIを実行させてみようという記事になります。
このハンズオンは、VScodeでEC2にRemortSSHをして実施していただくことを想定しております。
AWSでEC2を起動してVScodeでログインしてから試してください。
スクリプトについては、基本的にコピペで作成可能ですが、不要なインデントがないかやコメントを外すなど注意が必要です。
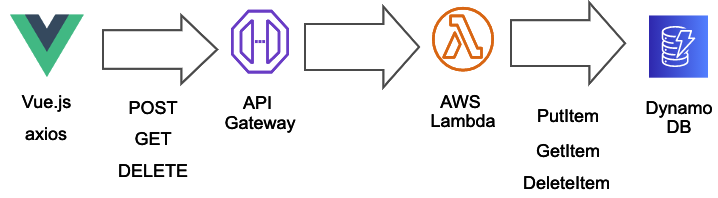
構成図
backendを構築
Serverless Fremeworkを使うためにnodenv環境を構築
$ sudo yum -y  install git-all
$ mkdir handson
$ cd handson
$ git clone https://github.com/riywo/anyenv ~/.anyenv
$ echo 'export PATH="$HOME/.anyenv/bin:$PATH"' >> ~/.bashrc
$ echo 'eval "$(anyenv init -)"' >> ~/.bashrc
$ exec $SHELL -l
$ anyenv install --init
$ anyenv install nodenv
$ exec $SHELL -l
$ nodenv install 15.14.0
$ nodenv local 15.14.0
$ nodenv versions
$ mkdir back-end //Serverless Fremework用のディレクトリを作成
$ cd back-end
Serverless Fremeworkを使ってAWS環境を構築します。
Serverless Fremeworkのプロジェクト作成
$ npm install serverless
$ $(npm bin)/serverless create --template aws-nodejs --name serverless-backend
AWS Lambda、APIGateway、DynamoDB、IAM用にserverless.yamlを編集する
serverless.yaml
# Serverless Frameworkのプロジェクト名
service: backend
# Serverless Frameworkのversion
frameworkVersion: "2"
provider:
  name: aws
  # 言語のversion(今回はnode.js)
  runtime: nodejs14.x
  lambdaHashingVersion: 20201221
  # ここがAPIのパスになる
  stage: items
  region: ap-northeast-1
# Lambda関数を作成
functions:
  # 関数の名前を定義
  backend:
    # lambda_handler名・APIGatewayを定義
    handler: backend.handler
    name: ${self:service}-api
    events:
      - http:
          path: /
          method: post
          integration: lambda-proxy
          cors:
            headers: '*'
      - http:
          path: /{id}
          method: get
          integration: lambda-proxy
          cors:
            headers: '*'
      - http:
          path: /{id}
          method: delete
          integration: lambda-proxy
          cors:
            headers: '*'
    # LambdaにアタッチするIAMロールを選択(resourceでRoleの権限は別途定義して作成する)
    role: !GetAtt backendrole.Arn
# IAMとDynamoDBを作成
# resources以下はCloudFormationと同じ記法が可能
resources:
  Resources:
    # IAMロールの名前を定義
    backendrole:
      Type: AWS::IAM::Role
      # 以下でIAMロールを定義
      Properties:
        # IAMロールの内容を定義
        AssumeRolePolicyDocument:
          Version: "2012-10-17"
          Statement:
            - Effect: "Allow"
              Principal:
                Service:
                  - "lambda.amazonaws.com"
              Action:
                - "sts:AssumeRole"
        Path: /
        Description: backend
        # IAMポリシーを作成
        Policies:
          # IAMポリシーの名前
          - PolicyName: backendPolicy
            # IAMポリシーの内容を定義
            PolicyDocument:
              Version: "2012-10-17"
              Statement:
                - Effect: "Allow"
                  Action:
                    - "sts:AssumeRole"
                    - "logs:CreateLogStream"
                    - "logs:PutLogEvents"
                  Resource: "*"
                - Effect: "Allow"
                  Action:
                    - "dynamodb:DeleteItem"
                    - "dynamodb:GetItem"
                    - "dynamodb:PutItem"
                    - "dynamodb:Scan"
                    - "dynamodb:UpdateItem"
                  Resource: "arn:aws:dynamodb:*:*:table/*"
    DynamoDbTable:
      Type: 'AWS::DynamoDB::Table'
      Properties:
        TableName: backend-items
        # キーの型を指定
        AttributeDefinitions:
          - AttributeName: id
            AttributeType: S
        KeySchema:
          - AttributeName: id
            KeyType: HASH
        ProvisionedThroughput:
          ReadCapacityUnits: 5
          WriteCapacityUnits: 5
Serverless Fremeworkを使って、Lambda関数を編集
編集する前にjsファイルの名前を変更してください。
$ mv handler.js backend.js
backend.js
const AWS = require("aws-sdk");

const dynamo = new AWS.DynamoDB.DocumentClient();

exports.handler = async (event, context) => {
  let body;
  let statusCode = 200;
  const headers = {
    "Content-Type": "application/json",
  };
  console.log(JSON.stringify(event));
  try {
    if (
      event.requestContext.httpMethod == "DELETE" &&
      event.requestContext.resourcePath == "/{id}"
    ) {
      await dynamo
        .delete({
          TableName: "backend-items",
          Key: {
            id: event.pathParameters.id,
          },
        })
        .promise();
      body = `Deleted item ${event.pathParameters.id}`;
    } else if (
      event.requestContext.httpMethod == "GET" &&
      event.requestContext.resourcePath == "/{id}"
    ) {
      body = await dynamo
        .get({
          TableName: "backend-items",
          Key: {
            id: event.pathParameters.id,
          },
        })
        .promise();
      console.log(body);
    } else if (
      event.requestContext.httpMethod == "GET" &&
      event.requestContext.path == "/items"
    ) {
      body = await dynamo
        .scan({ TableName: "backend-items" })
        .promise();
    } else if (
      event.requestContext.httpMethod == "POST" &&
      event.requestContext.path == "/items"
    ) {
      let requestJSON = JSON.parse(event.body);
      await dynamo
        .put({
          TableName: "backend-items",
          Item: {
            id: requestJSON.id,
            name: requestJSON.name,
          },
        })
        .promise();
      body = `Put item ${requestJSON.id}`;
    } else {
      throw new Error(`Unsupported route: "${event.routeKey}"`);
    }
  } catch (err) {
    statusCode = 400;
    body = err.message;
  } finally {
    body = JSON.stringify(body);
  }

  return {
    statusCode,
    body,
    headers: {
      "Access-Control-Allow-Headers": "Content-Type",
      "Access-Control-Allow-Origin": "*",
      "Access-Control-Allow-Methods": "OPTIONS,POST,GET",
    },
  };
};
Serverless Fremeworkを実行
$ $(npm bin)/serverless deploy
CloudFormationがAWSリソースを作成する
作成が終われば、バックエンドの準備はOK AWSマネージメントコンソールから作成したサービスを確認する。
API Gatewayの画面を開いてURLをコピーして控えておきます。
ステージ>items>URL の呼び出し:https://{hogehoge}.execute-api.ap-northeast-1.amazonaws.com/items
ターミナルでAPIを叩いて確認してみましょう
$ curl  -v \
  -X POST \
  -H "Content-Type: application/json" \
  -d '{"id": "1","name": "hoge"}'  \
  https://{hogehoge}.execute-api.ap-northeast-1.amazonaws.com/items
DynamoDBのテーブルにデータが登録されているはずです。
frontendを構築
vue.jsの実行環境を作成します。
$ cd handson
$ mkdir front-end //vue.js環境用のディレクトリを作成
$ cd front-end
$ npm install vue
$ npm install -g @vue/cli
$ echo export PATH=$PATH:`npm bin -g` >> ~/.bash_profile
$ source ~/.bash_profile
$ vue --version
$ vue init webpack front-end

? Project name front-end
? Project description A Vue.js project
? Author
? Vue build standalone
? Install vue-router? Yes
? Use ESLint to lint your code? Yes
? Pick an ESLint preset Standard
? Set up unit tests No
? Setup e2e tests with Nightwatch? No
? Should we run `npm install` for you after
 the project has been created? (recommended
) npm


$ npm install bootstrap bootstrap-vue
$ npm install axios --save
main.js
import Vue from 'vue'
import App from './App.vue'
import router from './router'

import { BootstrapVue, IconsPlugin } from 'bootstrap-vue' //追加
import 'bootstrap/dist/css/bootstrap.css' //追加
import 'bootstrap-vue/dist/bootstrap-vue.css' //追加

Vue.use(BootstrapVue) //追加
Vue.use(IconsPlugin) //追加

Vue.config.productionTip = false

new Vue({
  router,
  render: h => h(App)
}).$mount('#app')
HelloWorld.vue
<template>
    <div class='home'>
        <b-container>
            <b-row>
                <b-col sm='12' class='mb-3'>
                    <hr>
                </b-col>
                <b-col sm='3' class='mx-auto mb-3'>
                    <b-form-input v-model='id' placeholder='id'></b-form-input>
                    <b-form-input v-model='name' placeholder='name'></b-form-input>
                </b-col>
                <b-col sm='12' class='mb-5'>
                    <b-button variant='primary' v-on:click='postData'>登録</b-button>
                </b-col>
                <b-col sm='3' class='mx-auto mb-3'>
                    <b-table striped hover :items='items'></b-table>
                    <b-form-input v-model='text' placeholder='id'></b-form-input>
                </b-col>
                <b-col sm='12' class='mb-5'>
                    <b-button variant='success' v-on:click='getData'>表示</b-button>
                </b-col>
                <b-col sm='12' class='mb-5'>
                    <b-button variant='danger' v-on:click='deleteData'>削除</b-button>
                    <hr>
                </b-col>
            </b-row>
        </b-container>
    </div>
</template>

<script>
import axios from 'axios'
export default {
  name: 'home',
  components: {
  },
  data() {
      return {
          // API Gatewayの設定パス
          path: 'https://{hogehoge}.execute-api.ap-northeast-1.amazonaws.com/items',
          id: '',
          name: '',
          text: '',
          items: []
      }
  },
  methods: {
      getData: function () {
          // 検索ID指定
          const path = this.path + '/' + this.text;
          const myInit = {
              headers: {},
              response: true,
          };
          // データ取得
          axios.get(path, myInit).then(response => {
              // テーブル表示
              console.log(response)
              this.items = [
                  {
                      id: response.data.Item.id,
                      name: response.data.Item.name
                  }
              ];
          }).catch(error => {
              // テーブルリセット
              this.items = [];
              console.log(error)
          });
      },
      postData: function () {
          const myInit = {
              headers: {},
              response: true,
                  id: String(this.id),
                  name: String(this.name)
          };
          // データ登録
          axios.post(this.path, myInit).then(response => {
              console.log(response);
          }).catch(error => {
              console.log(error)
          });
      },
      deleteData: function () {
          const path = this.path + '/' + this.text;
          const myInit = {
              headers: {},
              response: true,
          };
          // データ削除
          axios.delete(path, myInit).then(response => {
              console.log(response);
              this.items = [];
          });
      }
  }
}
</script>
※以下App.vueに関しては、編集しなくてもWEBページは表示させられます。
App.vue
<template>
  <div id="app">
    <div id="nav">
      <router-link to="/">従業員登録サイト</router-link> //変更
    </div>
    <router-view/>
  </div>
</template>

<style>
#app {
  font-family: Avenir, Helvetica, Arial, sans-serif;
  -webkit-font-smoothing: antialiased;
  -moz-osx-font-smoothing: grayscale;
  text-align: center;
  color: #2c3e50;
}

#nav {
  padding: 30px;
}

#nav a {
  font-weight: bold;
  color: #2c3e50;
}

#nav a.router-link-exact-active {
  color: #42b983;
}
</style>
vue.jsを実行
$ npm run dev
Open browserとポップが出てくるのでOpenをクリックすると以下の画面が表示されます。
※真っ白な画面が出てしまった場合は、どこか誤りがあります

API実行手順
1. id・nameを入力して登録ボタンを押す
DynamoDBのテーブルに入力したid・nameのデータが表示されます。

2. 先程作成したid・nameを入力して、表示ボタンを押す
DynamoDBのデータがWEBページに表示されます。
3. 削除ボタンを押す
DynamoDBからデータが削除されます。
お疲れさまでした!
これでWEBページからAPIを実行している挙動を確かめることができました。
確認ができたらAWSのリソースは以下で削除してしまいましょう。
serverless remove -v
以上、サーバーレスハンズオンでした。