

こんにちは、技術1課の加藤です。
AWS を使った認証といえば Cognito ですが、たまには違うものも触ってみたい。
ということで今回は認証基盤サービスとして有名な Auth0 を使ってみました。
Auth0 とは
認証機構を簡単に実装するためのプラットフォームです。
AWS ユーザー的にいえば Cognito User Pool みたいなものでしょうか。
非常にシンプルに認証機構を実装できるらしいということでとても気になっていたんですよね。
65以上の SDK が用意されていていろんな言語に使えるのも魅力的。
今回は Vue.js のアプリケーションに、 Auth0 による認証機構をつけてみます。
手順
0. Vue CLIをインストール
今回は Vue CLI を用いてサクッと Vue.js のサンプルアプリを作ってしまいます。
Vue CLI をインストールしていない人は以下のコマンドでインストールしておきましょう。
$ yarn global add @vue/cli
# or
$ npm install -g @vue/cli
1. Vue.js のサンプルアプリを作成
ではサンプルアプリを作りましょう。
vue create 実行時、インストールするプラグインを聞かれるので、default のまま Enter を押して進めてください。
$ vue create vue-auth0
$ cd vue-auth0
2. Auth0 でテナントを作る
今回は無料トライアルで使っていきます。
https://auth0.com/signup にアクセスし、サインアップを行います。

サインアップが完了したら、テナントを立てます。
お好きなドメイン名を入力し、お好きなリージョンを選択したら NEXT を押します。
[caption id="attachment_81988" align="alignnone" width="1024"] 画像はデフォルト表示の Domain のままになっていますがお好きな文字列に変更してください[/caption]
次に ACCOUNT TYPE を聞かれるので Personal を選択し CREATE ACCOUNT を押します。
Dashboard にリダイレクトされれば完了です。
3. Auth0 でアプリケーションを作る
テナントにアプリケーションを作成していきます。
Getting Started 画面中段の Integrate Auth0 into your application ボックスにある Create Application を押します。
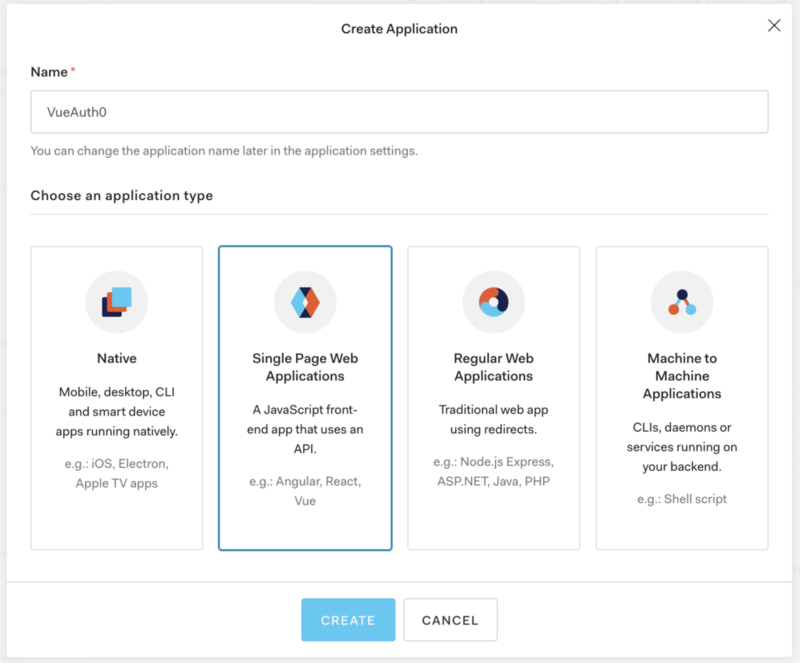
 Name に VueAuth0を入力、
Choose an application type に Single Page Web Applications を選択し、CREATE ボタンを押します。
4. Quick Start に従って Auth0 と統合したアプリケーションを作成する
プラットフォームを指定すると Quick Start にいい感じに手順が出てくれるみたいなのでそれに従っていきましょう。
Quick Start タブから Vue.js を選択します。
 表示される手順の Configure Auth0 から設定を行っていきましょう。

4-1. アプリケーションキーを取得
まずアプリケーションキーを取得します。
Quick Start タブと同列に並んでいる Settingsタブを選択し、以下の設定を取得しておいてください。
- Domain
- Client ID
4-2. 認証に必要なホワイトリストを設定
以下 3つのホワイトリストを設定します。
- Web Origins
- Callback URLs
- Logout URLs
それぞれについて、詳しく説明していきます。
まずWeb Origins は認証機構を利用できるオリジンをホワイトリスト形式で設定するものです。
ここにアプリケーションのオリジンが設定されていないと、自動でトークンのリフレッシュを行うことができません。ページにアクセスした際やリロードをかけた際、ログアウト状態になってしまいます。
Callback URLs には Auth0 で認証されたユーザーがリダイレクトできる URL を設定します。
ここが設定されていないと、ユーザーはログインを完了することができません。
Logout URLs にはアプリケーションからのログアウト後、リダイレクトできる URL を設定します。
正しく設定されていないと、ユーザーはログアウトを完了することができ亡くなってしまいます。
今回は、テスト用のサイトをローカルで動かすため、3つ全てに http://localhost:8080 のみを設定しておきます。
Settings タブを開き、
- Allowed Web Origins
- Allowed Callback URLs
- Allowed Logout URLs
の3つに上記 URL を登録しておいてください。
4-3. SDK をインストール
CUI に戻り、以下のコマンドを実行します
$ yarn add @auth0/auth0-spa-js
or
$ npm install @auth0/auth0-spa-js
4-4. 認証用のラッパーコンポーネントを作成
認証用コンポーネントを作成して他のコンポーネントから呼び出す形で実装を行います。
$ mkdir src/auth
$ touch src/auth/index.js
$ vi src/auth/index.js // お好きなエディタで
作成した index.js に以下の内容を書き込みます。
import Vue from "vue";
import createAuth0Client from "@auth0/auth0-spa-js";

/** Define a default action to perform after authentication */
const DEFAULT_REDIRECT_CALLBACK = () =>
  window.history.replaceState({}, document.title, window.location.pathname);

let instance;

/** Returns the current instance of the SDK */
export const getInstance = () => instance;

/** Creates an instance of the Auth0 SDK. If one has already been created, it returns that instance */
export const useAuth0 = ({
  onRedirectCallback = DEFAULT_REDIRECT_CALLBACK,
  redirectUri = window.location.origin,
  ...options
}) => {
  if (instance) return instance;

  // The 'instance' is simply a Vue object
  instance = new Vue({
    data() {
      return {
        loading: true,
        isAuthenticated: false,
        user: {},
        auth0Client: null,
        popupOpen: false,
        error: null
      };
    },
    methods: {
      /** Authenticates the user using a popup window */
      async loginWithPopup(o) {
        this.popupOpen = true;

        try {
          await this.auth0Client.loginWithPopup(o);
        } catch (e) {
          // eslint-disable-next-line
          console.error(e);
        } finally {
          this.popupOpen = false;
        }

        this.user = await this.auth0Client.getUser();
        this.isAuthenticated = true;
      },
      /** Handles the callback when logging in using a redirect */
      async handleRedirectCallback() {
        this.loading = true;
        try {
          await this.auth0Client.handleRedirectCallback();
          this.user = await this.auth0Client.getUser();
          this.isAuthenticated = true;
        } catch (e) {
          this.error = e;
        } finally {
          this.loading = false;
        }
      },
      /** Authenticates the user using the redirect method */
      loginWithRedirect(o) {
        return this.auth0Client.loginWithRedirect(o);
      },
      /** Returns all the claims present in the ID token */
      getIdTokenClaims(o) {
        return this.auth0Client.getIdTokenClaims(o);
      },
      /** Returns the access token. If the token is invalid or missing, a new one is retrieved */
      getTokenSilently(o) {
        return this.auth0Client.getTokenSilently(o);
      },
      /** Gets the access token using a popup window */

      getTokenWithPopup(o) {
        return this.auth0Client.getTokenWithPopup(o);
      },
      /** Logs the user out and removes their session on the authorization server */
      logout(o) {
        return this.auth0Client.logout(o);
      }
    },
    /** Use this lifecycle method to instantiate the SDK client */
    async created() {
      // Create a new instance of the SDK client using members of the given options object
      this.auth0Client = await createAuth0Client({
        domain: options.domain,
        client_id: options.clientId,
        audience: options.audience,
        redirect_uri: redirectUri
      });

      try {
        // If the user is returning to the app after authentication..
        if (
          window.location.search.includes("code=") &&
          window.location.search.includes("state=")
        ) {
          // handle the redirect and retrieve tokens
          const { appState } = await this.auth0Client.handleRedirectCallback();

          // Notify subscribers that the redirect callback has happened, passing the appState
          // (useful for retrieving any pre-authentication state)
          onRedirectCallback(appState);
        }
      } catch (e) {
        this.error = e;
      } finally {
        // Initialize our internal authentication state
        this.isAuthenticated = await this.auth0Client.isAuthenticated();
        this.user = await this.auth0Client.getUser();
        this.loading = false;
      }
    }
  });

  return instance;
};

// Create a simple Vue plugin to expose the wrapper object throughout the application
export const Auth0Plugin = {
  install(Vue, options) {
    Vue.prototype.$auth = useAuth0(options);
  }
};
4-1 で取得した Domain と Client ID を書き込む config ファイルを用意します。
$ touch auth_config.json
$ vi auth_config.json // お好きなエディタで
auth_config.json には以下を書き込みます。
{
  "domain": "your domain",
  "clientId": "your clientId"
}
4-5. main.js から認証コンポーネントを利用
src/main.js を書き換えて、4-4 で作成した認証用コンポーネントを読み込みます。
import Vue from 'vue'
import App from './App.vue'

// Import the Auth0 configuration
import { domain, clientId } from "../auth_config.json";

// Import the plugin here
import { Auth0Plugin } from "./auth";

// Install the authentication plugin here
Vue.use(Auth0Plugin, {
  domain,
  clientId
});

Vue.config.productionTip = false;

new Vue({
  render: h => h(App)
}).$mount("#app");
4-6. ログインページを作成
ここまでの手順で認証周りのメソッドは実装できました。
ここから UI コンポーネントをいじり、実際にログインできるようにしていきます。
src/views/Home.vue を開き、以下の内容を書き込んでください。
<template>
  <div id="app">
    <img alt="Vue logo" src="./assets/logo.png">
    <HelloWorld msg="Welcome to Your Vue.js App"/>

    <!-- Check that the SDK client is not currently loading before accessing is methods -->
    <div v-if="!$auth.loading">
      <!-- show login when not authenticated -->
      <button v-if="!$auth.isAuthenticated" @click="login">Log in</button>
      <!-- show logout when authenticated -->
      <div v-if="$auth.isAuthenticated">
        <button @click="logout">Log out</button>
        <h2>{{ $auth.user.name }}</h2>
        <p>{{ $auth.user.email }}</p>
      </div>
    </div>
  </div>
</template>

<script>
import HelloWorld from './components/HelloWorld.vue'

export default {
  name: 'App',
  components: {
    HelloWorld
  },
  methods: {
    // Log the user in
    login() {
      this.$auth.loginWithRedirect();
    },
    // Log the user out
    logout() {
      this.$auth.logout({
        returnTo: window.location.origin
      });
    }
  }
}
</script>

<style>
#app {
  font-family: Avenir, Helvetica, Arial, sans-serif;
  -webkit-font-smoothing: antialiased;
  -moz-osx-font-smoothing: grayscale;
  text-align: center;
  color: #2c3e50;
  margin-top: 60px;
}
</style>
4-7. 動作を確認
では実際に動かしてみましょう。以下のコマンドで開発サーバーを立ち上げます。
$ yarn serve
or
$ npm run serve
ブラウザで http://localhost:8080 にアクセスすると以下の画面が表示されます。
Login ボタンを押してみましょう。

すると Auth0 の認証用のページに移ります。
お好きな認証方法を選択し、ログインしてください。

元のページにリダイレクトされ、ご自身の登録した情報が表示されれば完了です。

所感
Quick Start の手順通りに実装しただけですが、とても簡単に認証が実装できてしまってちょっと驚きました。
チュートリアルのコピペで済ませているところが結構ありますが、コードの内容も特に複雑ではないですし、細かい設定も割とききそうです。
今回はものすごくサラッと触っただけなので、今後ちょこちょこ触ってみて使い勝手を確認してみたいと思います。