こんにちは、AWSテクニカルグループの山田です。
ELBで新たにProxy Protocol のサポートが加わり、HTTP(S)以外の接続でも接続元のIPが取得出来るようになったので早速検証してみました。
構成
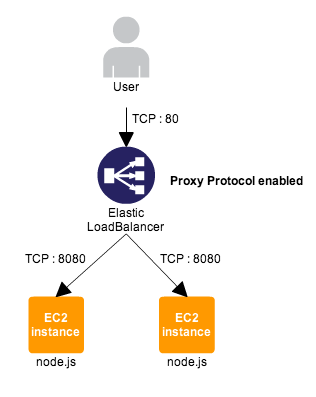
今回は、新たに追加されたProxyProtocolPolicyを有効にしたELBに、ProxyProtocolモジュールを組み込んだNode.jsのWebサーバをアタッチして、接続元IP・接続元ポート・ELBのIPを表示するような構成にしています。
確認手順
まず、ELBのProxyProtocolを有効化するためにPolicyを作成します。
$ elb-create-lb-policy ELB名 --policy-name EnableProxyProtocol --policy-type ProxyProtocolPolicyType --attribute "name=ProxyProtocol, value=true"
次に作成したPolicyをELBに適用します。
$ elb-set-lb-policies-for-backend-server ELB名 --instance-port 8080 --policy-names EnableProxyProtocol
Policyが適用されているかどうか確認します。
$ elb-describe-lb-policies ELB名 --headers
POLICY  NAME                 TYPE_NAME
POLICY  EnableProxyProtocol  ProxyProtocolPolicyType
これでELBの準備は完了です。
次にELBの配下で待ち受ける、node.jsサーバを用意します。
まず、node.jsに必要なパッケージをインストールします。
$ sudo yum install gcc-c++ make openssl-devel
$ sudo yum install git
nvmのgithubのリポジトリをクローンしてsourceします。
$ git clone git://github.com/creationix/nvm.git .nvm
$ . .nvm/nvm.sh
nvmからnode.jsをインストールします。
$ nvm install v0.10.13
proxy protocol用のモジュールをnpmでインストールします。
$ npm install proxy-protocol
次に、node.jsのWebサーバを作成します。
このサーバは、ELBから8080番ポートへのTCP接続に対して、Proxy Protocol データを解析し、送信元IPとポートとELBのIPを表示するだけの、単純なNode.jsのサーバです。
$ vim server.js


var net = require('net');
var proxy_protocol = require('node-proxy-protocol');

var response = 'HTTP/1.1 200 OKn
Content-Type: text/htmln
n
<!doctype html>n
<html lang="en">n
<head>n
<meta charset="utf-8" />n
<title>New Feautre: Proxy Protocol Support for Elastic Load Balancing</title>n
<link rel="stylesheet" href="http://code.jquery.com/ui/1.10.3/themes/smoothness/jquery-ui.css" />n
<script src="http://code.jquery.com/jquery-1.9.1.js"></script>n
<script src="http://code.jquery.com/ui/1.10.3/jquery-ui.js"></script>n
<script>n
$(function() {n
$( "#dialog" ).dialog({ width: 500, top: 200 });n
});n
</script>n
</head>n
<body>n
<div id="dialog" title="Connection Details" style="width:400px">n
<p><b>Source IP:</b> {SOURCE_ADDRESS}</p>n
<p><b>Source Port:</b> {SOURCE_PORT}</p>n
<p><b>ELB IP:</b> {PROXIED_BY}</p>n
</div>n
</body>n
</html>';

net.createServer(function(socket) {
    var clientDetails = {};
    proxy_protocol.parse(socket, function(error, obj) {
        if (error) {
            clientDetails.sourceAddress = socket.remoteAddress;
            clientDetails.sourcePort = socket.remotePort;
            clientDetails.proxiedBy = "Not detected";
            clientDetails.proxiedPort = "";
        } else {
            console.log(obj);
            clientDetails.sourceAddress = obj.srca;
            clientDetails.sourcePort = obj.srcp;
            clientDetails.proxiedBy = socket.remoteAddress;
            clientDetails.proxiedPort = socket.remotePort;
        }
        socket.end(response.replace("{SOURCE_ADDRESS}", clientDetails.sourceAddress)
                            .replace("{SOURCE_PORT}", clientDetails.sourcePort)
                            .replace("{PROXIED_BY}", clientDetails.proxiedBy));
    });
}).listen(8080);
上記のソースコードは、こちらのページにある(http://aws.typepad.com/aws/2013/07/elastic-load-balancing-adds-support-for-proxy-protocol.html)elb-pp-app.zip の中の server.js を参考にしました。
Node.jsのサーバを起動します。
$ node server.js
最後に、作成したNode.jsのWebサーバをELBへアタッチして、Listener Configurationを設定します。
Node.jsのWebサーバは8080ポートで待ち受けているので Instance Port は TCP:8080 にします。
確認
ELBにアクセスすると、Node.jsのWebサーバ が ProxyProtocol を解析して、送信元IP・ポート・ELBのIPが取得出来ているのが分かります。
最後に
Proxy Protocol はTCP上の任意のプロトコルで使うことが出来るので、これから様々な場面で活用できると思います。
ELBの可能性がこれでまた広がりましたね。


