

- 1.構成
- 2.まずはRADIUSサーバー用のEC2をローンチ
- 3.必要なパッケージのインストールと設定
- 3.RADIUSサーバーが認証するユーザーの設定
- 4.Google Authenticatorのアプリでワンタイムコードが発行されるように登録
- 5.Directory Serviceの設定
- 6.WorkSpacesにアクセスしてみる
- まとめ
こんにちは、鎌田です。 WorkSpacesを運用される際に、多要素を検討されるお客様が増えてきました。 今回のブログでは、RADIUSサーバーを構築し、WorkSpacesで多要素認証を有効にする方法をご紹介します。
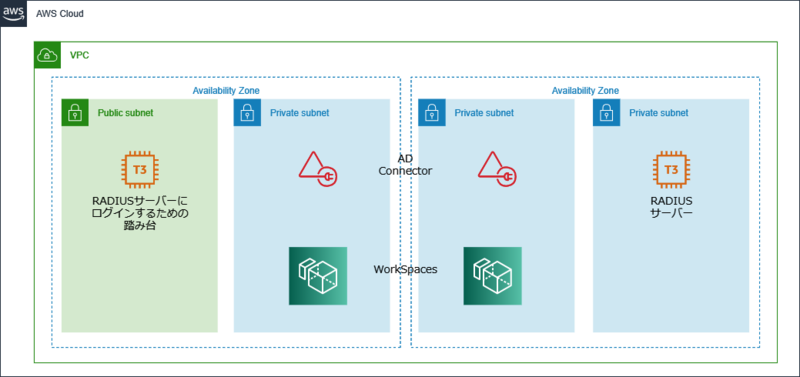
1.構成
以下のような構成で、実施しました。 RADIUSサーバーを冗長化したい場合、ELB等は不要で、同じ設定をしたサーバーを2台並べておくだけでOKです。 AZがまたがっても問題ありません。 RADIUSサーバーの他に、Active Directoryのサーバー、Directory Serviceが必要になりますので、構築しておきましょう。 また、RADIUSはprivateサブネットに構築しますので、必要に応じて踏み台用のインスタンスを置くなどしてください。
2.まずはRADIUSサーバー用のEC2をローンチ
LinuxサーバーのEC2をローンチします。 RADIUSの接続があるため、UDPの1812のポートをinboundで開けておくことを忘れないようにしましょう。 インスタンスサイズは、適宜アクセスを考慮して変更してください。
| 設定項目 | 内容 |
|---|---|
| OS | Amazon Linux2 |
| インスタンスタイプ | t3.micro |
| セキュリティグループ(RADIUS) | AD Connectorの所属するサブネットから、UDP 1812の接続を許可するインバウンドルールを追加 |
| セキュリティグループ(SSH) | OSログインしての作業が必要なため、適切なIPアドレスからのSSH接続を許可 |
3.必要なパッケージのインストールと設定
必要なパッケージは以下の通りです。
- freeradius
- freeradius-utils
- google-authenticator
構築したEC2にSSHでログインしましょう
google-authenticatorをyumでinstallする準備
google-authenticatorはそのままではyumでinstallできないため、事前に必要なパッケージをインストールしておきます。 下記のコマンドを実行してインストールしましょう。
$ sudo amazon-linux-extras install -y epel
RADIUSサーバーに必要なパッケージをインストール
次はRADIUSサーバーに必要なパッケージのインストールです。 下記のコマンドを実行してインストールしましょう。
$ sudo yum -y install freeradius freeradius-utils google-authenticator
RADIUS経由の認証を許可するグループの作成
RADIUS経由の認証を許可するグループを作成します。 RADIUSサーバーは個別にユーザーを作る必要があるのですが、この際にこのグループに所属させておきます。
$ sudo groupadd radius-enabled
ホスト名の設定
ホスト名を設定しておきます。ホスト名は、後ほどGoogle Authenticatorに登録した際に、登録名で使われます。
$ sudo hostnamectl set-hostname radius.(ドメイン名)
hostsファイルにも同様にホスト名を記載しておきます。 以下のようなIPアドレス、ドメイン名を最終行に追加しておきます。
$ sudo vi /etc/hosts
/etc/hostsファイルの抜粋
192.168.5.166 radius.(ドメイン名)
FreeRADIUSの設定
radiusd.confの編集
radiusdをrootユーザーで動作させる必要があるため、設定を次の通り変更します。
sudo vi /etc/raddb/radiusd.conf
変更前
         user = radiusd
         group = radiusd
変更後
         user = root
         group = root
radius-enabledのユーザーがradius認証を経由するように設定
/etc/raddb/usersを開き、radius-enabledのグループに所属しているユーザーがradius認証されるように設定します。
$ sudo vi /etc/raddb/users
追加する内容
DEFAULT    Group != "radius-enabled", Auth-Type := Reject,Reply-Message = "Your account has been disabled."
DEFAULT    Auth-Type := PAM
degaultファイルの設定
radius認証の際、内部ではpamという機構が使われますが、これを有効化しておきます。
$ sudo vi /etc/raddb/sites-available/default
変更前
        #  Pluggable Authentication Modules.
#        pam
変更後
        #  Pluggable Authentication Modules.
        pam
GoogoleAuthenticatorが使われるように設定
RADIUS認証の際に、GoogoleAuthenticatorが使われるように設定しておきます。
$ sudo vi /etc/pam.d/radiusd
下記の通りに書き換えます。
#%PAM-1.0
#auth       include     password-auth
#account    required    pam_nologin.so
#account    include     password-auth
#password   include     password-auth
#session    include     password-auth
auth requisite pam_google_authenticator.so
account required pam_permit.so
session required pam_permit.so
RADIUSがプロトコルを受け付けるクライアントの設定
RADIUSがプロトコルを受け付けるクライアントについての設定をします。
$ sudo vi /etc/raddb/clients.conf
末尾に、下記のような設定を追加してください。 ipaddrはvpcのIPアドレスレンジ、secretは、後ほどDirectory Serviceに入れる設定です。 ※値は環境に応じて適宜変更してください
client vpc {
        ipaddr = 192.168.0.0/16
        secret = xxxxxx
}
シンボリックリンクの追加
pamモジュールを有効化するため、シンボリックリンクを追加します。
$ sudo ln -s /etc/raddb/mods-available/pam /etc/raddb/mods-enabled/pam
RADIUSサーバーを起動
radiusdの自動起動を有効化し、RADIUSサーバーを起動します。
$ sudo systemctl enable radiusd
$ sudo systemctl start radiusd
これでRADIUSサーバーの準備ができました。
3.RADIUSサーバーが認証するユーザーの設定
RADIUSサーバーはActive Directoryと連携している訳ではないので、RADIUSサーバー上にもActive Directoryと同じユーザーの追加が必要です。 Active Directory上ユーザー名を指定し、Linux上にユーザーを追加します。
$ useradd -g radius-enabled (ユーザー名)
ユーザーを追加したら、追加したユーザーの権限で、google-authenticatorを起動しましょう。
$ sudo -u (ユーザー名) /usr/bin/google-authenticator
時刻ベースのトークンにするか?と英語で聞かれるので、yで進めましょう。
Do you want authentication tokens to be time-based (y/n) y
この後、2次元コードを表示するURLと2次元コードが表示されます。
Warning: pasting the following URL into your browser exposes the OTP secret to Google:
  https://www.google.com/chart?chs=200x200&chld=M|0&cht=qr&chl=otpauth://totp/kamata@radius.leaf.local%3Fsecret%xxxxxx%26issuer%3Dradius.leaf.local
表示後もいくつかの設問がありますが、yで進めて問題ありません。
Do you want me to update your "/home/kamata/.google_authenticator" file? (y/n) y

Do you want to disallow multiple uses of the same authentication
token? This restricts you to one login about every 30s, but it increases
your chances to notice or even prevent man-in-the-middle attacks (y/n) y

By default, a new token is generated every 30 seconds by the mobile app.
In order to compensate for possible time-skew between the client and the server,
we allow an extra token before and after the current time. This allows for a
time skew of up to 30 seconds between authentication server and client. If you
experience problems with poor time synchronization, you can increase the window
from its default size of 3 permitted codes (one previous code, the current
code, the next code) to 17 permitted codes (the 8 previous codes, the current
code, and the 8 next codes). This will permit for a time skew of up to 4 minutes
between client and server.
Do you want to do so? (y/n) y

If the computer that you are logging into isn't hardened against brute-force
login attempts, you can enable rate-limiting for the authentication module.
By default, this limits attackers to no more than 3 login attempts every 30s.
Do you want to enable rate-limiting? (y/n) y
4.Google Authenticatorのアプリでワンタイムコードが発行されるように登録
先程発行されたURLにアクセスすると、二次元コードが表示されます。 Google Authenticatorのアプリを起動し、二次元コードを登録しましょう。 登録できると、構築したRADIUSサーバーのホスト名のワンタイムパスワードが発行されるようになっているはずです。

5.Directory Serviceの設定
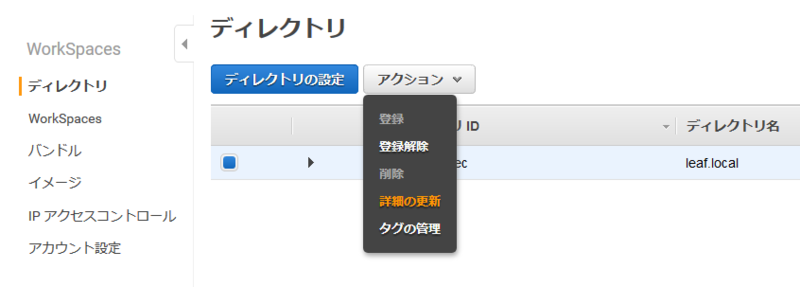
AWSマネジメントコンソールに戻りましょう。 WorkSpacesの画面より多要素認証を設定するDirectory Serviceを選択し、アクションより「詳細の更新」をクリックします。
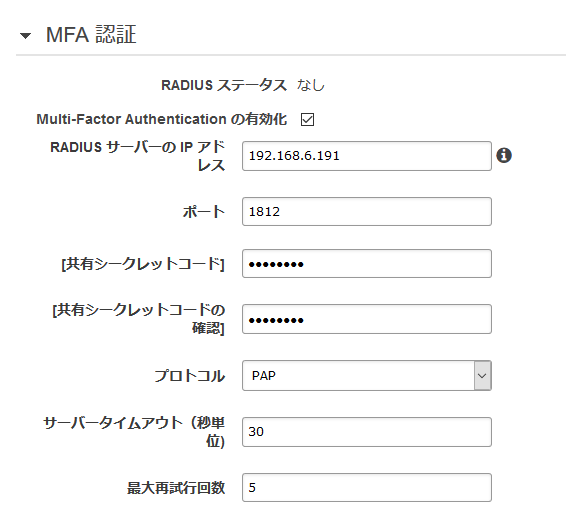
設定の中からMFA認証の部分の設定を下記の通りに設定します。
| 設定項目 | 設定値 |
|---|---|
| RADIUS サーバーの IP アドレス | 先程構築したEC2のローカルIP |
| ポート | 1812 |
| 共有シークレットコード | 先程RADIUSサーバーに設定したsecretの値 |
| プロトコル | PAP |
| サーバータイムアウト | 30 |
| 最大試行回数 | 5 |
設定できたら、設定を反映させましょう。
6.WorkSpacesにアクセスしてみる
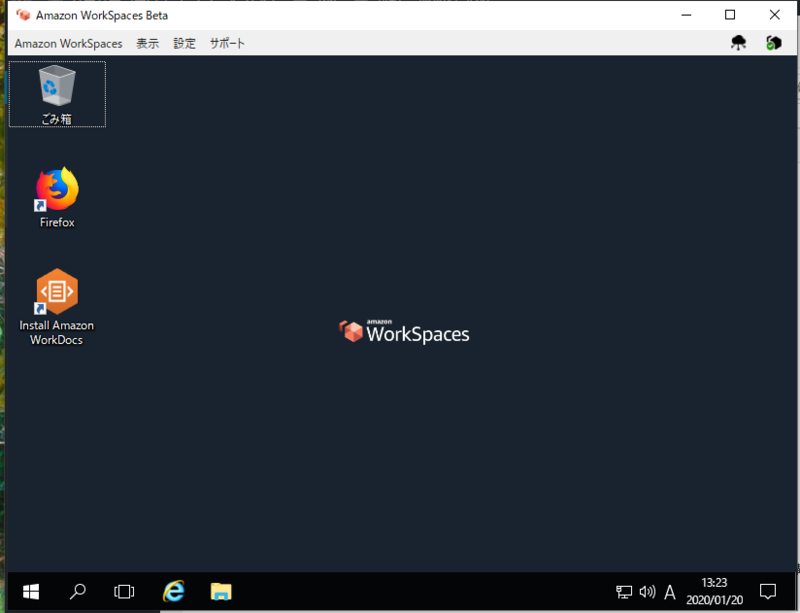
RADIUSの設定がされたWorkSpacesの登録コードを入力し、登録をすると・・・

MFAコードを入力する部分が追加されています。 必要な情報を入力すると、WorkSpacesに接続出来ました!
まとめ
少し手順は必要ですが、WorkSpacesで多要素認証を有効にする方法するための、RADIUSサーバーの構築についてご説明しました。 簡単ではない部分もありますので、WorkSpacesの多要素認証でお悩みの際は、当社にご相談ください。